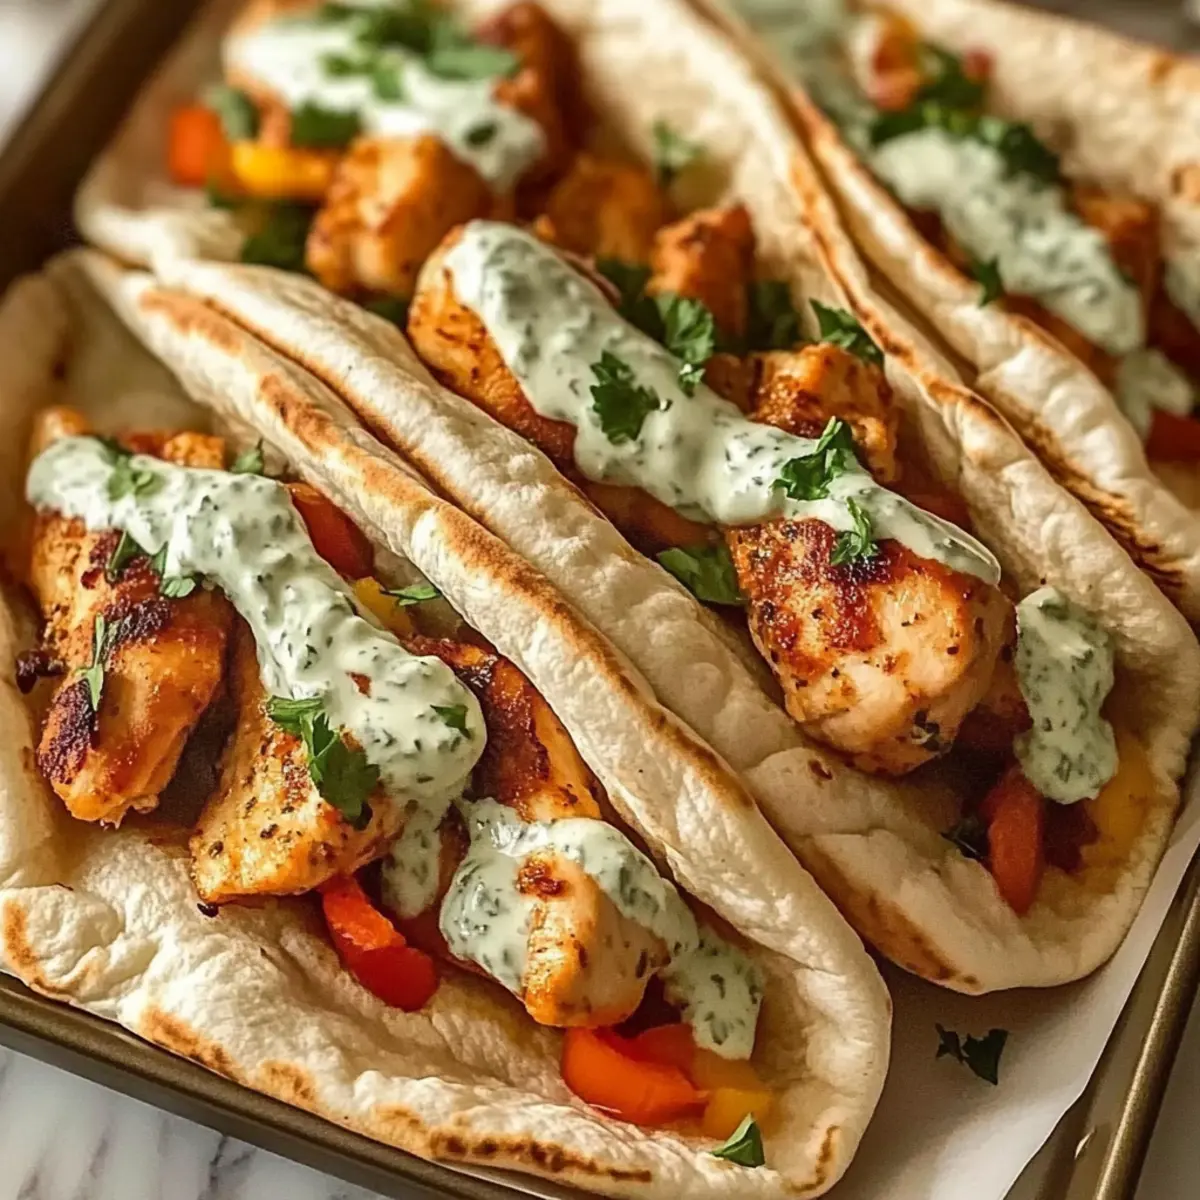
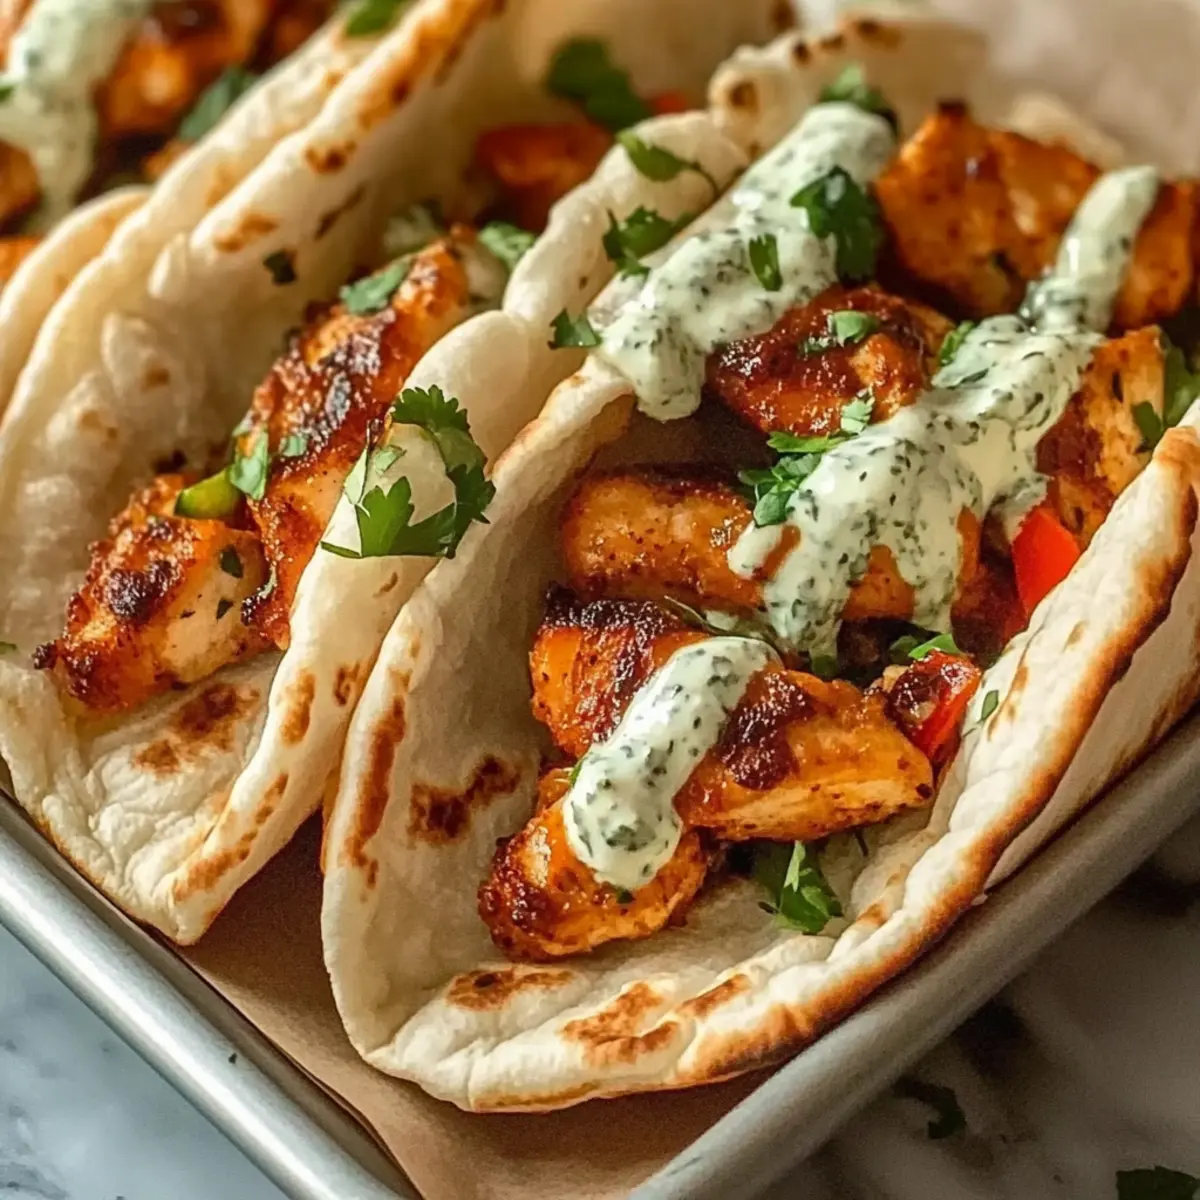
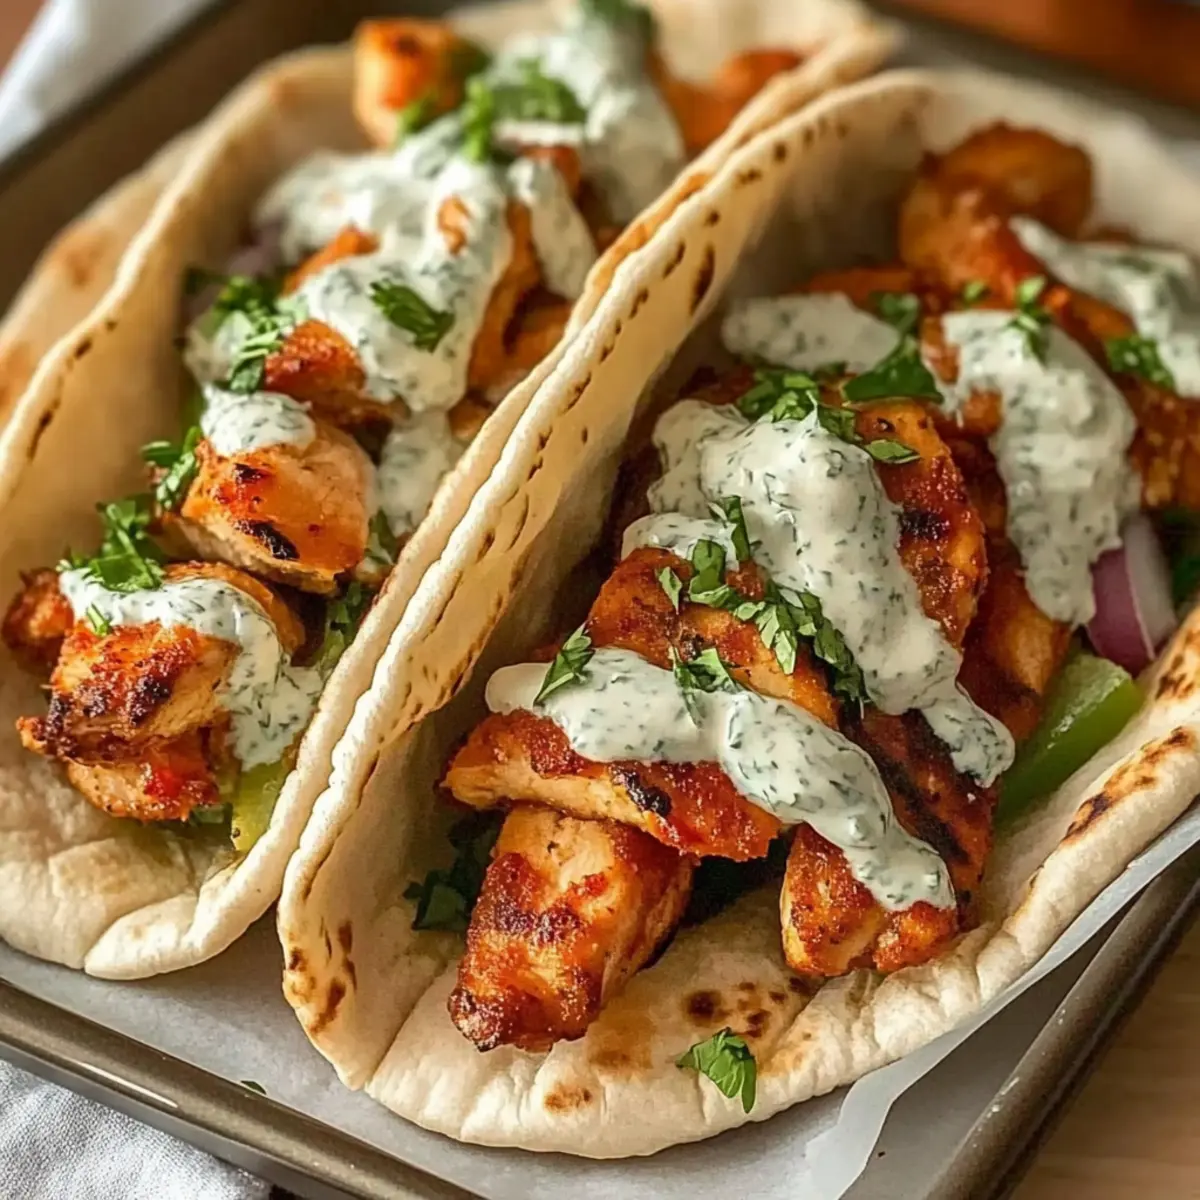
The enticing scent of roasting bell peppers and seasoned chicken fills the kitchen, transforming an ordinary weeknight into something special. These Sheet Pan Chicken Pitas with Herby Ranch are not just a meal; they’re a lifesaver for busy schedules and a canvas for creativity! With their tender, juicy chicken strips perfectly mingling with vibrant veggies, this recipe promises a delightful dinner that’s both quick and customizable. Plus, the herby ranch dressing adds a zesty touch that will have your family coming back for seconds. Whether you’re meal prepping or whipping up a comforting dinner, these pitas make satisfying, flavorful bites without the fuss of multiple pans. Curious about how this one-pan wonder can elevate your dining experience? Let’s dive into the details!
Why Choose Sheet Pan Chicken Pitas?
Simplicity at Its Best: This recipe requires minimal prep and cooking skills, making it perfect for both cooking novices and experienced chefs alike.
Flavor Explosion: With juicy chicken, roasted veggies, and a tangy herby ranch dressing, every bite bursts with flavor that will delight your taste buds.
Customizable Delight: Want to switch things up? You can easily modify ingredients or toppings to suit your family’s preferences, making it a versatile option for any meal.
Time-Saving Meal: The one-pan method not only reduces cleanup, but also allows you to have dinner ready in 30 minutes, giving you more time to relax.
Crowd-Pleasing Choice: Perfect for family dinners or casual gatherings, these pitas are sure to impress everyone at the table, just like my Sheet Pan Cashew Chicken or Chicken Enchiladas Fun.
Sheet Pan Chicken Pitas Ingredients
Elevate your weeknight dinners with these delicious Sheet Pan Chicken Pitas!
For the Chicken and Veggies
- 1.5 pounds boneless, skinless chicken – Use breasts or thighs for juicy, flavorful protein.
- 1 medium red bell pepper – Adds sweetness and vibrant color; substitute with any bell pepper you have.
- 1 medium yellow bell pepper – Brightens the dish with sweet flavor; an orange bell pepper can replace it as well.
- 1 medium red onion – Provides depth and sweetness; yellow onion serves as a wonderful alternative.
- 2 tablespoons olive oil – Great for roasting and enhancing flavor; avocado oil also works well.
- 2 teaspoons garlic powder – For savory depth; fresh garlic will elevate the flavor even more.
- 2 teaspoons paprika – Imparts smokiness and color; consider using smoked paprika for a bolder kick.
- 1 teaspoon dried oregano – Adds a touch of herby goodness; substitute with fresh oregano if available.
- 0.5 teaspoon cumin – Contributes warmth; omit for a milder palate.
- 0.5 teaspoon chili flakes (optional) – Adds a kick of heat; adjust according to your spice preference.
- Salt and pepper to taste.
For the Herby Ranch
- 0.5 cup mayonnaise – Creates a creamy base; swap for Greek yogurt for a lighter option.
- 0.5 cup sour cream or Greek yogurt – Delivers tanginess; you can use all Greek yogurt if desired.
- 2 tablespoons milk – Helps thin the ranch for easy drizzling; substitute with buttermilk for enhanced flavor.
- 2 tablespoons fresh parsley – Introduces bright, herby notes; if you’re out of fresh, dried can work in a pinch.
- 1 tablespoon fresh dill – Elevates the ranch flavor; dried dill is a handy alternative when fresh isn’t available.
- 1 tablespoon fresh chives or green onion – Offers a mild onion flavor; use shallots if necessary.
- 1 teaspoon garlic powder, 1 teaspoon onion powder, 1 tablespoon lemon juice or vinegar – These essentials showcase the ranch flavor; adjust acidity to your liking.
For Assembling
- 4 pieces of pitas – The perfect base for filling; whole wheat or gluten-free options work wonders too.
- Shredded lettuce or mixed greens – Adds crunch and freshness inside the pita.
- 1-2 slices tomato – Juicy texture that enhances the pita; any ripe variety is delicious.
- Optional toppings: Crumbled feta, pickled onions, cucumber, or hot sauce – Elevate flavors and textures to your liking.
Unleash your creativity with these Sheet Pan Chicken Pitas!
Step‑by‑Step Instructions for Sheet Pan Chicken Pitas
Step 1: Preheat Your Oven
Begin by preheating your oven to 425°F (220°C). This temperature is perfect for achieving crispy, caramelized veggies and juicy chicken strips. While the oven heats up, gather a large sheet pan and prepare to toss your ingredients, ensuring everything will roast evenly and efficiently.
Step 2: Prepare the Herby Ranch
In a medium bowl, combine 0.5 cup mayonnaise, 0.5 cup sour cream or Greek yogurt, and 2 tablespoons of milk. Stir in 2 tablespoons of fresh parsley, 1 tablespoon of fresh dill, and 1 tablespoon of chives or green onion along with the garlic powder, onion powder, and lemon juice. Mix thoroughly and refrigerate this herby ranch dressing while you prepare the chicken and vegetables.
Step 3: Toss Chicken and Vegetables
On your large sheet pan, place 1.5 pounds of boneless, skinless chicken strips, along with your sliced peppers and red onion. Drizzle 2 tablespoons of olive oil over the mixture. Then, sprinkle 2 teaspoons of garlic powder, 2 teaspoons of paprika, 1 teaspoon of oregano, and 0.5 teaspoon of cumin, seasoning everything generously with salt and pepper. Toss all ingredients until well-coated in the oil and spices, making sure they are evenly distributed.
Step 4: Arrange on the Sheet Pan
Spread the seasoned chicken and vegetable mixture in a single layer across the sheet pan. This is crucial for the chicken to roast evenly and develop that lovely golden color. Make sure not to overcrowd the pan, as this can hinder proper roasting and lead to steaming rather than crisping.
Step 5: Roast to Perfection
Place the sheet pan in the preheated oven and roast the chicken and vegetables for 20-25 minutes. Flip the chicken halfway through cooking to ensure it browns evenly. The chicken is done when it reaches an internal temperature of 165°F (74°C), and the vegetables should be tender and slightly charred, showcasing their delicious flavor.
Step 6: Warm the Pitas
While the chicken and veggies are roasting, take 4 pieces of pita bread and wrap them in foil. Place them in the oven for the last 5 minutes of roasting to warm up, or heat them in a skillet over medium heat until they are slightly charred and pliable. This will enhance the overall experience when you assemble your pitas.
Step 7: Assemble Your Pitas
Once everything is done, take a warm pita and fill it generously with shredded lettuce, followed by the roasted chicken and vegetables from the sheet pan. Add 1-2 slices of fresh tomato for added juiciness and flavor. Drizzle the herby ranch dressing over the top, customizing it with your favorite toppings, such as crumbled feta or pickled onions, for a delicious finishing touch.
What to Serve with Sheet Pan Chicken Pitas?
Elevate your dining experience by curating a delicious spread that complements the irresistible flavors of these pitas.
- Crispy Sweet Potato Fries: Their natural sweetness and crispiness provide a delightful contrast to the savory chicken and herby ranch, adding a satisfying crunch.
- Lemony Green Salad: A zesty salad with mixed greens, cucumbers, and a light vinaigrette refreshes the palate and balances the richness of the pitas.
- Grilled Corn on the Cob: Charred corn adds a sweet, smoky flavor that pairs beautifully with the roasted veggies and chicken, creating a summery vibe at your table.
- Mediterranean Quinoa Salad: This wholesome side with cucumbers, tomatoes, and feta offers a bright, tangy addition that enhances the flavors of your pitas while adding a grainy texture.
- Herbed Couscous: Fluffy couscous with fresh herbs is a simple yet elegant pairing, soaking up the delicious ranch with its light, airy texture.
- Sparkling Lemonade: A refreshing drink that cuts through the richness of the meal, sparkling lemonade adds a touch of sweetness and a fizzy twist to your dining experience.
Expert Tips for Sheet Pan Chicken Pitas
• Uniform Sizing: Cut chicken into even-sized strips to ensure they cook uniformly, yielding tender bites in your Sheet Pan Chicken Pitas.
• Avoid Overcrowding: Spread chicken and veggies in a single layer on the sheet pan. This prevents steaming and promotes proper roasting, achieving that delightful caramelization.
• Taste the Ranch: Before chilling, sample your herby ranch dressing. Flavors can mellow once refrigerated, so adjust seasoning to taste while fresh.
• Proper Reheating: If you have leftovers, reheat them briefly in the microwave to avoid drying out the chicken. For best results, use a skillet to retain moisture.
• Creative Variations: Don’t hesitate to explore different flavors. Swap out chicken for your favorite protein or try adding unique toppings to personalize your Sheet Pan Chicken Pitas.
Make Ahead Options
These Sheet Pan Chicken Pitas are ideal for those busy days when you need a delicious meal ready in a flash! You can easily marinate the chicken strips with olive oil and spices up to 24 hours in advance, allowing the flavors to develop. Additionally, chop the vegetables and store them in an airtight container in the refrigerator for up to 3 days to maintain their crispness. When it’s time to cook, simply toss the marinated chicken and prepped veggies onto your sheet pan and roast as directed. Assemble the pitas with the roasted filling and freshly made herby ranch dressing, and enjoy a satisfying homemade meal that saves you time and stress any day of the week!
Variations & Substitutions for Sheet Pan Chicken Pitas
Feel free to let your taste buds lead the way and customize this recipe to your heart’s content.
- Thigh Swap: Replace chicken breasts with thighs for richer flavor and juiciness—a great twist for tender bites!
- BBQ Ranch: Substitute the herby ranch dressing with your favorite BBQ sauce for a smoky and sweet barbecue flavor. It adds a fun twist that everyone will love.
- Hawaiian Touch: Incorporate pineapple chunks and smoked paprika for a Hawaiian twist, bringing a beautiful sweet-savory contrast to your pitas.
- Mediterranean Magic: Add kalamata olives and crumbled feta as toppings to create a delightful Mediterranean flair that elevates every bite.
- Spicy Kick: For some added heat, mix in Sriracha or chipotle peppers with the ranch dressing. A little spice goes a long way!
- Veggie Delight: Toss in additional vegetables like zucchini, asparagus, or cherry tomatoes to increase the dish’s freshness and nutrient content.
- Gluten-Free: Use gluten-free pitas or lettuce leaves instead of traditional pitas to accommodate any dietary preferences while enjoying the same delicious flavors.
- Meal Prep Friendly: Prep the chicken and veggies ahead of time, so they’re ready to roast whenever you are—perfect for busy weeknights! Check out my Rotisserie Chicken Gnocchi Soup for another easy meal prep idea.
Storage Tips for Sheet Pan Chicken Pitas
Fridge: Store leftovers in an airtight container for up to 3-4 days to maintain freshness. If possible, keep the components (chicken, veggies, pita, and dressing) separate to prevent sogginess.
Freezer: For longer storage, freeze the cooked chicken and veggies in a heavy-duty freezer bag for up to 3 months. Pitas can be frozen separately; just make sure to wrap them well to prevent freezer burn.
Reheating: To reheat, thaw in the fridge overnight. Warm chicken and veggies in the oven at 350°F (175°C) until heated through, about 10-15 minutes. Pitas can be warmed in a skillet or the oven for that fresh taste.
Preparation: If meal prepping, consider storing the Herby Ranch dressing separately to keep it fresh and flavorful until you’re ready to enjoy your Sheet Pan Chicken Pitas!

Sheet Pan Chicken Pitas Recipe FAQs
What type of chicken should I use for the pitas?
Absolutely! You can opt for boneless, skinless chicken breasts for a leaner choice, or try thighs for a more succulent, juicy flavor. If you have both on hand, feel free to mix them for a variety of textures!
How should I store leftovers?
After enjoying your meal, store any leftovers in an airtight container in the refrigerator for up to 3-4 days. I recommend keeping the chicken, veggies, pitas, and dressing separate to maintain freshness and prevent your pitas from getting soggy!
Can I freeze the cooked chicken and veggies?
Yes, you can! To freeze, place the cooked chicken and veggies in a heavy-duty freezer bag, making sure to squeeze out as much air as possible, and they’ll stay good for up to 3 months. Just remember to label the bags with the date so you know when to use them.
How can I reheat the pitas without drying them out?
To reheat, thaw any frozen chicken and veggies overnight in the fridge. Then, preheat your oven to 350°F (175°C) and warm the chicken and veggies for about 10-15 minutes until heated through. The pitas can be warmed in the oven or lightly toasted in a skillet for that fresh, soft texture!
Are there any dietary considerations I should be aware of?
Very! If you or your guests have dietary restrictions, consider using gluten-free pitas to make the meal suitable for those with gluten sensitivities. For a lighter ranch option, Greek yogurt can replace mayonnaise. Always check ingredient labels for allergies to dairy or specific spices if using pre-made components.
Delicious Sheet Pan Chicken Pitas for Effortless Weeknight Meals
Ingredients
Equipment
Method
- Preheat your oven to 425°F (220°C). Gather a large sheet pan and prepare to toss your ingredients for even roasting.
- In a medium bowl, combine mayonnaise, sour cream or Greek yogurt, and milk. Stir in parsley, dill, chives, garlic powder, onion powder, and lemon juice. Mix thoroughly and refrigerate.
- On your large sheet pan, place chicken strips, sliced peppers, and red onion. Drizzle olive oil and season with garlic powder, paprika, oregano, cumin, salt, and pepper. Toss until well-coated.
- Spread the seasoned mixture in a single layer across the sheet pan for even roasting.
- Roast for 20-25 minutes, flipping halfway through. Ensure chicken reaches an internal temperature of 165°F (74°C), and veggies are tender.
- While roasting, wrap pitas in foil and warm in the oven for the last 5 minutes or heat in a skillet.
- Fill warm pitas with shredded lettuce, roasted chicken and vegetables, fresh tomato slices, and drizzle with herby ranch. Customize with optional toppings.
Leave a Reply