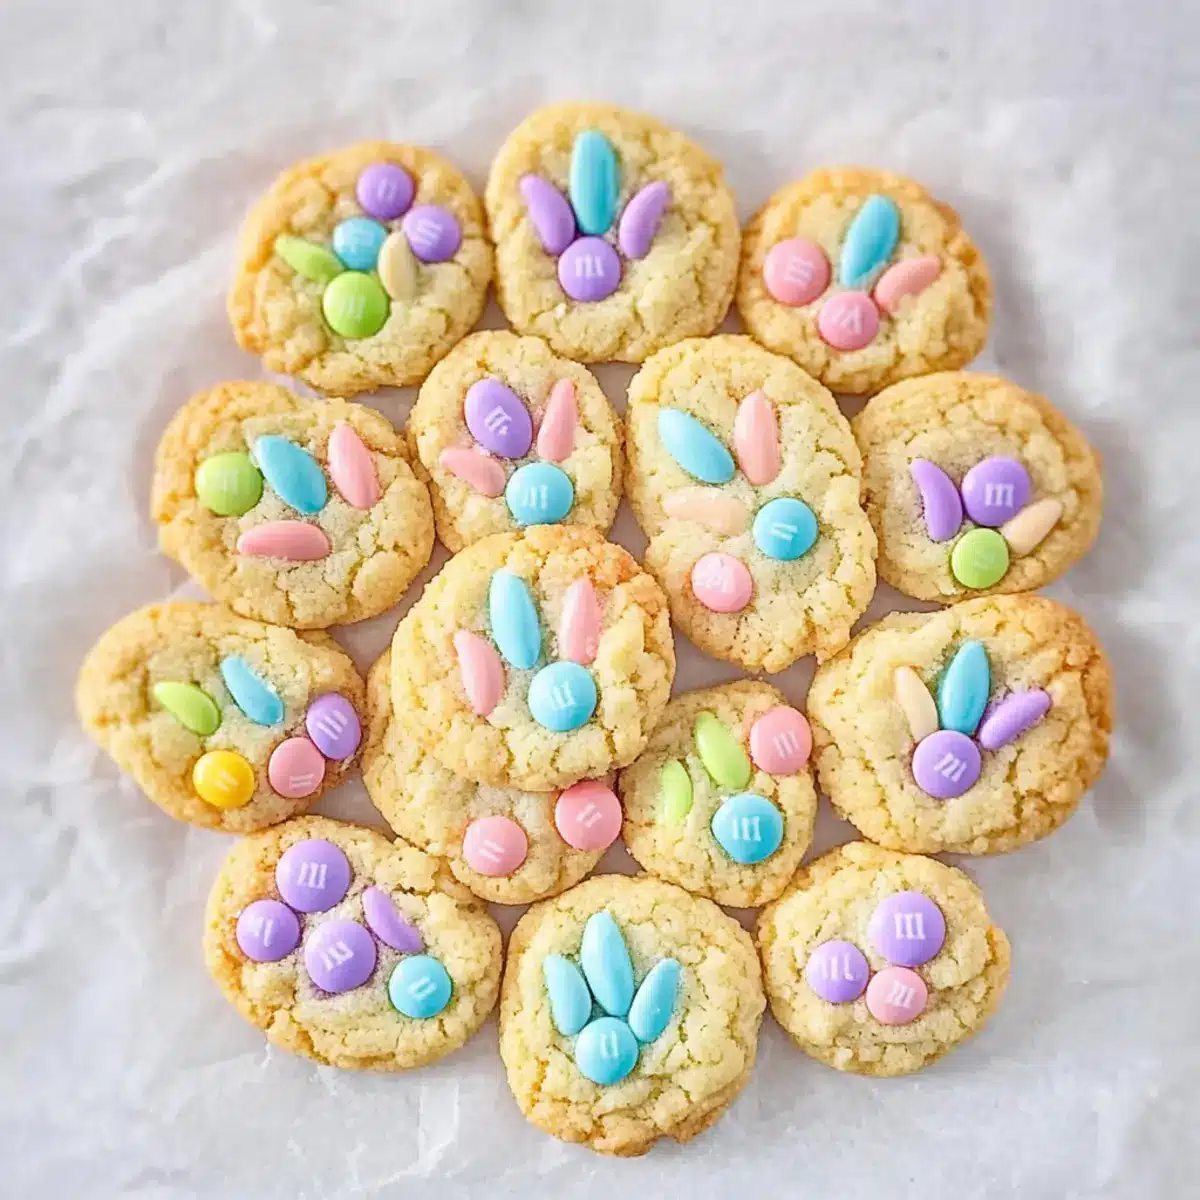
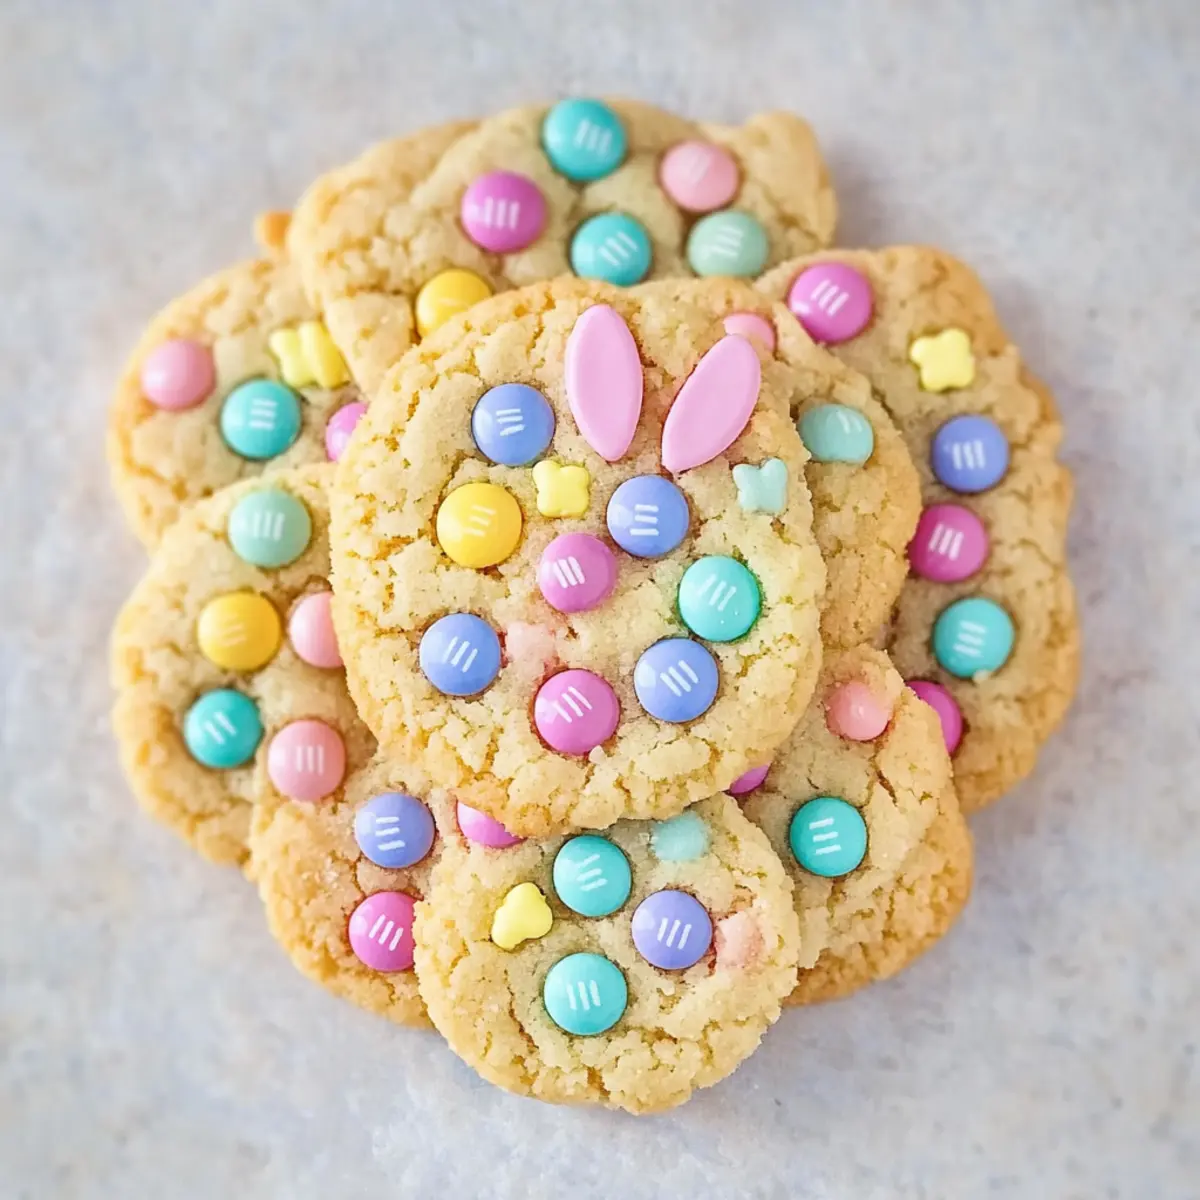
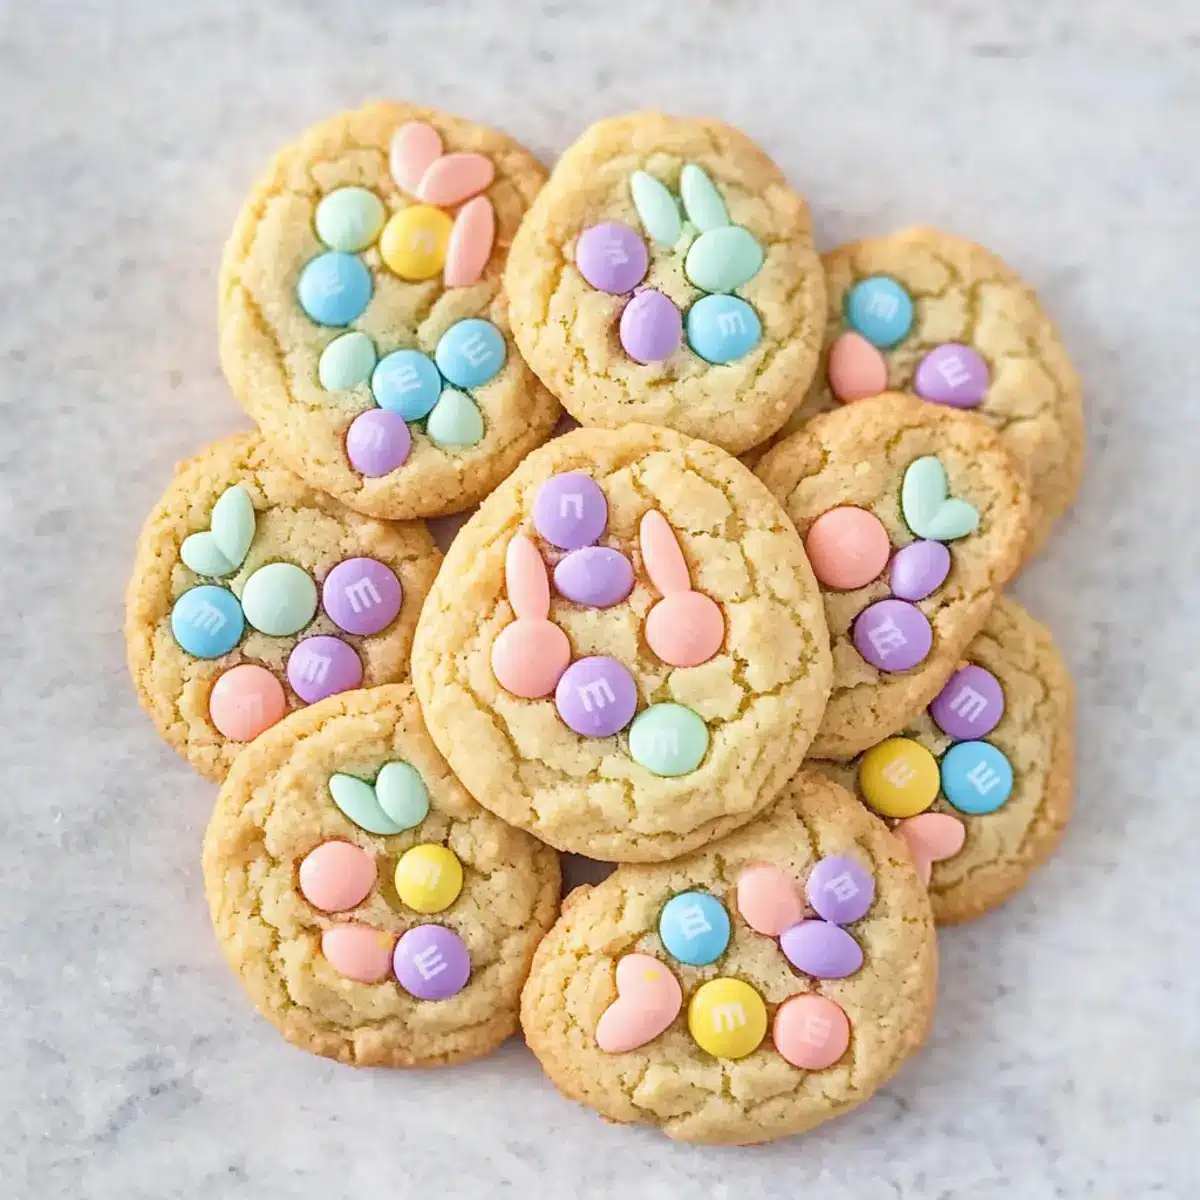
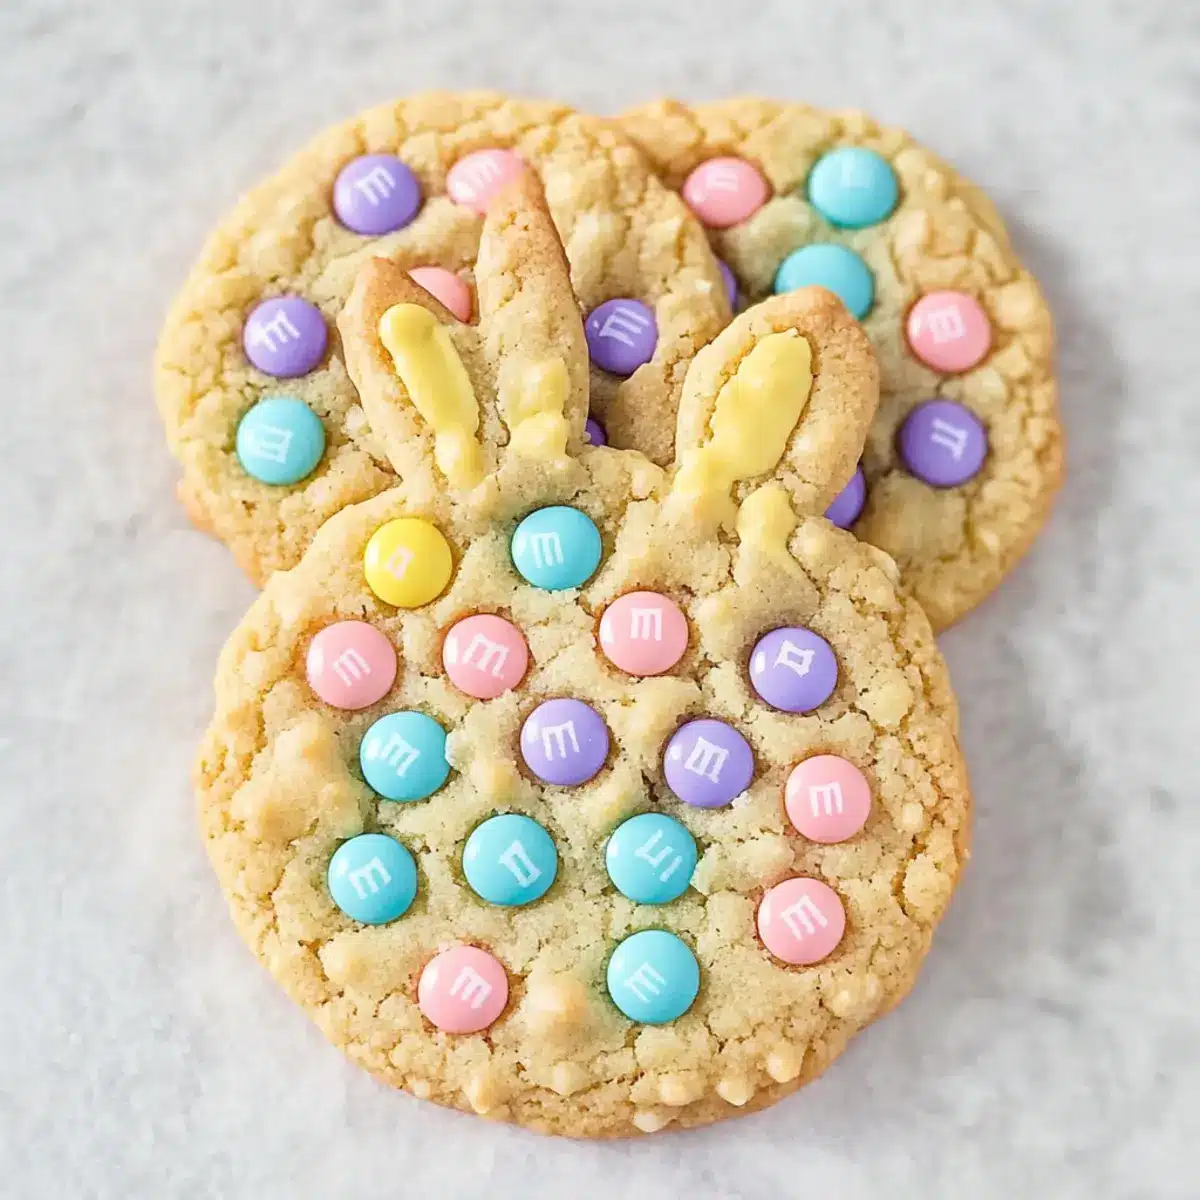
Have you ever felt the excitement of seeing pastel colors brightening up your kitchen? This spring, let’s channel that joy into crafting adorable M&M Bunny Cookies! These treats are not only visually delightful with their charming bunny faces but also incredibly easy to whip up. In just 15 minutes of prep and a quick bake time, you’ll bring soft and chewy cookies to your table, perfect for Easter celebrations or spring gatherings. Imagine biting into a cookie that’s a little crispy on the outside and delightfully tender on the inside, complemented by rich, buttery flavors. Plus, these cookies are vegetarian-friendly, making them a hit for everyone! So, are you ready to spread some sweetness this season and wow your loved ones with these whimsical treats?
Why Are M&M Bunny Cookies a Must-Bake?
Joyful Aesthetics: These cookies are not only delicious but also a feast for the eyes, featuring adorable bunny faces that will make everyone smile.
Quick and Easy: With just 15 minutes of prep and a mere 10-12 minutes of baking, you can whip these up without breaking a sweat.
Perfectly Soft: Each cookie boasts a soft, chewy center and a slight crisp at the edges—ideal for anyone craving that comforting texture.
Versatile Treat: Feel free to switch out the pastel M&Ms with your favorite candy for a personalized spin, just like with my Savory Rosemary Cookies that blend flavors beautifully!
Crowd Pleaser: Whether for Easter brunch or school parties, these cookies are sure to impress both friends and family alike, making memories sweeter!
Vegetarian-Friendly: Enjoyed by all, they cater to various dietary preferences, ensuring everyone can indulge in the fun.
M&M Bunny Cookies Ingredients
• Ready to create some festive fun?
For the Cookie Dough
- All-Purpose Flour – Essential for forming the dough and providing structure.
- Baking Powder – A leavening agent that helps your cookies rise gently.
- Baking Soda – Ensures cookies have a light texture for that perfect bite.
- Salt – Enhances flavor beautifully; opt for fine sea salt for even distribution.
- Butter (softened) – Adds rich flavor and tenderness; you can substitute with margarine for a dairy-free treat.
- Granulated Sugar – Provides sweetness and moisture; coconut sugar can be partially swapped for a healthier choice.
- Brown Sugar (packed) – Contributes moisture and a deeper flavor; light brown is a lovely option for milder sweetness.
- Large Egg (lightly beaten) – Binds everything together perfectly; try a flax egg for a vegan alternative.
- Vanilla Extract – Enhances flavor remarkably; almond extract can add a fun twist!
- Milk Chocolate Pastel M&Ms – Bring sweetness and a pop of color; feel free to swap with dark chocolate or another candy for your M&M Bunny Cookies variation.
For Decorating
- Extra M&Ms – Have a handful ready for pressing into warm cookies to create bunny faces—don’t miss this festive touch!
Step‑by‑Step Instructions for M&M Bunny Cookies
Step 1: Preheat the Oven
Begin by preheating your oven to 350°F (175°C). While the oven warms up, line a baking sheet with parchment paper to prevent sticking and ensure even baking. This step is crucial as it sets the stage for baking your delightful M&M Bunny Cookies to a perfect golden hue.
Step 2: Whisk the Dry Ingredients
In a medium bowl, whisk together 2 cups of all-purpose flour, 1 teaspoon of baking powder, 1 teaspoon of baking soda, and a pinch of salt. This mixture creates the foundation for your cookies, adding structure and helping them rise. Ensure the dry ingredients are well combined to avoid any clumps, ready for the next step.
Step 3: Cream the Butter and Sugars
In a separate large bowl, cream together ½ cup softened butter with ½ cup granulated sugar and ½ cup packed brown sugar until the mixture is smooth and light in color. This should take about 2-3 minutes with an electric mixer. The creaming process incorporates air, giving your M&M Bunny Cookies that soft, chewy texture we all love.
Step 4: Add Egg and Vanilla
Mix in 1 lightly beaten large egg and 1 teaspoon of vanilla extract into the butter-sugar mixture. Blend until fully combined, which should take another minute. You’ll notice the mixture becoming richer and creamier; this will enhance the flavors in your cookies, making them irresistibly delicious.
Step 5: Combine Wet and Dry Ingredients
Gradually incorporate the dry ingredient mixture into the wet ingredients, mixing just until a soft dough forms. Be careful not to overmix, as this could result in tougher cookies. The dough should be cohesive and soft, ready to shape into delightful little balls for your M&M Bunny Cookies.
Step 6: Scoop the Cookie Dough
Using a cookie scoop or spoon, portion out the dough into balls, about 2-3 tablespoons each. Place them on the prepared baking sheet, ensuring they are spaced 2-3 inches apart to allow for spreading. You should see that each ball is plump and beautifully shaped, hinting at the soft, chewy cookies to come.
Step 7: Bake the Cookies
Bake your cookies in the preheated oven for 10-12 minutes. Keep an eye on them; they should be lightly golden at the edges while still looking slightly soft in the center. This visual cue will ensure your M&M Bunny Cookies come out with that perfect chewy texture everyone adores.
Step 8: Decorate with M&Ms
Once baked, remove the cookies from the oven and immediately press nine pastel M&Ms into each warm cookie to form adorable bunny faces. This step is essential while the cookies are hot, as it helps the candies adhere perfectly, adding a festive flair to your treats.
Step 9: Cool the Cookies
Allow the cookies to cool on the baking sheet for about 5 minutes before transferring them to a wire rack. This waiting period helps them firm up slightly, ensuring they’re soft and chewy yet stable enough to enjoy. You’ll be delighted by the sight of these charming M&M Bunny Cookies as they cool and set!
Expert Tips for M&M Bunny Cookies
Work Quickly: Ensure you decorate the cookies with M&Ms while they’re still warm. This helps the candies stick better and keeps your bunny faces intact.
Chill the Bowl: If the dough becomes too soft during mixing, chill your mixing bowl in the refrigerator. This will help maintain a firm dough for easier shaping.
Uniform Size: Scoop out dough using a cookie scoop for evenly sized M&M Bunny Cookies. This ensures they bake at the same rate, giving you a consistent texture throughout.
Avoid Overbaking: Keep a close eye on your cookies; they should be removed from the oven when the edges are lightly browned. This will give you that perfect soft and chewy center.
Use Parchment Paper: Lining your baking sheet with parchment paper not only prevents sticking but also aids in achieving an even bake and golden finish.
Flavor Variations: Feel free to swap the pastel M&Ms for other chocolates or candies of your choice. This lets you personalize your M&M Bunny Cookies while still keeping the festive touch!
M&M Bunny Cookies Variations & Substitutions
Feel free to get creative with these M&M Bunny Cookies and make them your own by trying out these fun twists!
-
Dairy-Free: Substitute softened butter with coconut oil or margarine for a perfect dairy-free option.
-
Chocolate Lovers: Swap pastel M&Ms for dark chocolate chips or chunks to satisfy that sweet tooth with a deeper flavor.
-
Nutty Twist: Add ½ cup of chopped walnuts or pecans into the dough for an unexpected crunchy texture.
-
Flavored Extracts: Experiment by replacing vanilla extract with almond or coconut extract for an exciting flavor upgrade.
-
Fruity Fun: Incorporate dried cherries or cranberries into the dough for a tart, fruity surprise amidst the sweet cookie.
-
Sandwich Cookies: Spread a layer of frosting or fruit jam between two cookies for a delightful dessert sandwich. Just imagine that creaminess!
-
Added Spice: Introduce a teaspoon of cinnamon or nutmeg into the dry ingredients for a warm spiced flavor that complements the sweetness beautifully.
-
Holiday Themes: For a Halloween twist, use orange and black candies instead, transforming these into seasonal delights. Check out my Healthy Pistachio Cookies for inspiration on using alternative ingredients throughout the year!
Make Ahead Options
These M&M Bunny Cookies are perfect for meal prep enthusiasts! You can prepare the cookie dough up to 48 hours in advance; simply refrigerate it in an airtight container to keep it fresh and maintain its delightful texture. If you’re really preparing in advance, you can also freeze the dough for up to 3 months. When you’re ready to bake, just scoop the dough onto a baking sheet and let it sit at room temperature for 15-20 minutes before baking. For baked cookies, store them in an airtight container at room temperature for up to 4 days. These make-ahead tips ensure you can enjoy these soft and chewy M&M Bunny Cookies with minimal hassle on busy days!
Storage Tips for M&M Bunny Cookies
Room Temperature: Store your cookies in an airtight container at room temperature for up to 4 days to maintain their delightful soft texture.
Freezer: Baked cookies can be frozen for up to 2 months. Place them in a single layer in an airtight container, separating layers with parchment paper to prevent sticking.
Dough Storage: If you want to prepare ahead, refrigerate your cookie dough for up to 48 hours before baking. This allows for deeper flavors and makes rolling the dough easier.
Reheating: When ready to enjoy a cookie from the freezer, simply thaw at room temperature or microwave for a few seconds to restore that warm, chewy goodness of your M&M Bunny Cookies.
What to Serve with M&M Bunny Cookies
These charming cookies are just the beginning of a delightful Easter spread that will leave your guests smiling.
-
Fresh Fruit Salad: A vibrant mix of berries, melons, and citrus offers a refreshing contrast to the sweetness of the cookies.
-
Creamy Vanilla Ice Cream: The cool, rich creaminess pairs beautifully with the soft and chewy texture of M&M Bunny Cookies.
-
Fluffy Rabbit Pancakes: Start your Easter morning with fluffy pancakes shaped like bunnies, enhancing the festive theme of the day.
-
Light Lemonade: A refreshing glass of lemonade balances the sweetness of the cookies with a zesty, thirst-quenching flavor.
-
Chocolate-Dipped Strawberries: These sweet, juicy treats add an elegant touch, complementing the cookies’ sweetness while providing a bit of crunch.
-
Mini Marshmallow Treats: Soft and chewy, these treats echo the texture of the cookies while adding a fun, nostalgic element to your dessert table.
-
Nutty Trail Mix: For a savory crunch, serve a homemade trail mix with nuts and dried fruit; it creates a delightful balance to the sweet cookies.
-
Sparkling Water with Lemon: A bubbly, refreshing drink infused with fresh lemon perfectly cleanses the palate between bites of cookies.
-
Carrot Cupcakes with Cream Cheese Frosting: Celebrate Easter with these cute cupcakes, their moistness and tangy frosting making a deliciously complementary dessert.
M&M Bunny Cookies Recipe FAQs
What is the best way to choose ripe ingredients for M&M Bunny Cookies?
Absolutely! For the best results, ensure your butter is softened to room temperature, which usually takes about 30 minutes out of the fridge. Fresh eggs should also be used—look for ones without cracks and with a clean shell. When selecting M&Ms, make sure they’re of good quality, with intact candy coatings and no dark spots.
How should I store my M&M Bunny Cookies after baking?
To keep your cookies soft and fresh, store them in an airtight container at room temperature for up to 4 days. If the cookies lose their moisture, adding a slice of bread in the container can help retain their softness!
Can I freeze M&M Bunny Cookies? How do I do it?
Yes, you can freeze baked cookies for up to 2 months! Allow the cookies to cool completely, then place them in a single layer in an airtight container with parchment paper between layers. Alternatively, you can wrap individual cookies in plastic wrap before placing them in a freezer bag. When you’re ready to enjoy, thaw at room temperature or warm briefly in the microwave for that fresh-baked taste.
What are some common troubleshooting tips for M&M Bunny Cookies?
If your cookies spread too much while baking, it may mean your butter was too soft or you added too much sugar. On the other hand, if they turn out too dry, ensure that you measured your flour correctly—using a spoon to scoop it into the measuring cup can prevent packing it down. Also, avoid overmixing the dough, as this can lead to tougher cookies.
Are M&M Bunny Cookies safe for people with dietary restrictions?
Yes! These cookies are vegetarian-friendly. If you need them to be dairy-free or vegan, substitute the butter with margarine, and use a flax egg instead of a traditional egg. Always check ingredient labels for potential allergens, especially concerning M&Ms, as they may have traces of nuts or other allergens.
Can I change the ingredients in M&M Bunny Cookies?
Absolutely! Feel free to experiment by substituting pastel M&Ms with chocolate chips, chunks, or even seasonal candies like holiday-themed ones. You can also incorporate chopped nuts for added crunch or use flavored extracts for creative variations that cater to your taste!
Delightful M&M Bunny Cookies for a Cheery Easter Treat
Ingredients
Equipment
Method
- Preheat your oven to 350°F (175°C) and line a baking sheet with parchment paper.
- Whisk together flour, baking powder, baking soda, and salt in a medium bowl.
- Cream butter, granulated sugar, and brown sugar until smooth and light in color.
- Mix in the beaten egg and vanilla extract until fully combined.
- Gradually incorporate the dry ingredients into the wet mixture until a soft dough forms.
- Scoop the dough into balls, placing them on the prepared baking sheet, spaced apart.
- Bake for 10-12 minutes until lightly golden at the edges.
- Press nine pastel M&Ms into each warm cookie to form bunny faces.
- Allow cookies to cool on the baking sheet for 5 minutes before transferring to a wire rack.
Leave a Reply