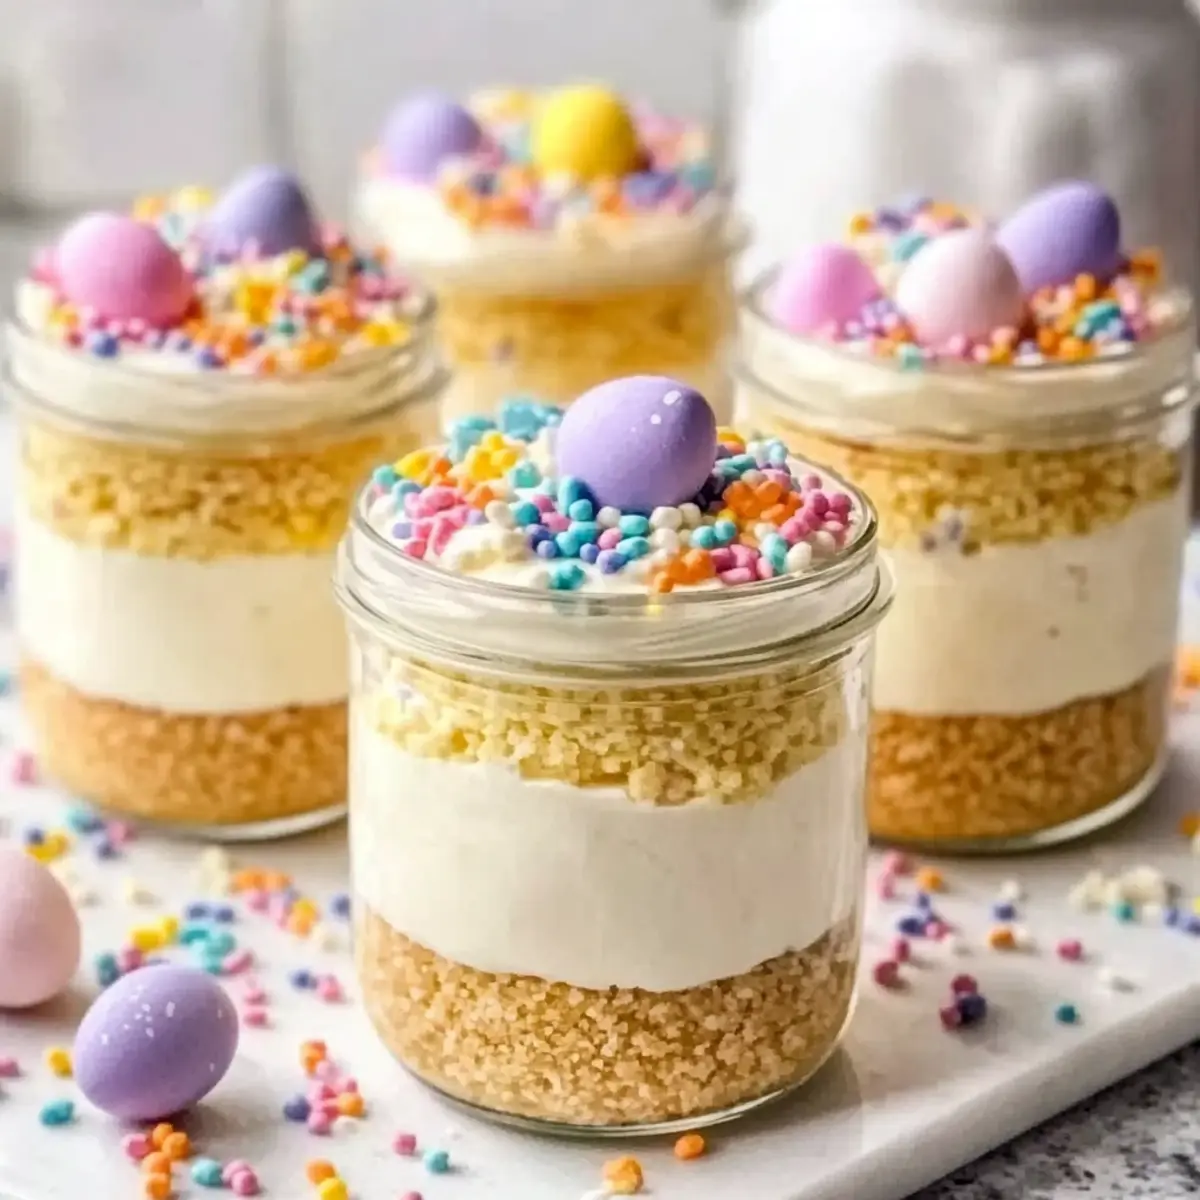
As I rummaged through my pantry, I stumbled upon a stash of colorful candy and vibrant gel food colors that made me think instantly of spring. Inspired by the cheerful spirit of the season, I couldn’t resist whipping up these adorable Mini Easter Cheesecake Jars. This no-bake delight is perfect for anyone looking to impress without the oven! Each jar is filled with smooth, creamy cheesecake layered atop a crunchy graham cracker crust, making them not just visually appealing but also a breeze to prepare ahead of time. Plus, they’re perfectly portion-controlled, so there’s no fight over who gets the largest slice! With a pop of color and delightful toppings, these jars are bound to be the centerpiece of your next gathering. Curious how you can whip up this crowd-pleaser in mere moments? Let’s get started!
Why are Mini Easter Cheesecake Jars a Must-Try?
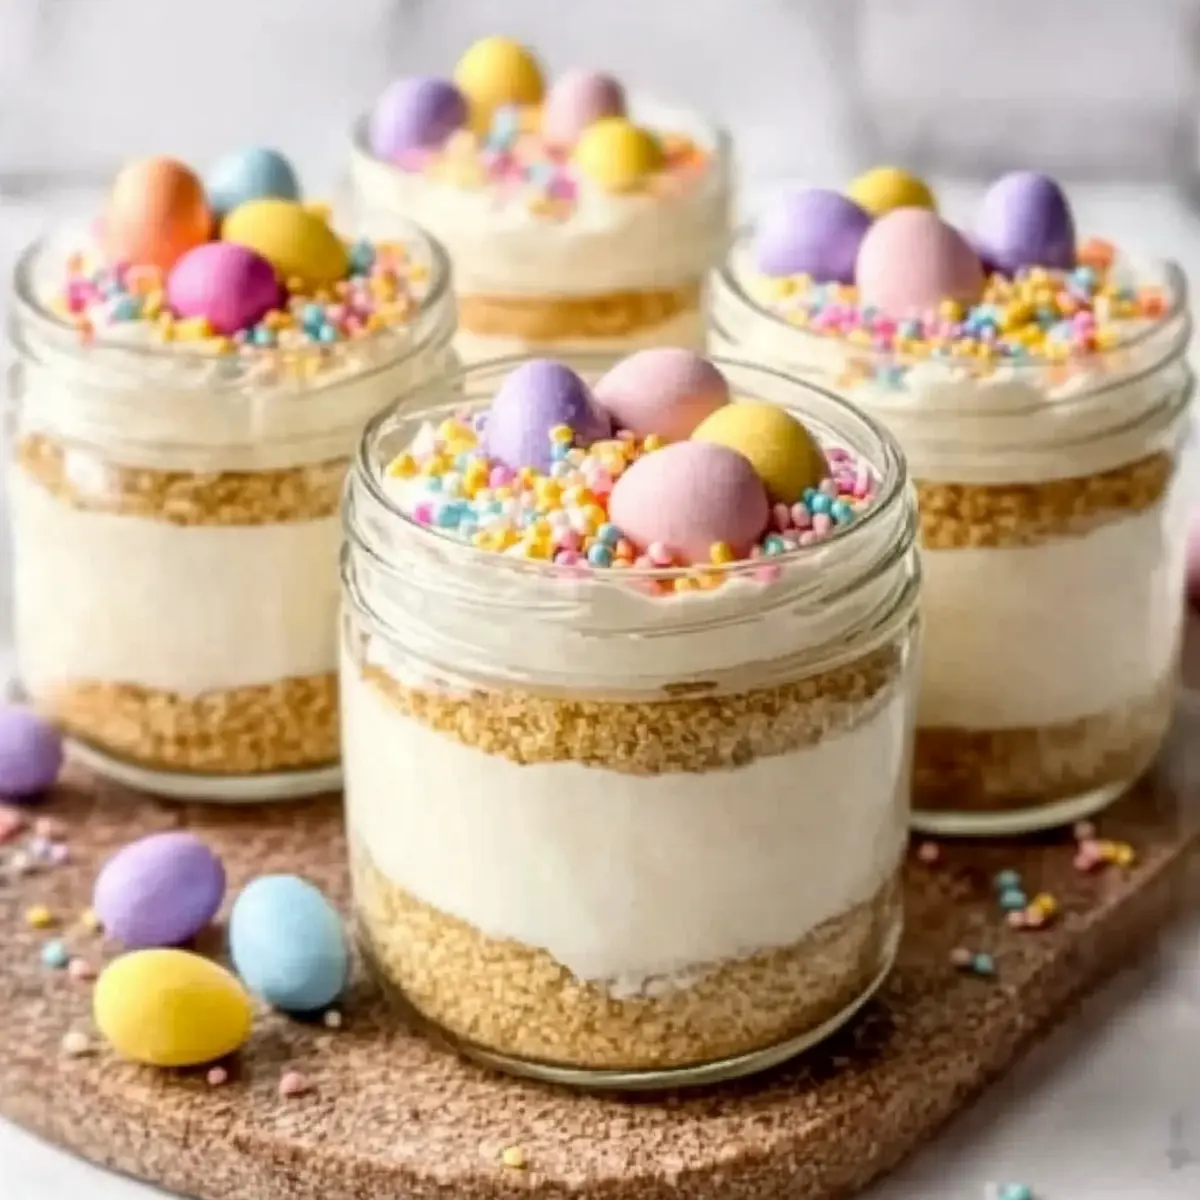
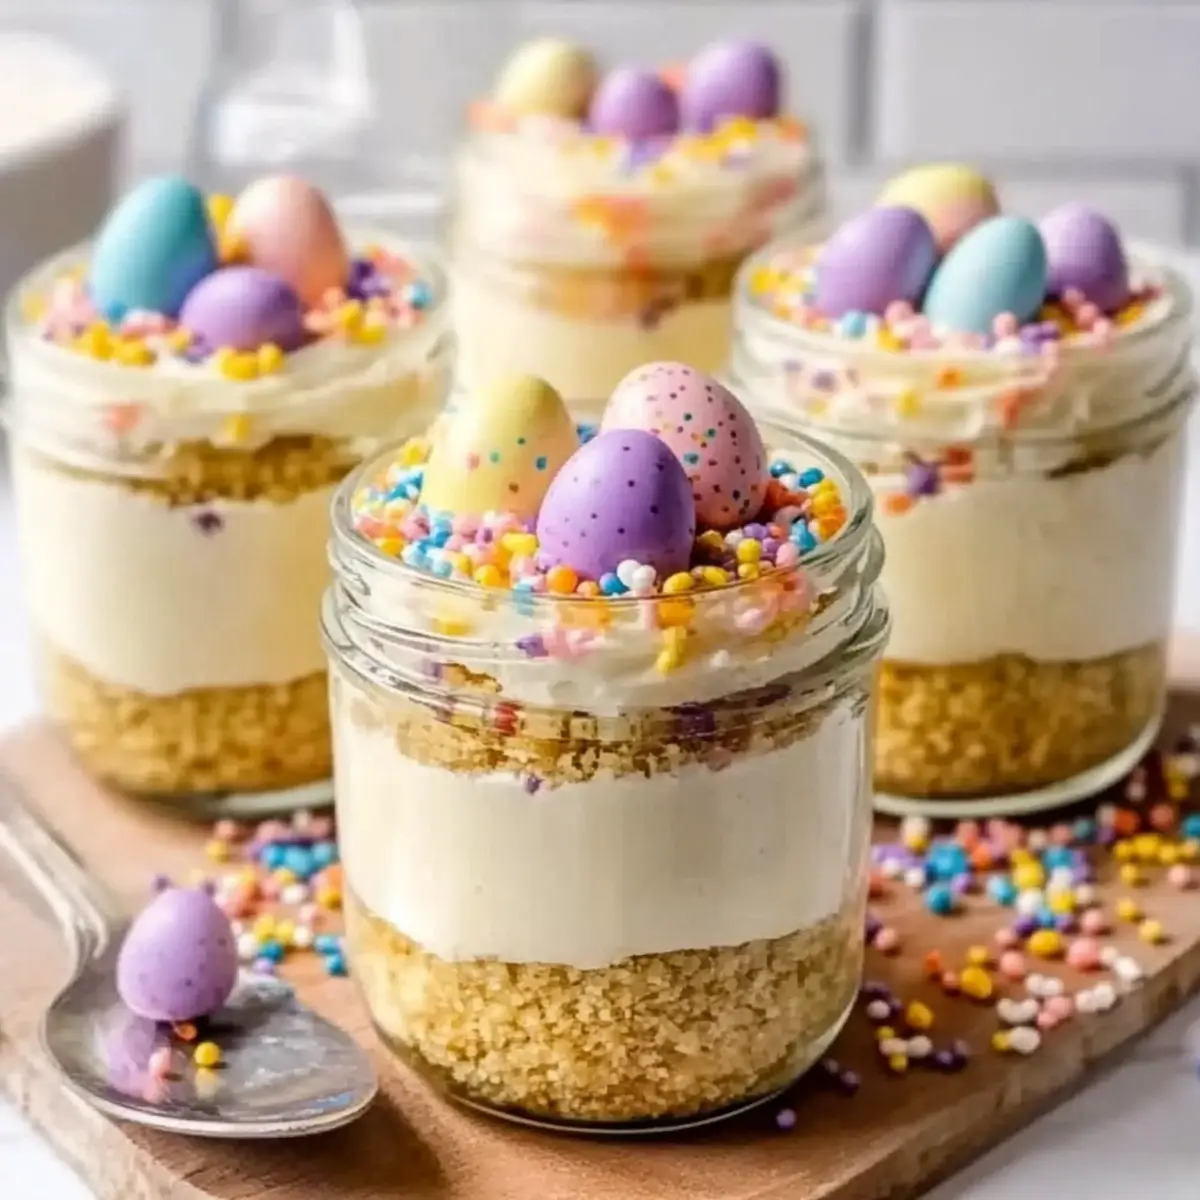
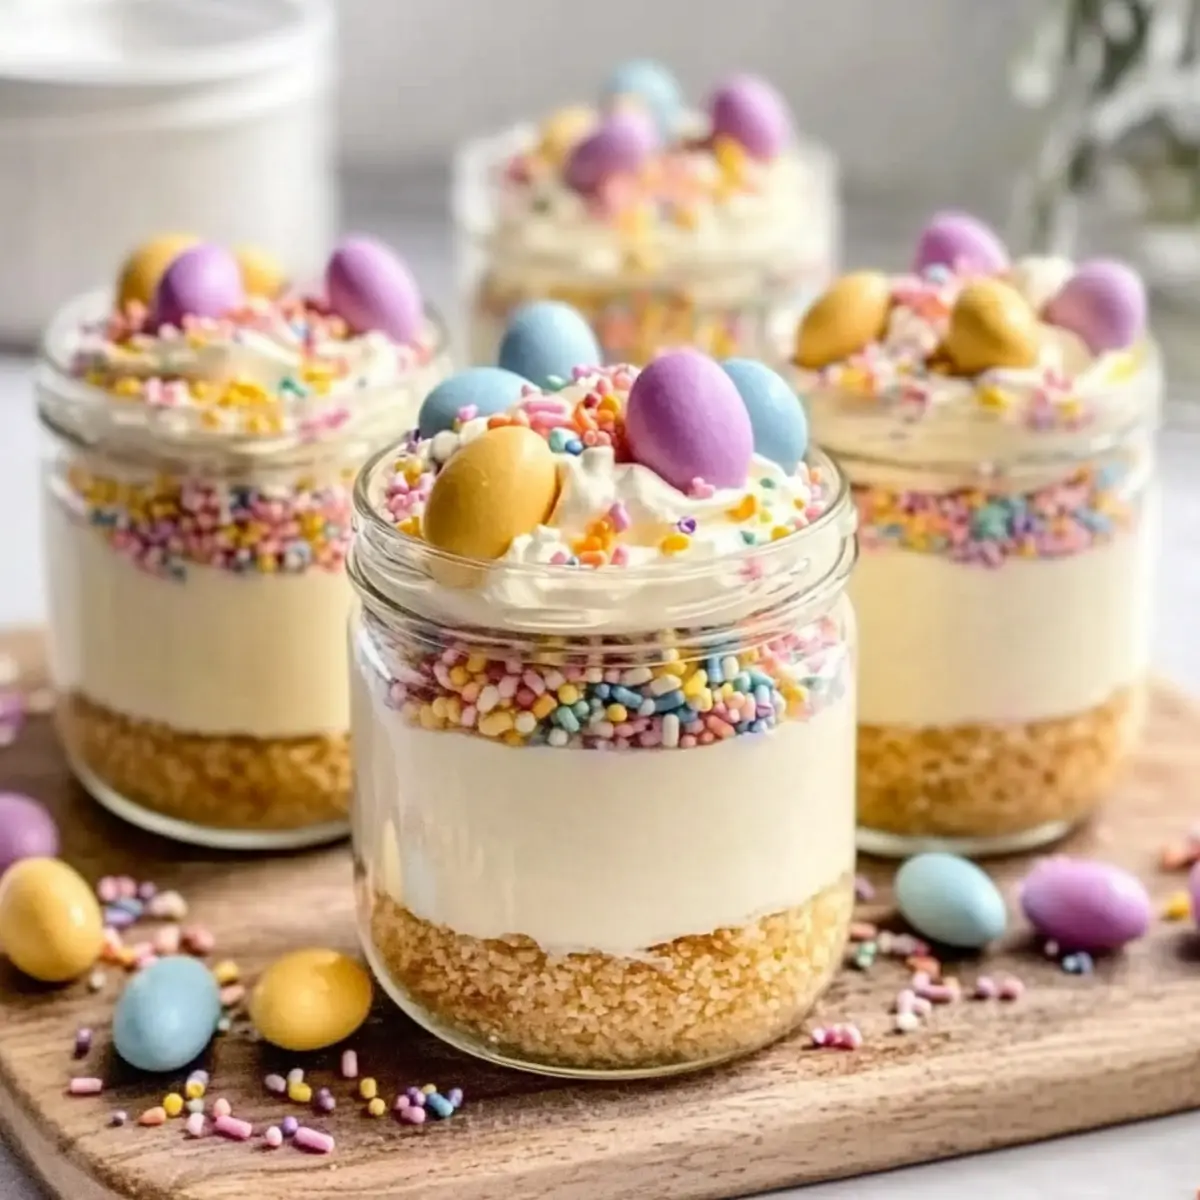
Delightful Presentation: These jars are not only delicious but also showcase beautiful layers that are perfect for celebrating spring and Easter.
No-Bake Convenience: Say goodbye to oven stress! This easy, no-bake recipe ensures you spend minimal time in the kitchen while still creating a stunning dessert.
Kid-Friendly Fun: Involve the kids in decorating these jars—let them choose their favorite toppings like mini chocolate eggs and sprinkles for a festive touch!
Make-Ahead Magic: Prep these mini cheesecakes in advance for stress-free entertaining. With a quick chill, they’re ready when you are.
Perfect Portion Control: No need to slice a pie; everyone gets their own jar! They’re ideal for gatherings where guests can serve themselves.
For more tasty treats, don’t miss my Strawberry Crunch Cheesecake or Caramel Crunch Cheesecake.
Mini Easter Cheesecake Jars Ingredients
• Get ready to create this delightful spring treat!
For the Crust
- Graham Cracker Crumbs – Structure the crust; substitute with digestive biscuits if desired.
- Unsalted Butter (melted) – Binds the crust; ensure it’s completely melted for a uniform mixture.
- Sugar – Adds sweetness to the crust; white sugar is typical, but brown sugar can add richer flavor.
- Pinch of Salt – Balances sweetness in the crust.
For the Cheesecake Filling
- Cream Cheese (softened) – Provides the creamy base of the cheesecake; ensure it’s just softened, not too warm.
- Powdered Sugar – Sweetens and stabilizes the cheesecake filling.
- Vanilla Extract – Adds flavor depth; feel free to substitute with almond extract for a distinct twist.
- Lemon Juice – Brightens the flavors of the filling.
- Cold Heavy Whipping Cream – Creates a light, fluffy texture; whip to medium-stiff peaks for the best results.
- Gel Food Coloring (optional) – Use for pastel colors in the filling if desired for seasonal decoration.
For the Toppings
- Mini chocolate eggs – For a festive touch and extra sweetness.
- Jelly beans – Add color and fun to your jars.
- Pastel sprinkles – Enhance the visual appeal of your mini desserts.
- Shredded coconut – For decoration; can be dyed green for a playful “grass” effect.
Step‑by‑Step Instructions for Mini Easter Cheesecake Jars
Step 1: Make the Crust
In a mixing bowl, combine 1 cup of graham cracker crumbs, 2 tablespoons of sugar, and a pinch of salt. Pour in 4 tablespoons of melted unsalted butter and mix until it resembles wet sand. This crust mixture will provide a crunchy foundation for your Mini Easter Cheesecake Jars, so make sure it holds together when pressed.
Step 2: Pack Crust
Spoon about 2–3 tablespoons of the crust mixture into the bottom of each jar. Use the back of a spoon or your fingers to firmly pack down the crust, creating an even layer. The crust should be compacted but not overly dense, providing a deliciously crunchy base for the cheesecake filling.
Step 3: Whip Cream
In a separate bowl, ensure your mixing equipment is cold, then pour in 1 cup of cold heavy whipping cream. Using an electric mixer, whip the cream on medium-high speed until it reaches medium-stiff peaks, which will take about 3–5 minutes. The goal is to have creamy peaks that hold their shape. Chill this whipped cream in the refrigerator while you prepare the filling.
Step 4: Mix Cheesecake Filling
In another large bowl, place 8 ounces of softened cream cheese, 1 cup of powdered sugar, 1 teaspoon of vanilla extract, and 1 tablespoon of lemon juice. Beat on medium speed until the mixture is perfectly smooth and creamy, about 2–3 minutes. This will be the luscious base of your Mini Easter Cheesecake Jars, with a sweet tang from the lemon.
Step 5: Fold Whipped Cream
Gently fold the whipped cream into the cream cheese mixture in two additions. Use a spatula to incorporate the whipped cream, being careful not to deflate it. Aim for a fluffy, airy mixture that will give your cheesecakes a light texture. Ensure no streaks of whipped cream remain as you blend them together.
Step 6: Add Color
If desired, divide the cheesecake mixture into smaller bowls and tint with gel food coloring to create pastel shades. Carefully mix the colors until even, ensuring you maintain the fluffy consistency. This step adds a fun, festive flair to your Mini Easter Cheesecake Jars, perfect for spring celebrations.
Step 7: Assemble Jars
Using a piping bag or a spoon, layer the colored cheesecake filling over the packed crust in each jar, leaving some space at the top for toppings. Start with one color, then follow with another if you’ve used multiple shades. This layering effect will create a beautiful presentation for your Mini Easter Cheesecake Jars.
Step 8: Chill
Cover the assembled jars with plastic wrap or lids and refrigerate for at least 2 hours, allowing the cheesecake filling to set. This chilling step is crucial to achieving the ideal creamy texture and flavor balance for your delightful dessert jars.
Step 9: Decorate
Just before serving, unleash your creativity and decorate the tops of the Mini Easter Cheesecake Jars with shredded coconut, pastel sprinkles, mini chocolate eggs, or jelly beans. The toppings will add both texture and visual appeal to your jars, inviting your guests to indulge.
Step 10: Serve
Once decorated, serve the jars chilled to ensure each spoonful is refreshing. These Mini Easter Cheesecake Jars are ready to become the star of your spring gatherings, offering delightful portions that your guests will adore!
What to Serve with Mini Easter Cheesecake Jars
Elevate your spring celebration with these delightful dessert pairings that enhance every bite of your creamy creations.
- Fresh Berries: Bursting with vibrant flavor, their tartness contrasts perfectly with the sweet cheesecake layers.
- Whipped Cream: A dollop on top adds an airy texture and creaminess that harmonizes beautifully with the cheesecake.
- Mint Leaves: Bright and refreshing, a sprig adds a pop of color and a fresh aroma across jars, inviting joy to every serving.
- Fruit Salad: A mix of seasonal fruits complements the rich cheesecake, balancing indulgence with a light, refreshing touch.
- Iced Tea or Lemonade: The crisp, citrusy notes of these drinks cleanse the palate, making each cheesecake bite even more enjoyable.
- Chocolate Dipped Strawberries: Their sweetness and chocolatey richness create an elegant pairing that’s perfect for springtime gatherings.
- Mini Chocolate Eggs: The same festive candies used as toppings can be served alongside for added playful texture.
- Coconut Macaroons: Their chewy texture and sweetness mirror the cheesecake’s charm, crafting a delightful dessert trio.
- Biscotti: A crunch from these traditional cookies offers a delightful contrast and encourages a cozy coffee pairing for an after-dinner treat.
Expert Tips for Mini Easter Cheesecake Jars
- Cream Cheese Check: Ensure the cream cheese is softly room temperature—too warm can lead to a liquidy filling.
- Perfect Whipped Cream: Whip the heavy cream just until medium-stiff peaks form; underwhipping will lead to a flat texture, while overwhipping could cause separation.
- Gentle Folding: When mixing in the whipped cream, be gentle to retain airiness. Overmixing can flatten the lush texture of your Mini Easter Cheesecake Jars.
- Timing is Key: For the best results, chill your jars for a full 2 hours. This helps the flavors meld beautifully and ensures a lovely, set filling.
- Decorate with Care: Add toppings just before serving to keep them looking fresh and vibrant; this prevents melting and color bleeding in your jars.
- Flavor Experimentation: Don’t hesitate to mix up flavors! Experiment with various extracts or fruit purees for endless variations on your Mini Easter Cheesecake Jars.
Mini Easter Cheesecake Jars Variations
Feel free to get creative and make these Mini Easter Cheesecake Jars your own!
-
Almond Extract: Sub in almond extract for vanilla in the filling for a sweet, nutty twist.
There’s something wonderfully aromatic about almond that elevates the cheesecake to another level of deliciousness. -
Chocolate Crust: Use chocolate cookie crumbs instead of graham crackers for a rich, cocoa-flavored base.
This simple swap transforms your jars into indulgent chocolate cheesecakes, perfect for chocolate lovers. -
Berry Swirls: Introduce swirls of fruit puree, like raspberry or strawberry, into the cream cheese filling for added flavor.
The bursts of berry goodness will not only look stunning but also enhance the dreamy texture of the jars. -
Nut Toppings: Add crushed nuts, such as pecans or walnuts, atop the jars for a satisfying crunch.
This delightful twist adds an element of surprise and texture that perfectly complements the creamy filling. -
Spiced Filling: Incorporate a dash of cinnamon or nutmeg into the cheesecake filling for a warm flavor profile.
This subtle change will make your jars taste like a cozy hug, perfect for those autumn-inspired spring days!
For other delightful cheesecakes, don’t forget to check out my Cheesecake Pumpkin Swirl or indulge in a Caramel Crunch Cheesecake.
-
Coconut Cream: Top your jars with whipped coconut cream instead of regular whipped cream for a tropical flair.
The light and airy texture of coconut cream pairs beautifully with the rich cheesecake filling, giving a new spin to each spoonful. -
Spicy Kick: Add a pinch of cayenne pepper to the filling for an unexpected spicy heat contrast.
This little addition can create a wonderful burst of flavor that keeps everyone guessing what makes your cheesecake so memorable!
Make Ahead Options
These Mini Easter Cheesecake Jars are perfect for busy home cooks who want to save time while still impressing guests! You can prepare the crust and cheesecake filling up to 24 hours in advance. Simply make the graham cracker crust and pack it into the jars, then mix and layer the cheesecake filling but leave off the toppings. Cover tightly and refrigerate; this helps to ensure they stay fresh and delicious. When you’re ready to serve, simply add your favorite decorations like coconut, sprinkles, or chocolate eggs just before serving for a stunning presentation. Enjoy delightful no-bake cheesecakes that stay just as creamy and delicious!
How to Store and Freeze Mini Easter Cheesecake Jars
- Refrigerator: Keep jars covered in the fridge for up to 3 days. This keeps the cheesecake filling fresh and creamy, ensuring every bite is delightful.
- Freezer: For longer storage, place jars without toppings in the freezer for up to 1 month. To enjoy, simply thaw them in the fridge overnight for the best texture.
- Airtight Containers: If possible, use airtight containers when refrigerating or freezing to minimize exposure to air and retain flavor.
- Reheating Not Required: There’s no need to heat these Mini Easter Cheesecake Jars; serve them chilled to maintain that refreshing, creamy goodness!
Mini Easter Cheesecake Jars Recipe FAQs
How do I choose ripe ingredients for Mini Easter Cheesecake Jars?
Absolutely! For the best flavor, make sure your cream cheese is at room temperature, not warm but just soft enough to mix smoothly. If using gel food coloring, choose quality brands for vibrant colors. Additionally, opt for fresh toppings like mini chocolate eggs and jelly beans for an appealing presentation.
How should I store Mini Easter Cheesecake Jars?
Keep your jars covered in the refrigerator for up to 3 days for optimal freshness. Cover them tightly with plastic wrap or lids to prevent any odors from seeping in, and keep the jars in the main body of the refrigerator where temperatures are most stable.
Can I freeze Mini Easter Cheesecake Jars?
Yes, you can! To freeze, assemble the jars without any toppings and seal them tightly with lids or plastic wrap. These jars can be kept freezer-safe for up to 1 month. When you’re ready to enjoy them, simply transfer them to the fridge overnight to thaw, ensuring you don’t skip that tasty chill!
What should I do if my whipped cream isn’t forming stiff peaks?
No worries! If your whipped cream isn’t thickening, it could be due to a few factors. First, ensure your bowl and beaters are cold—this definitely helps! Whip on medium-high speed for about 3 to 5 minutes, stopping to check for medium-stiff peaks. If still soft, try gradually adding a tablespoon of powdered sugar as you whip. This can provide additional structure!
Are there any dietary considerations for Mini Easter Cheesecake Jars?
Very! These jars can be adapted for various dietary needs. For those with gluten sensitivities, substitute graham cracker crumbs with gluten-free cookies or oatmeal. If you have dairy allergies, use dairy-free cream cheese and coconut cream for the whipped component. Always check ingredient labels to ensure safety for allergies, especially with toppings like chocolate and jelly beans.
What’s the best way to decorate the jars without making a mess?
For a neat and festive look, use a piping bag with a round tip to add your toppings, like whipped cream or shredded coconut. This method allows for precision and minimizes mess, making it easier to create perfect little swirls and decorative patterns. Plus, get the kids involved for even more fun and creativity!
Mini Easter Cheesecake Jars for a Delightful Spring Treat
Ingredients
Equipment
Method
- In a mixing bowl, combine 1 cup of graham cracker crumbs, 2 tablespoons of sugar, and a pinch of salt. Pour in 4 tablespoons of melted unsalted butter and mix until it resembles wet sand.
- Spoon about 2–3 tablespoons of the crust mixture into the bottom of each jar. Pack down to create an even layer.
- In a separate bowl, whip 1 cup of cold heavy whipping cream until it reaches medium-stiff peaks.
- In another bowl, beat together 8 ounces of softened cream cheese, 1 cup of powdered sugar, 1 teaspoon of vanilla extract, and 1 tablespoon of lemon juice until smooth.
- Gently fold the whipped cream into the cream cheese mixture.
- If desired, divide the mixture and tint with gel food coloring.
- Layer the cheesecake filling over the packed crust in each jar.
- Cover and refrigerate for at least 2 hours.
- Before serving, decorate with toppings like shredded coconut, pastel sprinkles, mini chocolate eggs, or jelly beans.
- Serve chilled.
Leave a Reply