As I watched the vibrant colors of spring unfold outside my kitchen window, it struck me that Easter is the perfect time for sweet, joyful baking. That’s when these Easter Chocolate Cookies burst onto my radar, transforming a classic dessert into a festive treat adorned with adorable Malteser Bunnies and Mini Eggs. This one-bowl wonder not only cuts down on cleanup, but it also ensures that each cookie remains deliciously soft and chewy, making them a surefire crowd-pleaser. Whether you’re celebrating with family or simply indulging in a sweet moment at home, these cookies are bound to bring smiles and satisfaction. So, are you ready to dive into cookie magic this Easter?

Why are these cookies a must-try?
Simplicity: This easy one-bowl recipe saves time and effort, making baking pure joy!
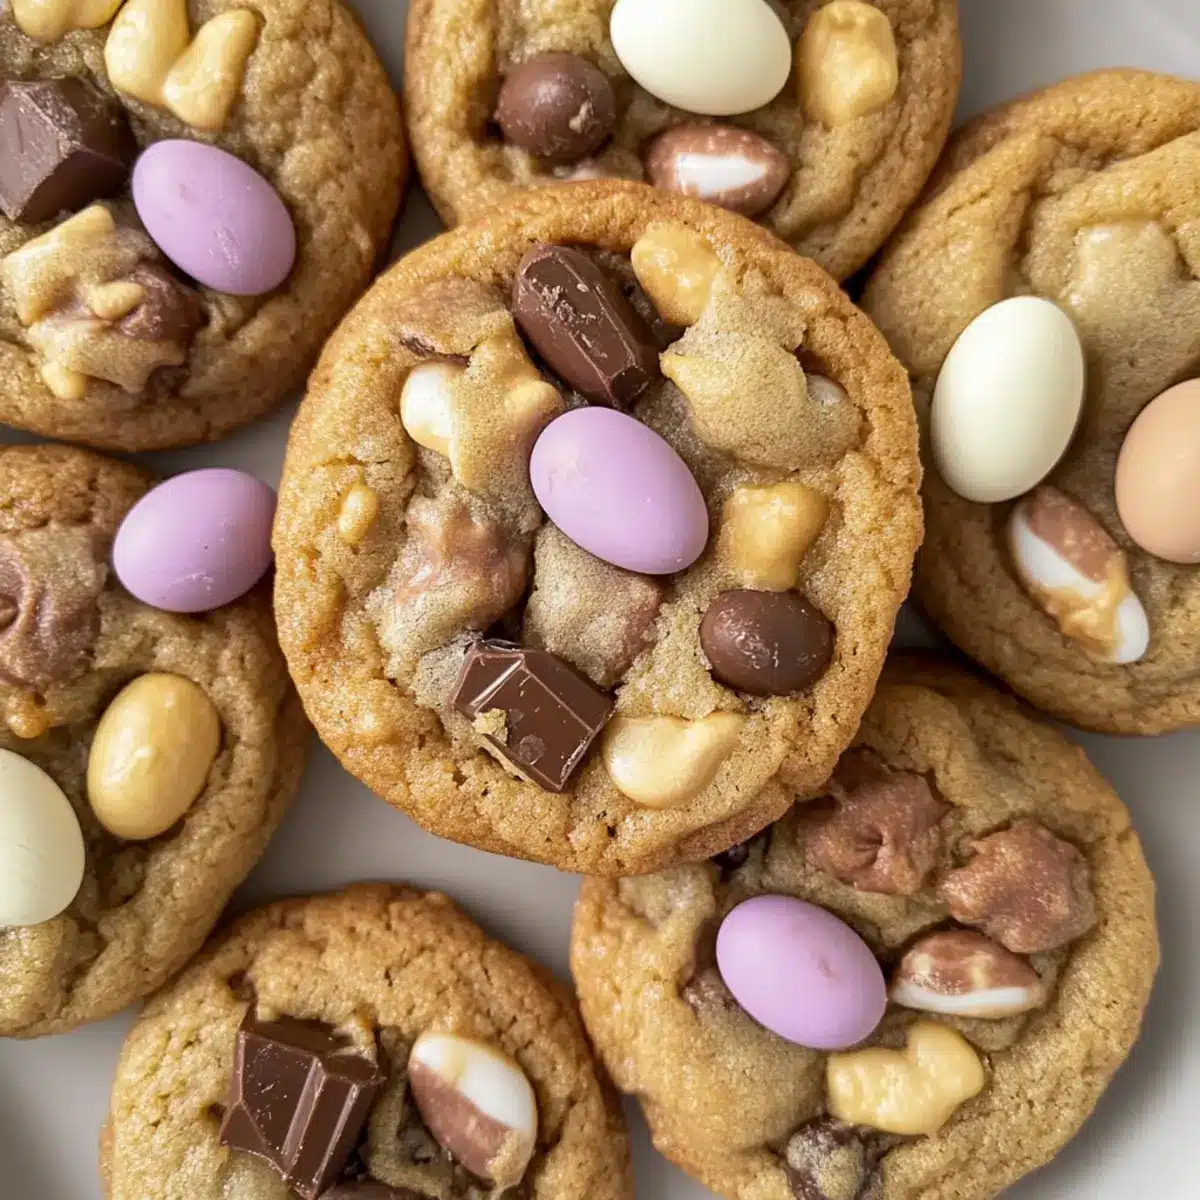
Festive Touch: Adorned with cute Malteser Bunnies and Mini Eggs, these cookies are perfect for Easter gatherings.
Crowd-Pleasing: Their rich chocolate flavor, paired with a chewy texture, will satisfy sweet cravings for adults and kids alike!
Customizable: Feel free to swap in your favorite chocolates or candies for endless variations—perhaps some delightful Savory Rosemary Cookies next to these?
Make-Ahead Friendly: Prepare the dough in advance for quick baking, ensuring you can enjoy warm cookies whenever the mood strikes!
Whether sharing at a family gathering or enjoying an afternoon treat, these cookies are bound to be a hit!
Easter Chocolate Cookie Ingredients
For the Cookie Dough
• Unsalted Butter – Provides moisture and richness; you can use margarine for a dairy-free option.
• White Caster Sugar – Adds sweetness and helps achieve a light texture; feel free to substitute with granulated sugar.
• Light Brown Sugar – Contributes moisture and a caramel flavor; dark brown sugar works for a richer taste.
• Medium Egg – Binds the ingredients together and contributes to texture; make sure it’s at room temperature for even mixing.
• Medium Egg Yolk – Adds extra richness; avoid substituting with a whole egg for the best results.
• Vanilla Extract – Enhances flavor; almond extract can be used for a unique twist.
• Self-Raising Flour – Provides structure and helps the cookies rise; you can substitute with all-purpose flour combined with 1 tsp of baking powder per cup.
• Salt – Balances the sweetness and enhances flavor; there are no direct substitutes.
• Chocolate (Milk/White or Mix) – Adds rich chocolate flavor and texture; use any favorite type of chocolate.
For Topping
• Mini Malteser Bunnies – A fun Easter-themed decoration; any small chocolate can be substituted.
• Mini Eggs – Adds a festive flair; feel free to swap with any small candy-coated chocolate.
These delightful Easter Chocolate Cookies are not only easy to whip up but also perfect for sharing the joy of the season!
Step‑by‑Step Instructions for Easter Chocolate Cookies
Step 1: Prepare Dough
Begin by melting 150g of unsalted butter in a small saucepan over low heat until fully liquid. In a large mixing bowl, combine the melted butter with 100g of white caster sugar and 100g of light brown sugar, stirring until smooth. Crack in one medium egg and one egg yolk, then add a splash of vanilla extract, whisking until the mixture is well blended and creamy.
Step 2: Combine Dry Ingredients
Gradually sift in 200g of self-raising flour and a pinch of salt into the wet ingredients, folding gently until a rich dough forms. Next, incorporate 150g of chocolate chunks, mixing just until they’re evenly distributed throughout the dough. This Easter Chocolate Cookies dough should be thick and slightly sticky, perfect for shaping.
Step 3: Chill Dough
Cover the bowl with clingfilm and refrigerate the dough for at least 5 hours, or preferably overnight. Chilling is crucial as it enhances the flavor and texture of your Easter Chocolate Cookies, making them irresistibly chewy. While you wait, you might want to gather your Easter chocolates for decorating later!
Step 4: Preheat Oven
When ready to bake, preheat your oven to 180°C (fan) or 200°C (conventional). Line a baking tray with greaseproof paper to ensure that your cookies don’t stick while baking. This setup will prepare you for a smooth baking process, allowing the cookies to spread beautifully as they bake.
Step 5: Shape Cookies
Scoop out the chilled dough using a tablespoon and roll them into balls, aiming for about 12-14 cookies in total. Place each dough ball onto the prepared tray, spacing them approximately 5cm apart to allow for spreading as they bake. The little moment of patience here will result in beautifully shaped cookies!
Step 6: Bake
Transfer the tray to the oven, baking your Easter Chocolate Cookies for 10 minutes. Keep a close eye on them—the edges should be golden brown while the centers remain soft and slightly underbaked. This contrast will ensure the chewy texture we all love in these delightful holiday treats.
Step 7: Add Toppings
Right after pulling the cookies from the oven, gently press a Mini Malteser Bunny and a Mini Egg into each warm cookie. This will create a festive touch and allow the chocolates to slightly melt, turning into the perfect adornments for your Easter Chocolate Cookies.
Step 8: Cool
Let the cookies sit on the tray for 20 minutes to set before transferring them to a wire rack. Allowing them to cool properly will help them firm up while keeping that scrumptiously soft center. These Easter Chocolate Cookies will be a delightful treat once they cool down and are ready to be enjoyed!

Easter Chocolate Cookies Variations & Substitutions
Let your creativity shine by personalizing these delightful Easter Chocolate Cookies to suit your taste!
- Dairy-Free: Swap unsalted butter for vegan margarine to make these cookies dairy-free.
- Flour Alternatives: Use almond flour or a gluten-free blend instead of self-raising flour for a gluten-free option. Just remember to add a bit of baking powder!
- Sweetener Switch: Replace white caster sugar with coconut sugar for a lower glycemic index. This will give your cookies a unique flavor complexity.
- Different Chocolates: Experiment with a mix of dark and white chocolate chips to create a beautiful contrast in flavor and appearance.
- Nutty Delight: Incorporate chopped nuts, like walnuts or pecans, into the dough for added texture and a delightful crunch.
- Spiced Up Cookies: Add a pinch of cinnamon or nutmeg to the dough to introduce a warm, aromatic flavor perfect for the holiday spirit.
- Tropical Twist: Consider pressing mini chocolate-covered coconut pieces into the cookies for a tropical touch that makes each bite delightful.
- Fruit Fusion: Fold in dried fruits, such as cranberries or cherries, before baking for a fruity burst of flavor alongside all that chocolate goodness.
Feel free to pair these whimsical Easter Chocolate Cookies with a delightful glass of milk or perhaps serve them alongside some charming Christmas Pinwheel Cookies for a festive mood. Happy baking!
How to Store and Freeze Easter Chocolate Cookies
Room Temperature: Store cookies in an airtight container at room temperature for up to 5 days. This way, they’ll remain soft and chewy, ready for snacking!
Fridge: If you prefer them colder, you can store the cookies in the fridge for up to a week. Just ensure they’re in a sealed container to avoid drying out.
Freezer: For longer storage, freeze unbaked dough or baked cookies in an airtight container for up to 3 months. Thaw overnight in the fridge before baking or enjoying!
Reheating: If cookies have been frozen, reheat in a warm oven (about 150°C or 300°F) for a few minutes to restore that delightful softness before serving. These Easter Chocolate Cookies are worth every bite!
Make Ahead Options
These Easter Chocolate Cookies are perfect for meal prep, allowing you to enjoy festive treats with minimal last-minute effort. You can prepare the cookie dough up to 24 hours in advance by chilling it in the fridge, ensuring it develops rich flavors and maintains its delightful chewy texture. Simply follow the dough preparation steps, cover the bowl with clingfilm, and refrigerate it until you’re ready to bake. When you’re set to indulge, scoop and roll the chilled dough into balls, then bake as directed. This method guarantees that your Easter Chocolate Cookies will be just as delicious and fresh as if they were made the same day, giving you the gift of time during busy celebrations!
Expert Tips for Easter Chocolate Cookies
-
Chill Thoroughly: Ensure your dough is chilled for at least 5 hours. This enhances the flavor and contributes to that chewy texture that defines your Easter Chocolate Cookies.
-
Perfect Baking Time: Underbake the cookies slightly, about 1-2 minutes less than 10 minutes. They’ll keep cooking on the tray, resulting in a delightful softness!
-
Room Temperature Eggs: Use eggs at room temperature for better incorporation into the dough, ensuring an even and smooth mixture throughout.
-
Don’t Overmix: Gently fold in the dry ingredients and chocolate chunks. Overmixing can lead to tougher cookies, which we want to avoid for that perfect chewiness.
-
Topping Creativity: While Mini Malteser Bunnies and Mini Eggs are a seasonal hit, feel free to swap in your favorite candies for a personalized touch to these Easter Chocolate Cookies.
What to Serve with Easter Chocolate Cookies
These delightful cookies perfectly complement a variety of tasty sides and treats, adding sweet festivity to your table.
-
A Glass of Milk: A classic pairing, ice-cold milk enhances the cookies’ rich flavors and balances the sweetness beautifully.
-
Vanilla Ice Cream: Serve warm cookies à la mode! The creamy ice cream offers a perfect cooling contrast to the chewy warmth of the cookies.
-
Fresh Berries: A side of plump, juicy strawberries or raspberries introduces a vibrant freshness, making every bite a harmonious blend of flavors.
-
Creamy Coffee: A frothy cappuccino or a latte provides a comforting warmth, bringing out the chocolate richness in the cookies.
-
Chocolate Dipping Sauce: For an extra indulgent treat, serve a warm chocolate sauce for dipping, deepening the chocolatey experience.
-
Easter-Themed Cupcakes: Create a festive dessert table by complementing your cookies with pastel-colored cupcakes topped with whimsical decorations.
-
Nutty Trail Mix: A mix of nuts and dried fruits offers a crunchy contrast, balancing the cookies’ soft texture while adding a nutritious element.
-
Hot Cocoa: For a cozy touch, a rich hot cocoa topped with marshmallows can elevate the festive mood, making it a sweet pairing with the cookies.
-
Cheese Platter: A platter of assorted cheeses brings a savory touch, providing a delightful balance to the sweetness of the cookies and appealing to diverse tastes.
-
Fruit Salad: A refreshing medley of seasonal fruits cleanses the palate and adds a burst of color, rounding out a delightful Easter spread.

Easter Chocolate Cookies Recipe FAQs
How do I choose the right chocolate for these cookies?
Absolutely! The type of chocolate you choose can elevate your Easter Chocolate Cookies. I recommend using a mix of milk and dark chocolate to balance sweetness and richness. If you’re feeling adventurous, try adding white chocolate chips or even butterscotch chips! Just ensure you chop the chocolate into large chunks, so you get delightful melty bits in each bite.
How should I store my Easter Chocolate Cookies?
To keep your cookies fresh and delicious, store them in an airtight container at room temperature for up to 5 days. If you prefer them a bit colder, you can refrigerate them for a week, just remember to seal them tightly. If they start to harden, a quick warm-up in the microwave can restore some softness!
Can I freeze the cookie dough?
Yes, freezing cookie dough is a fantastic idea! To do this, scoop the dough into balls, place them on a baking sheet lined with parchment, and freeze until solid. Once frozen, transfer the dough balls to an airtight container or freezer bag, where they can be stored for up to 3 months. When you’re ready to bake, simply thaw them in the fridge overnight and bake as instructed, adding a minute or two to the baking time if they’re still cold.
What do I do if my cookies spread too much while baking?
Very good question! If your cookies spread too much, it could be due to overly warm dough. Always chill the dough for at least 5 hours to help control spreading. If you’ve skipped this step, consider placing the cookie sheet in the freezer for 10-15 minutes before baking. Also, ensure you’re using the right amount of flour; measuring accurately is key to achieving perfect consistency in your Easter Chocolate Cookies.
Are these cookies safe for pets?
No, it’s best to keep these cookies away from pets. Ingredients like chocolate can be toxic to dogs and cats. Always opt for pet-friendly treats for your furry friends, and keep these delightful Easter Chocolate Cookies for your household festivities!
Can I make these cookies gluten-free?
Absolutely! You can make these Easter Chocolate Cookies gluten-free by substituting the self-raising flour with a gluten-free all-purpose flour blend. Just be sure your baking powder is gluten-free as well. The texture may be slightly different, but with the right ingredients, they can still be just as delicious and chewy!
Chewy Easter Chocolate Cookies for a Sweet Celebration
Ingredients
Equipment
Method
- Melt the unsalted butter in a small saucepan over low heat until fully liquid.
- In a large mixing bowl, combine the melted butter with white caster sugar and light brown sugar, stirring until smooth.
- Add the medium egg and egg yolk, followed by a splash of vanilla extract, whisking until well blended.
- Gradually sift in self-raising flour and a pinch of salt, folding gently until a rich dough forms.
- Incorporate chocolate chunks, mixing until evenly distributed throughout the dough.
- Cover the bowl with clingfilm and refrigerate the dough for at least 5 hours or overnight.
- Preheat your oven to 180°C (fan) or 200°C (conventional) and line a baking tray with greaseproof paper.
- Scoop out the chilled dough and roll into balls, placing each on the prepared tray with 5cm spacing.
- Bake the cookies for 10 minutes until the edges are golden brown and centers are soft and slightly underbaked.
- Press a Mini Malteser Bunny and a Mini Egg into each warm cookie immediately after removing from the oven.
- Let the cookies sit on the tray for 20 minutes to set before transferring to wire rack to cool.
Leave a Reply