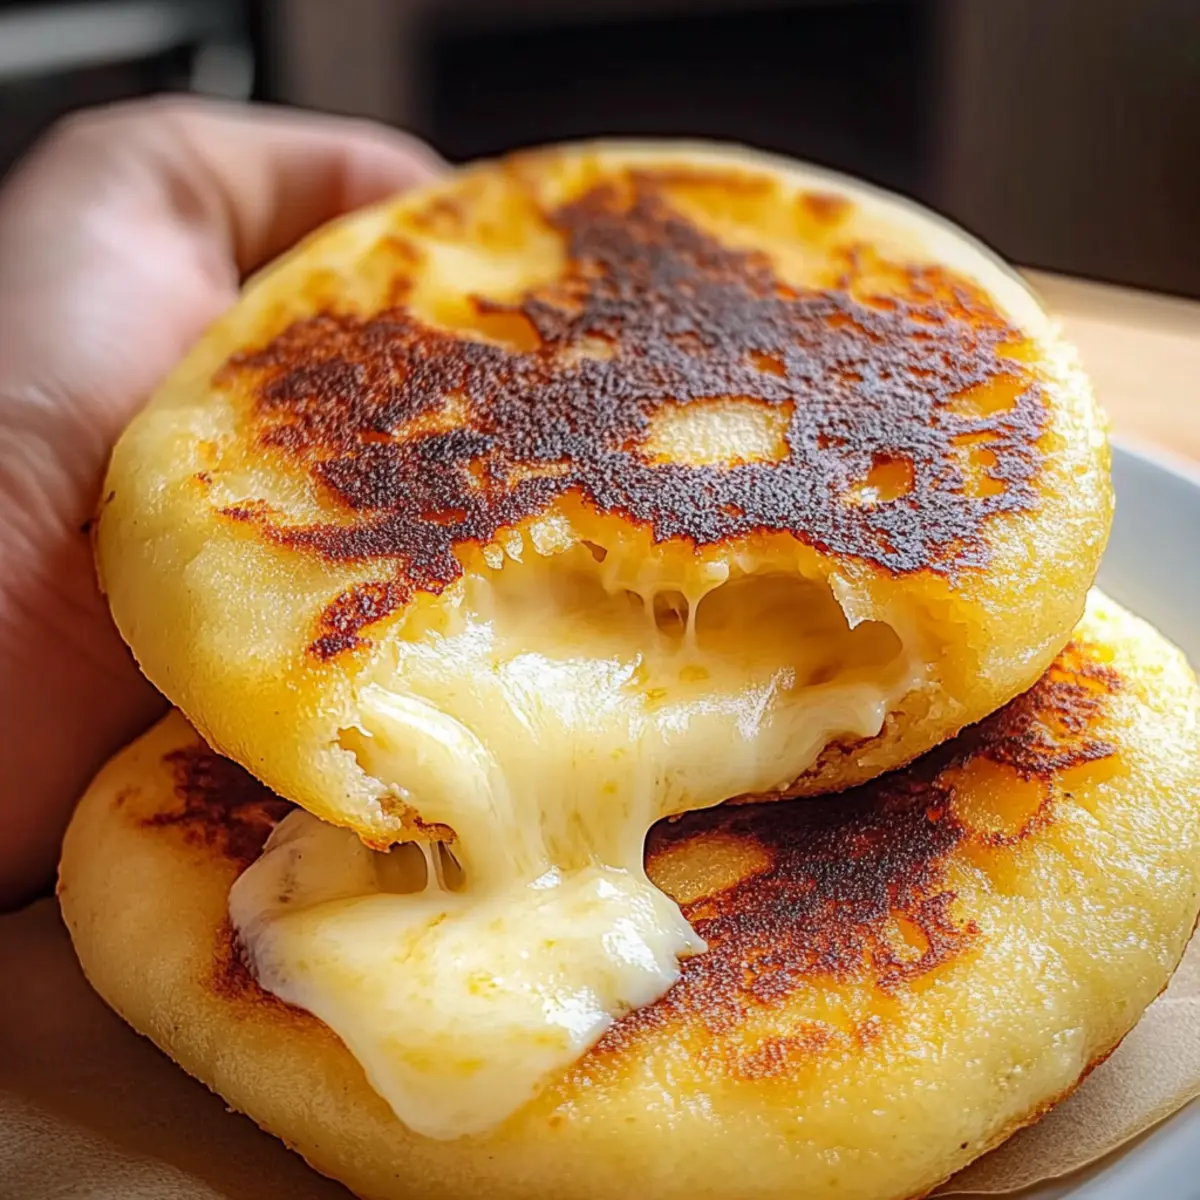
The sizzle of hot oil and the aroma of freshly fried cornmeal beckons like a warm hug on a busy day. As I stand in my kitchen, the thought of whipping up a batch of Arepas con Queso fills me with joy. These crispy delights, with their gooey melted cheese center, are a celebration of Colombian and Venezuelan flavors that can elevate any mealtime. What I love most about these arepas is their versatility; they’re quick to prepare in less than 30 minutes and can be customized to suit your palate—whether you prefer them simply cheesy or packed with savory fillings. Perfect as a snack, appetizer, or hearty side dish, I can’t help but smile thinking about how this comforting dish brings friends and family together. Ready to discover how to make these delicious arepas that will leave everyone asking for more? Let’s dive in!

Why are Arepas con Queso irresistible?
Simplicity and Speed: With just a few basic ingredients, these arepas can be ready in under 30 minutes, making them an ideal choice for a quick homemade meal.
Versatile Delight: Customize your fillings! From gooey cheddar to zesty feta, you can mix and match flavors to suit every taste preference.
Crowd-Pleasing Comfort: Whether served as a snack, appetizer, or dinner side, they’re sure to impress guests and family alike with their crispy texture and warm cheesy center.
Cultural Richness: Rooted in Colombian and Venezuelan cuisine, Arepas con Queso bring a taste of tradition and warmth into your kitchen that’s bound to spark joy during meal times.
Perfect Pairings: Enjoy them alongside fresh avocado or salsa for a burst of flavor that complements their cheesy goodness! For more meal ideas, check out my delicious Coconut Curry Soup or Pumpkin Curry Cozy.
Arepas con Queso Ingredients
For the Dough
• Masarepa (cornmeal) – A foundational ingredient that creates the perfect crispy texture; use precooked masarepa for optimal results.
• Water – Helps bind the cornmeal into a soft dough; make sure it’s at room temperature for easy mixing.
• Salt – Enhances the overall flavor; modify the amount to fit your taste preferences.
For the Cheese Filling
• Cheese (any melting cheese) – This provides that gooey, delicious center; consider using cheddar, gouda, or even feta for a unique twist.
For Frying
• Oil (for frying) – Crucial for creating a golden brown and crispy exterior; olive oil or vegetable oil are great options.
Step‑by‑Step Instructions for Arepas con Queso
Step 1: Prepare Dough
In a large mixing bowl, combine the masarepa and salt before slowly adding room temperature water. Use your hands to knead the mixture until it forms a smooth and pliable dough, about 2-3 minutes. The dough should feel soft but not sticky; if it is too dry, add a touch more water.
Step 2: Form Arepas
Divide the dough into equal portions, shaping each piece into a ball. Flatten each ball into a disc approximately ½ inch thick—this thickness ensures a crispy exterior with a gooey cheese center. Arrange the discs on a clean surface, ensuring they don’t touch, as they may stick together.
Step 3: Stuff with Cheese
Take one disc and place a generous spoonful of your chosen melting cheese in the center. Carefully fold the disc over, pinching the edges well to seal the cheese inside. Repeat this process for the remaining discs, ensuring each is well-sealed to prevent leakage during frying.
Step 4: Heat Oil
In a large skillet, pour enough oil to cover the bottom and heat it over medium heat. Allow the oil to warm for about 2-3 minutes until it glistens. This ensures the Arepas con Queso will fry properly, becoming golden brown and crispy on the outside.
Step 5: Fry Arepas
Gently place the stuffed arepas in the hot oil, being careful not to overcrowd the skillet. Fry each side for about 5-7 minutes, or until they achieve a beautiful golden brown color and a delightful crispiness. Turn them carefully using a spatula to avoid breaking the arepas.
Step 6: Serve
Once cooked, remove the Arepas con Queso from the skillet and let them drain on paper towels to absorb excess oil. Serve warm, paired with toppings such as fresh avocado or salsa. These crispy cheesy bites are sure to be a hit at any meal!

What to Serve with Arepas con Queso?
Transform your meal experience with delightful accompaniments that elevate these cheesy bites to a new level of flavor and satisfaction.
-
Fresh Avocado: Creamy and rich, ripe avocado adds a smooth texture that pairs beautifully with the crispy exterior and melty cheese.
-
Zesty Salsa: A vibrant salsa, whether mild or spicy, enhances the flavors of the arepas while providing a refreshing contrast.
-
Grilled Vegetables: Charred peppers, zucchini, and onions add a smoky sweetness that complements the savory goodness of the arepas.
-
Pickled Vegetables: Tangy, pickled onions or jalapeños bring a zesty crunch that balances the richness of the cheese.
-
Cilantro Lime Rice: Bright and fragrant, this dish adds a refreshing element alongside your arepas, making every bite more satisfying. This combination creates a delightful contrast of textures.
-
Cheesy Queso Dip: For those who crave extra cheese, a warm, gooey queso dip is a perfect dipping partner, taking cheesy indulgence to the next level.
-
Coconut Curry: The creamy coconut milk and spices in a simple coconut curry will envelop you in warmth and flavor, creating a harmonious meal with your arepas.
-
Sweet Plantains: Their natural sweetness offers a beautiful balance, making them a wonderful side that enhances the overall dining experience.
-
Horchata or Fresh Juice: Refreshing beverages like horchata or a citrusy juice can cleanse the palate, adding a delightful drink option to your meal.
Arepas con Queso Variations & Substitutions
Customize your Arepas con Queso to match your mood or dietary needs; the possibilities are endless and delicious!
-
Dairy-Free: Substitute cheese with a dairy-free melting option like cashew cheese for a luscious, creamy texture.
-
Spice it Up: Add chopped jalapeños or crushed red pepper flakes to the cheese filling for a delightful kick of heat that tantalizes the taste buds.
-
Herb-Infused: Mix fresh herbs like cilantro or parsley into the dough for a flavor boost that adds a bright, refreshing twist.
-
Savory Additions: Incorporate cooked meats like chorizo or shredded chicken into the cheese filling for a satisfying, hearty treat that’s sure to impress.
-
Whole Grain: Swap out traditional masarepa for whole grain cornmeal for a healthier, nuttier flavor that still delivers that satisfying crispiness.
-
Cheese Variety: Experiment with different cheeses; try gouda for a smoky finish, or feta for a briny, tangy twist that takes the arepas to new heights.
-
Sweet Treat: For a dessert spin, fill arepas with sweetened cream cheese and serve with a drizzle of honey or maple syrup for a delightful ending to any meal.
-
Stuff it Deep: Go for a double-stuffed option! Fill the arepas with two types of cheese or include a layer of sautéed veggies for added texture and flavor.
These customizations are just waiting for your culinary creativity! If you’re looking for more flavorful dishes, don’t forget to try my Coconut Curry Soup for a warm hug in a bowl, or enjoy my cozy Pumpkin Curry that pairs wonderfully with these crispy delights.
Expert Tips for Arepas con Queso
-
Perfect Dough: Always ensure the water is at room temperature; this prevents the dough from being too crumbly or too sticky, ensuring perfect Arepas con Queso every time.
-
Cheese Choices: Opt for cheeses that melt well, like mozzarella or gouda. They create that gooey center we’re all craving! Avoid hard cheeses, as they won’t achieve the desired texture.
-
Gentle Handling: When forming and stuffing the arepas, handle the dough gently. Overworking it can lead to tough arepas; you want them soft and tender.
-
Oil Temperature: Make sure your oil is hot enough before frying—if it’s not sizzling, the arepas can absorb excess oil instead of frying crispy, leading to disappointment.
-
Innovative Fillings: Don’t hesitate to get creative! Incorporate spices or chopped vegetables into your cheese filling for an exciting twist on classic Arepas con Queso.
-
Storage Savvy: If you have leftovers, store them in an airtight container. To reheat, use a skillet for that refreshing crunch or an oven for a more even warmth.
How to Store and Freeze Arepas con Queso
Fridge: Store leftover Arepas con Queso in an airtight container for up to 3 days. This keeps them fresh and ready to enjoy later!
Freezer: For longer storage, freeze the arepas in a single layer on a baking sheet. Once frozen, transfer them to a freezer-safe bag for up to 2 months.
Reheating: To reheat, place them in a skillet over medium heat for crispiness, or bake in the oven at 350°F (175°C) for about 10-15 minutes until warm. Enjoy your tasty Arepas con Queso!
Room Temperature: Avoid leaving cooked arepas at room temperature for more than 2 hours to prevent spoilage.
Make Ahead Options
These Arepas con Queso are perfect for meal prep enthusiasts! You can prepare the dough up to 24 hours in advance by mixing the masarepa, water, and salt, and storing it in an airtight container in the refrigerator. Also, consider stuffing the arepas with cheese ahead of time; just keep them in a single layer, separated by parchment paper, to prevent sticking. When you’re ready to serve, simply heat oil in a skillet and fry the arepas for about 5-7 minutes on each side until crispy and golden brown. By prepping ahead, you’ll save valuable time on busy weeknights while still enjoying these delicious cheesy bites just as tasty as when made fresh!
Arepas con Queso Recipe FAQs
What type of masarepa should I use for Arepas con Queso?
Absolutely, it’s best to use precooked masarepa specifically designed for arepas, which will give you the perfect texture and flavor. Brands like “P.A.N.” are popular options that ensure your arepas will turn out crispy and delicious.
How should I store leftover Arepas con Queso?
You can keep leftover Arepas con Queso in an airtight container in the fridge for up to 3 days. Make sure they are completely cooled before sealing to retain their crispy goodness. If you want to enjoy them later, consider freezing them.
Can I freeze Arepas con Queso?
Yes, you can! To freeze, place the cooked arepas in a single layer on a baking sheet and freeze until firm. Once frozen, transfer them to a freezer-safe bag. This way, they can be stored for up to 2 months. When you’re ready to enjoy them, simply reheat in a skillet for that delightful crunch!
What if my arepas split open while frying?
If this happens, don’t worry! It’s likely that the dough wasn’t sealed tightly enough around the cheese. For next time, ensure you pinch the edges firmly after folding them over. If they do burst in the oil, simply keep an eye on them and enjoy the crispy remnants—no part of an arepa goes to waste!
Are Arepas con Queso suitable for kids?
Very! Arepas con Queso are a great option for kids, as they’re fun to eat and can be filled with different cheeses and even hidden veggies! Just be cautious with younger children and ensure the arepas are cool enough to avoid burns from the gooey cheese inside.
Can I make Arepas con Queso in advance?
Absolutely! You can prepare the dough ahead of time and store it in the fridge for up to 24 hours before cooking. This makes meal prep a breeze! Just shape and fry them when you’re ready for a quick and delicious meal.

Arepas con Queso: Crispy Cheesy Bites for Any Meal
Ingredients
Equipment
Method
- In a large mixing bowl, combine the masarepa and salt before slowly adding room temperature water. Use your hands to knead the mixture until it forms a smooth and pliable dough, about 2-3 minutes.
- Divide the dough into equal portions, shaping each piece into a ball. Flatten each ball into a disc approximately ½ inch thick.
- Take one disc and place a generous spoonful of your chosen melting cheese in the center. Carefully fold the disc over, pinching the edges well to seal.
- Pour enough oil into a large skillet to cover the bottom and heat it over medium heat for about 2-3 minutes.
- Gently place the stuffed arepas in the hot oil and fry each side for about 5-7 minutes until golden brown and crispy.
- Once cooked, remove the Arepas con Queso from the skillet and let them drain on paper towels. Serve warm.
Leave a Reply