As I rummaged through my pantry on a warm afternoon, I stumbled upon the perfect ingredients for a quick yet delightful treat: creamy peanut butter, hearty oats, and a splash of maple syrup. My excitement bubbled over as I decided to whip up a batch of Peanut Butter Oat Cups. This no-bake recipe not only comes together in under 20 minutes but also holds the promise of being a crowd-pleaser among health-conscious friends and family. With options to make them gluten-free, vegan, and even adjustable in sweetness, these simple cups are a dessert you can feel good about indulging in! So, what do you say—are you ready to make these deliciously satisfying treats together?

Why are Peanut Butter Oat Cups irresistible?
Simplicity: This no-bake recipe comes together in just 20 minutes—perfect for a quick snack or dessert!
Versatile Options: Enjoy the flexibility of using your favorite nut or seed butter, and adjust the sweetness to your liking.
Healthy Indulgence: Made with wholesome ingredients, these cups are gluten-free, vegan, and filled with fiber, making them a guilt-free treat.
Crowd-Pleasing Flavor: The creamy peanut butter paired with rich chocolate is a combo that everyone will love, from kids to adults.
Perfect for Any Occasion: Whether it’s a weekday pick-me-up or a dessert for a gathering, these cups fit right in at any time! For more delicious combinations, try these fun variations or check out how to make perfectly roasted mushrooms to complement your meals.
Peanut Butter Oat Cups Ingredients
For the Base
• Peanut Butter – Provides creaminess and structure; you can substitute with any nut or seed butter to accommodate allergies.
• Rolled Oats – Acts as the base, offering texture and fiber; quick oats work, but the final texture may differ.
• Maple Syrup – Adds natural sweetness; can be replaced with honey, agave, or omitted for a less sweet version.
For the Filling
• Additional Peanut Butter – Used for filling within the oat cups, and can be increased for a stronger flavor.
• Protein Powder – Optional; adds nutritional value and can be mixed into the filling for added benefits.
For the Coating
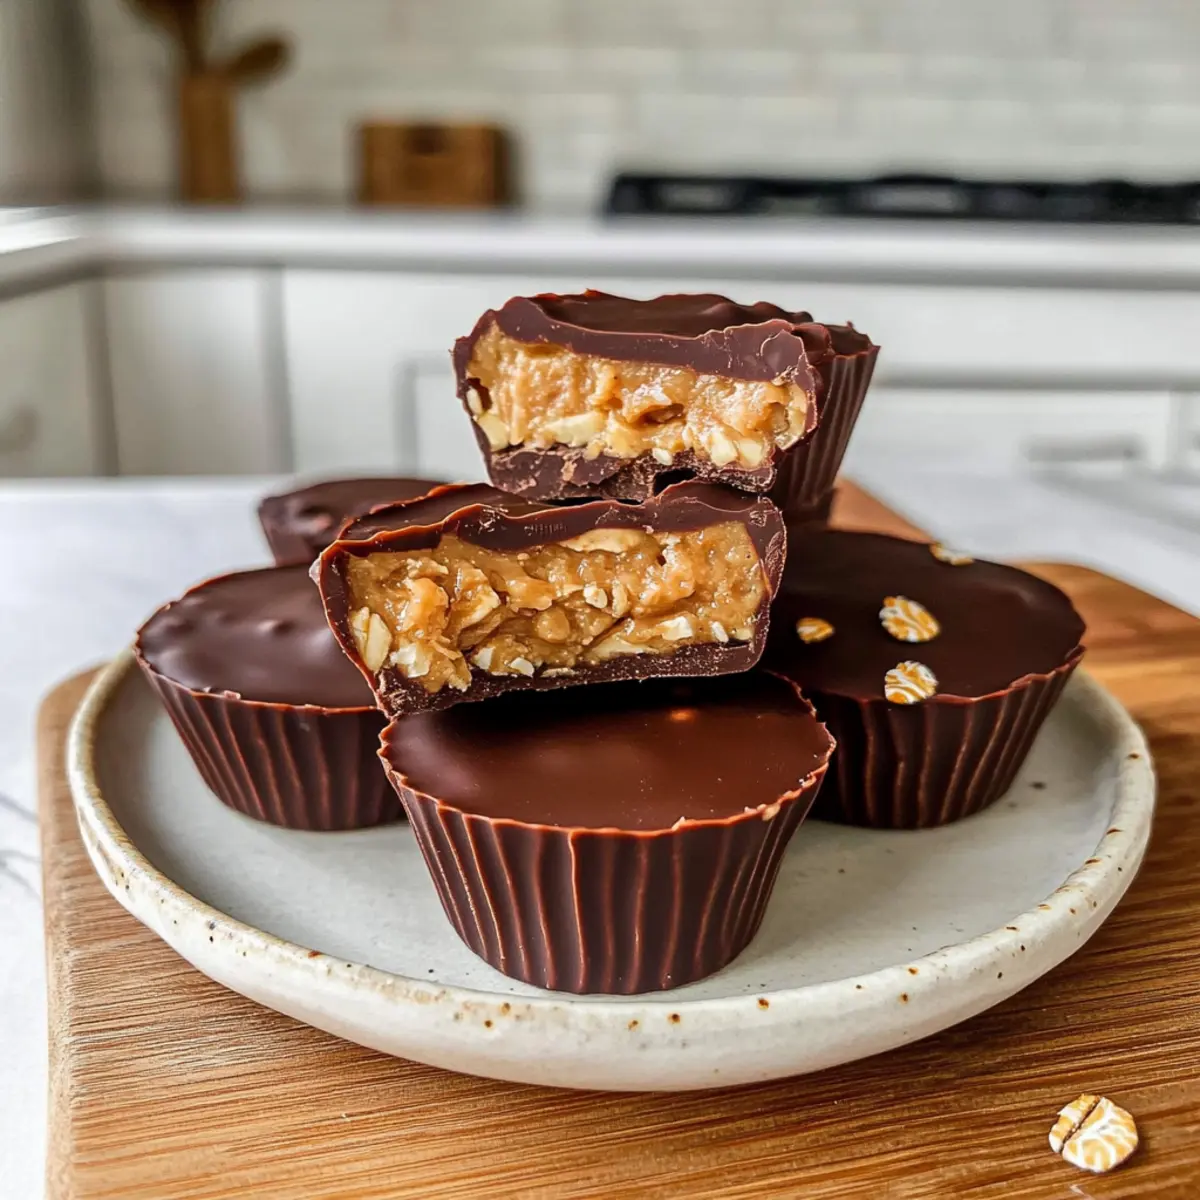
• Chocolate Chips – For coating; melt into a rich layer on top that enhances the peanut butter flavor. Vegan chocolate chips are perfect for a dairy-free option.
• Flakey Sea Salt – Optional garnish that enhances sweetness and flavor, making these Peanut Butter Oat Cups truly irresistible.
Step‑by‑Step Instructions for Peanut Butter Oat Cups
Step 1: Mix the Base Ingredients
In a mixing bowl, combine 1 cup of creamy peanut butter and a ⅓ cup of maple syrup. Use a sturdy spatula or mixing spoon to thoroughly blend until the mixture is smooth and uniform—about 1-2 minutes. This creates the flavorful, sweetened base for your Peanut Butter Oat Cups that binds the oats and filling together.
Step 2: Add the Rolled Oats
Stir in 2 cups of rolled oats to your peanut butter mixture. Ensure that the oats are fully coated by mixing vigorously for another 2-3 minutes. The oats should be well-integrated, creating a thick, dough-like consistency that holds everything together—a visual cue to look for is a sticky and cohesive blend.
Step 3: Prepare the Molds
Grab your silicone molds (this helps with easy removal) and spoon about 2 tablespoons of the mixture into each cavity. Press the mixture down firmly using the back of a spoon or a cookie scoop, creating an even layer. Aim for a flat top, which will help when you add the filling and chocolate later.
Step 4: Add the Filling
Dollop another teaspoon of peanut butter on top of each oat cup. For added protein, consider mixing a scoop of protein powder into the peanut butter before dolloping it on each cup. This step enhances the flavor and nutritional value while creating a delicious surprise within the Peanut Butter Oat Cups.
Step 5: Freeze to Set
Place your filled molds in the freezer and let them chill for about 20 minutes. This will help the layers firm up nicely, making it easier to add the chocolate topping. Check that the cups are set and firm to the touch before moving on to the next step.
Step 6: Melt the Chocolate
While the oat cups are chilling, melt 1 cup of chocolate chips in a microwave-safe bowl. Heat in 30-second intervals, stirring in between, until the chocolate is smooth and glossy—this should take about 1-2 minutes total. To achieve a better melting consistency, you can add a teaspoon of coconut oil if desired.
Step 7: Coat the Oat Cups
Once your Peanut Butter Oat Cups are set, carefully pour or spoon the melted chocolate over each cup, covering them completely. You can give them a gentle shake to even out the chocolate layer. Visually, they should look glossy and decadent.
Step 8: Final Freeze
Return the oat cups to the freezer for another 20 minutes, allowing the chocolate to harden fully. This will ensure that your Peanut Butter Oat Cups are perfectly chilled and ready to be enjoyed without any mess.
Step 9: Unmold and Garnish
After the final freeze, gently push the edges of the silicon molds to release each Peanut Butter Oat Cup. For the finishing touch, sprinkle a pinch of flakey sea salt on top of each cup to enhance flavor. Enjoy these delicious treats on their own or share them with friends and family!

Expert Tips for Peanut Butter Oat Cups
-
Silicone Molds Are Key: Using silicone molds will make removing your Peanut Butter Oat Cups a breeze and prevent any sticking.
-
Freezing Time Matters: Adjust the freezing times based on the creaminess of your peanut butter; smoother varieties may need more time to set completely.
-
Chocolate Consistency: Adding a bit of coconut oil to your chocolate when melting enhances its smoothness, making for a glossier finish on your cups.
-
Sweetness Control: If you prefer less sweetness, start with half the recommended maple syrup and taste-test before adding more—it’s always easier to add than to take away!
-
Flavor Variations: Try adding a sprinkle of cinnamon or a splash of vanilla extract to the oat mixture for a delightful twist that elevates the flavor of your Peanut Butter Oat Cups.
What to Serve with No-Bake Peanut Butter Oat Cups
Indulging in these delightful oat cups opens the door to an array of delicious pairings that elevate your meal experience.
-
Fresh Fruit Salad: A vibrant mix of seasonal fruits adds a refreshing contrast and balances the richness of the oat cups. Think zesty citrus or juicy berries.
-
Coconut Yogurt: This creamy, dairy-free yogurt brings a delightful tang that complements the sweetness of the peanut butter. Top with a sprinkle of granola for added crunch!
-
Coffee or Tea: A warm cup enhances the flavors of the Peanut Butter Oat Cups while giving a comforting touch—ideal for any time of day, especially as an afternoon treat.
-
Nutty Granola: A handful of crunchy granola not only boosts texture but provides an extra layer of nutty flavor that harmonizes beautifully with the oats.
-
Chocolate Dipped Bananas: More chocolate is always a good idea! The soft, sweet bananas offer a luscious contrast to the chewy oat cups while mirroring their flavor profile.
-
Dark Chocolate Almond Milk: This rich, creamy drink is an indulgent choice that pairs perfectly with these oat cups, making them feel like a truly decadent dessert.
-
Carrot Sticks with Hummus: For a savory option, the crunch of carrot sticks paired with creamy hummus rounds out the meal beautifully, keeping things light while satisfying your cravings.
-
Vanilla Ice Cream: For something truly indulgent, serving a small scoop of vanilla ice cream alongside your Peanut Butter Oat Cups creates a delightful combination of flavors and temperatures.
-
Chia Seed Pudding: A nutritious side that’s also creamy and rich, chia seed pudding pairs well and adds a healthful boost to your sweet treat experience.
Peanut Butter Oat Cups Variations
Feel free to embark on a delicious adventure by customizing your Peanut Butter Oat Cups for a unique twist!
-
Nut-Free: Swap peanut butter for sunflower seed butter for a creamy, nut-free delight that everyone can enjoy.
-
Lower Sweetness: Omit the maple syrup completely or use mashed bananas for natural sweetness without added sugars. A tasty alternative!
-
Protein Boost: Mix in your favorite protein powder directly into the base for a nutrient-dense snack that satisfies cravings.
-
Chocolate-Free Delight: Skip the chocolate topping entirely and sprinkle the cups with shredded coconut or chopped nuts instead. A new texture awaits!
-
Seasonal Spices: Enhance flavors by adding a dash of cinnamon or pumpkin spice to the oat mixture for a cozy, seasonal twist.
-
Crunchy Surprise: Add in chopped nuts or seeds to the base mixture for a delightful crunch that contrasts beautifully with the creamy richness.
-
Fruity Twist: Incorporate dried fruits like cranberries or raisins into the oat mixture for a sweet surprise that pairs perfectly with peanut butter.
-
Gourmet Finish: Drizzle melted chocolate mixed with a hint of espresso over the top, giving these cups an elevated coffee-infused flavor that’s perfect for coffee lovers!
Now that you have some fun variations to choose from, dive into your kitchen and craft the perfect version of these Peanut Butter Oat Cups or enjoy them alongside some perfectly roasted mushrooms for a delightful meal!
How to Store and Freeze Peanut Butter Oat Cups
Fridge: Keep your Peanut Butter Oat Cups in an airtight container for up to 3 days; this will maintain a softer, more chewy texture for a delightful snack anytime.
Freezer: For longer storage, freeze the cups in a single layer. Once hardened, transfer them to a freezer-safe container or bag for up to 2 months; simply allow them to soften slightly at room temperature before enjoying.
Individual Wrapping: For easy grab-and-go snacks, wrap each cup in parchment paper or plastic wrap before freezing; this helps prevent freezer burn and makes for quick access.
Reheating: If desired, you can microwave the frozen cups for about 10-15 seconds to enjoy them warm; however, they are delicious straight from the freezer as well!
Make Ahead Options
These Peanut Butter Oat Cups are perfect for meal prep! You can prepare the oat mixture and portion it into silicone molds up to 24 hours ahead of time—just cover the molds with plastic wrap to keep them fresh. When you’re ready to finish the recipe, all you need to do is add the dollop of peanut butter and freeze for 20 minutes. After freezing, melt the chocolate and pour it over. For the best flavor and texture, refrigerate the finished cups for up to 3 days or freeze for longer storage. Don’t worry; they’ll still be just as delicious when you’re ready to indulge!

Peanut Butter Oat Cups Recipe FAQs
How do I choose ripe ingredients for my Peanut Butter Oat Cups?
Absolutely! For the best flavor and texture, select creamy peanut butter—opt for natural varieties without added sugars or preservatives. If using substitutes like almond or sunbutter, check the consistency; they should be smooth and easy to mix. As for oats, rolled oats work best, while quick oats can give a different texture, so choose according to your preference!
What are the best storage methods for my Peanut Butter Oat Cups?
Very! You can store your Peanut Butter Oat Cups in an airtight container in the fridge for up to 3 days to maintain a softer texture. If you prefer them firmer, I recommend freezing them! Just place them in a single layer until they harden, then transfer to a freezer-safe bag or container where they will keep for up to 3 months.
Can I freeze Peanut Butter Oat Cups? How?
Absolutely! To freeze your Peanut Butter Oat Cups, first, let them set in the freezer for at least 20 minutes. Once they are firm, wrap each cup individually in parchment paper or plastic wrap to prevent freezer burn. Then, pack them in a freezer-safe container. They will remain delicious for up to 3 months! When you’re ready to enjoy, allow them to sit at room temperature for 10-15 minutes before digging in!
How can I troubleshoot if my Peanut Butter Oat Cups don’t set properly?
Very! If your oat cups are not setting, it may be due to the type of peanut butter used; creamy varieties can take longer. Try freezing them for an extra 10-20 minutes. You can also check the original mixture—it should be sticky and hold together well. If it appears too crumbly, add a touch more maple syrup or peanut butter to help bind the ingredients together.
Are there any dietary considerations I should be aware of for the Peanut Butter Oat Cups?
Absolutely! These Peanut Butter Oat Cups can be made vegan and gluten-free, depending on the ingredients you choose. Always check that your chocolate chips are dairy-free for a fully vegan treat, and if you or anyone you share with has nut allergies, consider using seed butters like sunbutter instead of peanut butter. It’s always important to read labels for any potential allergens!
Can I modify the sweetness level in my Peanut Butter Oat Cups?
Absolutely! You can easily adjust the sweetness to suit your taste. If you find maple syrup too sweet, start with half the amount and taste as you go, adding more slowly until you reach your desired level. Alternatively, you could use a sugar-free sweetener or leave it out entirely for a less sweet treat. The more the merrier!
Delicious No-Bake Peanut Butter Oat Cups You’ll Love
Ingredients
Equipment
Method
- Combine 1 cup of peanut butter and 1/3 cup of maple syrup in a mixing bowl until smooth.
- Stir in 2 cups of rolled oats until fully coated and a dough-like consistency is reached.
- Spoon about 2 tablespoons of the mixture into silicone molds and press down.
- Dollop 1 teaspoon of peanut butter on top of each cup.
- Freeze for about 20 minutes until set.
- Melt 1 cup of chocolate chips in intervals until smooth.
- Pour melted chocolate over oat cups to cover completely.
- Return to freezer for another 20 minutes to harden.
- Gently unmold and sprinkle with flaky sea salt before serving.
Leave a Reply