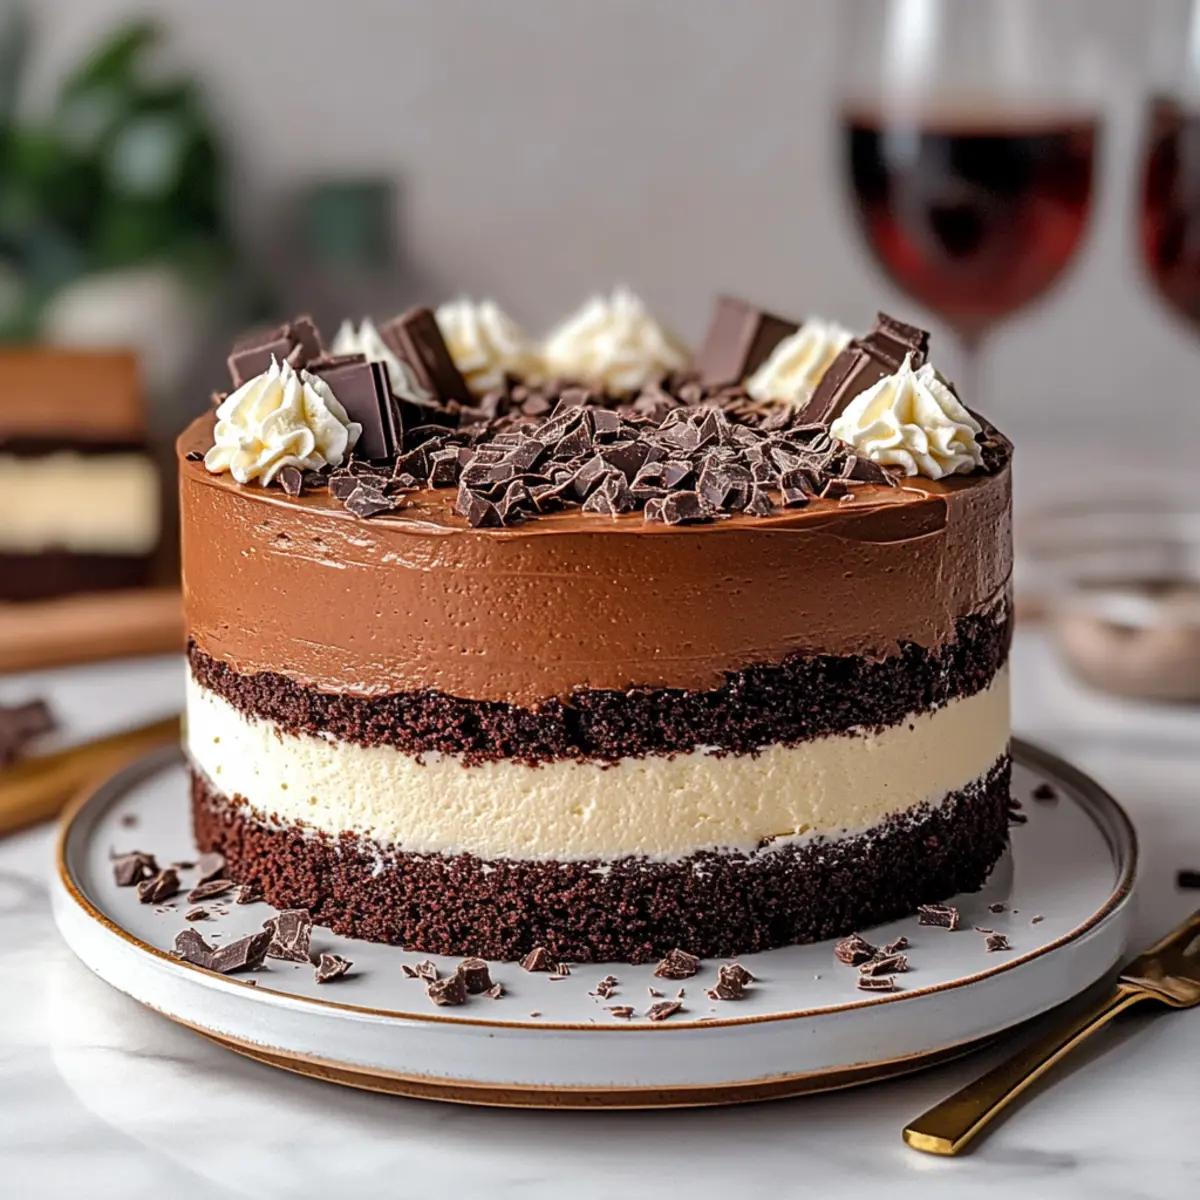
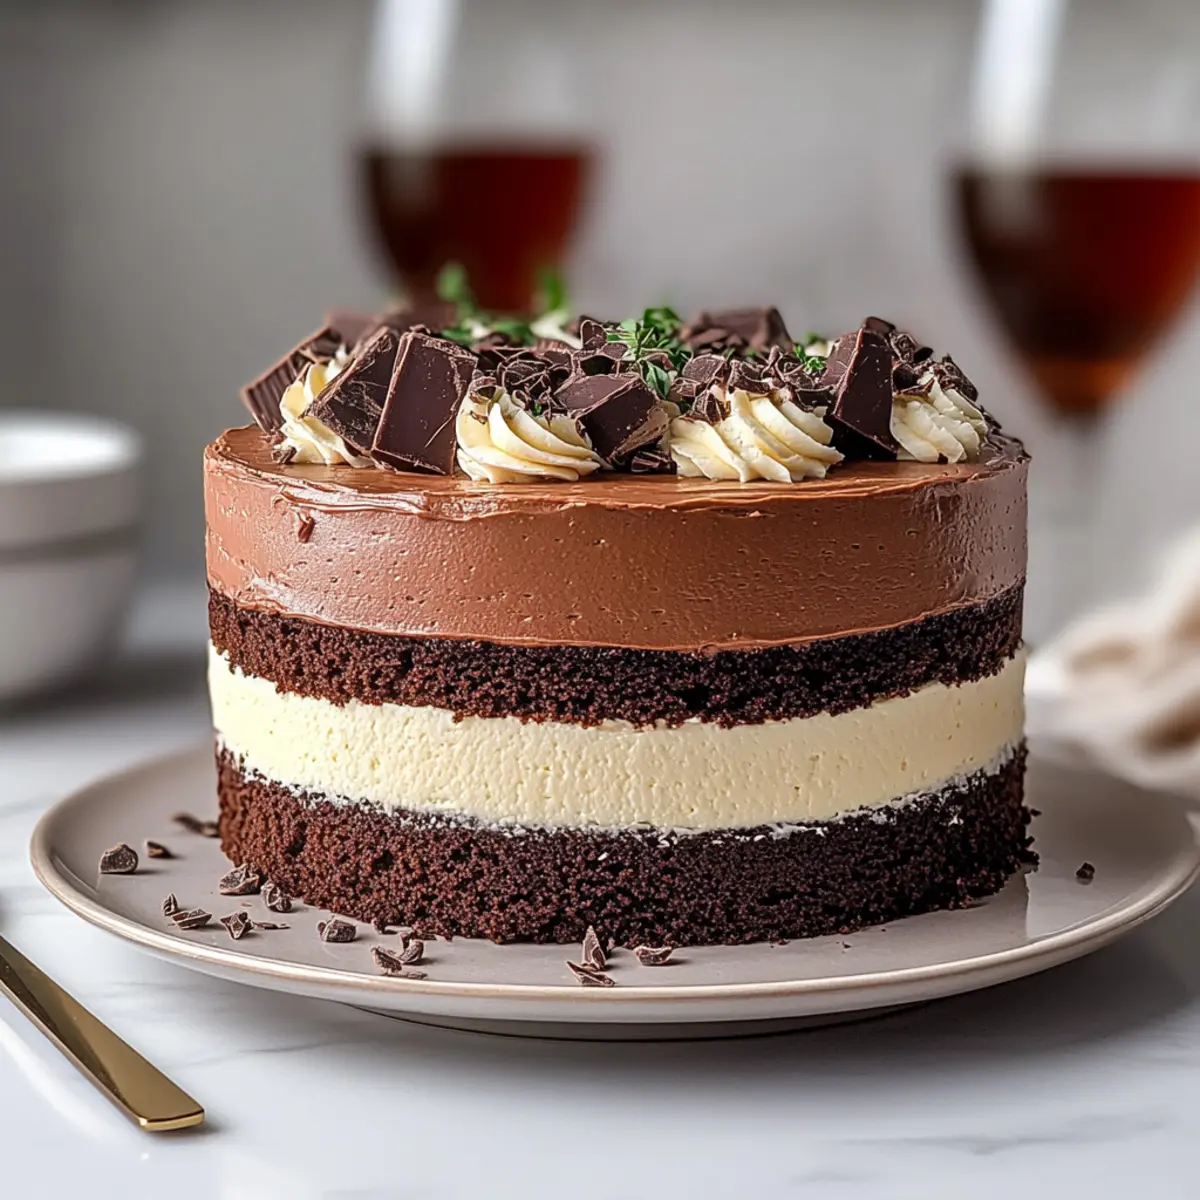
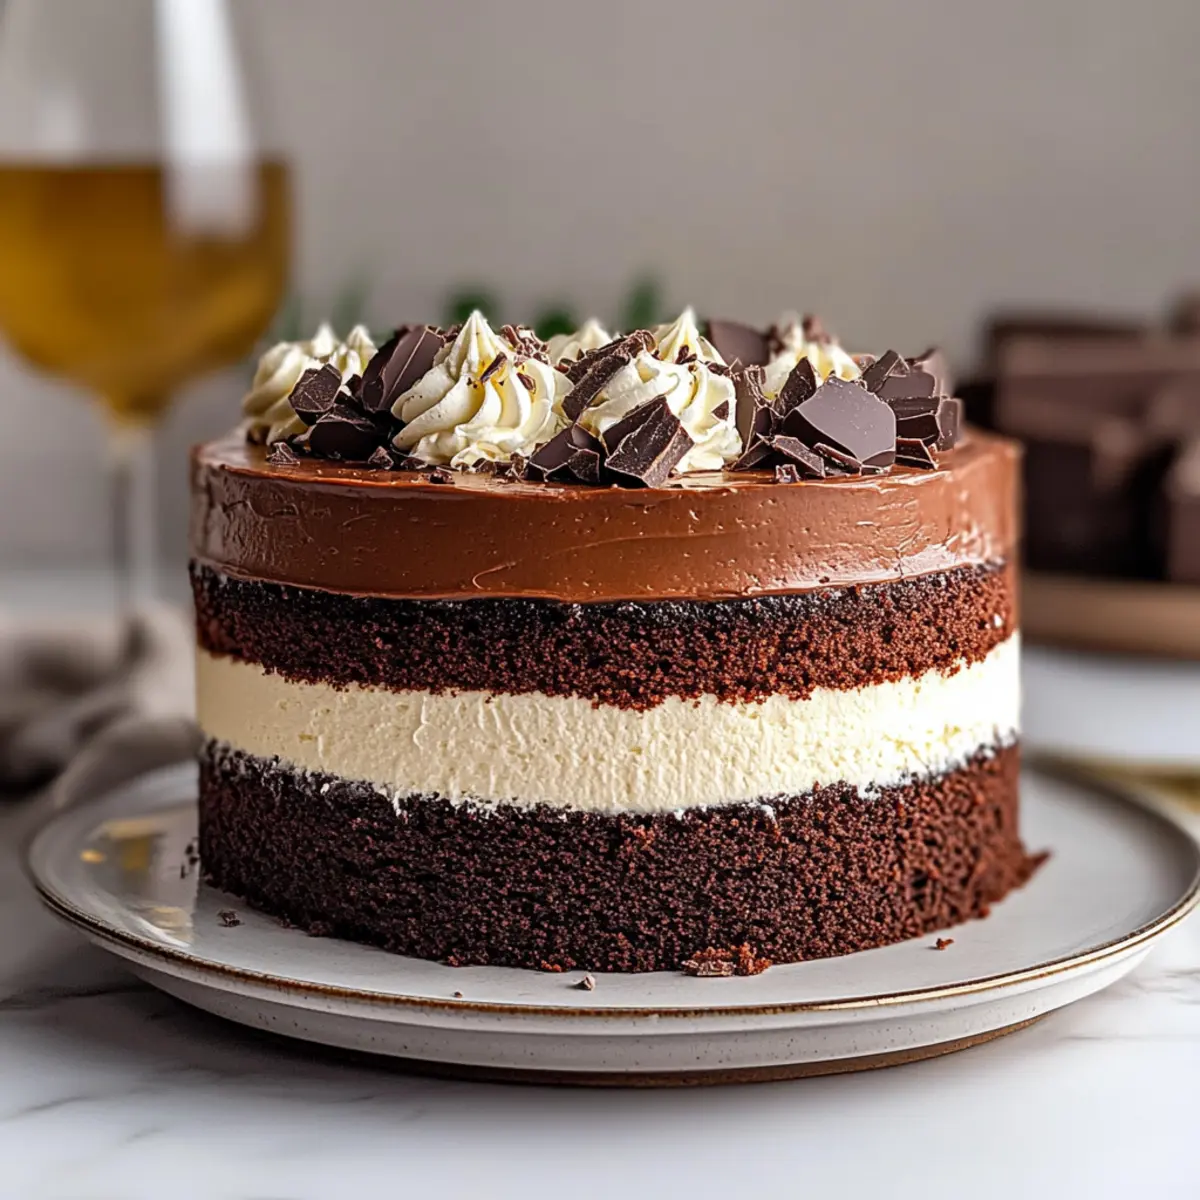
As I stood in my kitchen, the delightful aroma of melting chocolate wafted through the air, transforming an ordinary afternoon into a tempting adventure. This is how the Tuxedo Cake came to life—a stunning triple chocolate mousse cake that’s as indulgent as it is beautiful. Packed with layers of dark, milk, and white chocolate, this dessert is a showstopper that’s surprisingly easy to make. With gluten-free and dairy-free options available, it’s perfect for every guest at the table, whether they’re a chocolate lover or just looking for a light, sophisticated treat. Plus, it can be prepped ahead of time, making your hosting duties a breeze. Who wouldn’t want to impress their friends with a dessert that looks as amazing as it tastes? Ready to dive into the world of chocolate decadence? Let’s get started on creating this spectacular masterpiece together!

Why is Tuxedo Cake a Must-Try?
Layers of Flavor: This Tuxedo Cake features a stunning combination of dark, milk, and white chocolate mousses that create an explosion of taste in every bite. Versatile Options: With gluten-free and dairy-free variations, everyone can indulge in this dessert without compromise. Effortless Elegance: The striking appearance transforms any gathering into a celebration, while the preparation is surprisingly easy. Impress Your Guests: Serve this cake for special occasions or as a delightful treat during casual get-togethers—it’s bound to leave your friends raving! If you enjoy delightful desserts like Gingerbread Latte Cake or Blackberry Velvet Gothic Cake, this Tuxedo Cake will elevate your dessert game even further!
Tuxedo Cake Ingredients
• Prepare to create a stunning Tuxedo Cake layered with exquisite flavors!
For the Cake
- All-Purpose Flour – Provides structure and stability for the cake; substitute with almond flour for a gluten-free option.
- Granulated Sugar – Adds sweetness and moisture, balancing the rich chocolate flavors.
- Cocoa Powder – Provides the deep chocolate flavor base for this indulgent cake.
- Baking Powder & Baking Soda – Essential leavening agents that help the cake rise to perfection.
- Whole Milk – Contributes moisture and richness for a velvety texture.
- Eggs – Act as a binding agent, giving the cake its desired structure.
- Sour Cream – Enhances moisture and adds a slight tang; swap with Greek yogurt for a lighter version.
- Vegetable Oil – Keeps the cake moist and tender, ensuring an irresistible bite.
- Espresso Powder – Intensifies the chocolate flavor, giving depth to the cake.
- Vanilla Extract – Adds a lovely depth of flavor that beautifully complements the chocolate.
- Salt – Balances sweetness and enhances overall flavor complexity.
- Hot Water – Thin the batter for a smooth texture, making it easy to pour into pans.
For the Mousses
- Heavy Cream – Essential for both mousse and ganache, creating a rich, creamy texture.
- Dark Chocolate – Provides depth and richness for the dark chocolate mousse layer.
- White Chocolate – Offers sweetness and creaminess, forming the heavenly white chocolate mousse.
- Milk Chocolate – Adds another layer of flavor, creating complexity in the mousses.
- Cornstarch – Helps to thicken the custard for a luscious mousse consistency.
For the Ganache
- Milk Chocolate – Used in the ganache for a glossy finish and delightful sweetness.
- Heavy Cream – When heated, creates a silky smooth ganache that coats the cake beautifully.
This Tuxedo Cake is sure to impress with its rich chocolate layers and creamy mousses, making it a delightful choice for any celebration!
Step‑by‑Step Instructions for Tuxedo Cake
Step 1: Preheat the Oven and Prepare Pans
Begin by preheating your oven to 350°F (175°C). While that heats, take two 9-inch round cake pans and generously grease them with vegetable oil or butter. For an easy release, line the bottom of each pan with parchment paper and grease the parchment as well. This prep ensures your Tuxedo Cake layers won’t stick!
Step 2: Combine Dry Ingredients
In a large mixing bowl, whisk together the all-purpose flour, granulated sugar, cocoa powder, baking powder, baking soda, and salt until evenly blended. This mixture creates the delicious chocolate base for your Tuxedo Cake. Make sure the dry ingredients are well combined for a uniform cake texture, which is key to achieving that mouthwatering indulgence.
Step 3: Mix Wet Ingredients
In a separate bowl, beat together the whole milk, eggs, sour cream, vegetable oil, espresso powder, and vanilla extract. Ensure everything is well-incorporated, as this creamy mixture adds moisture and flavor to your cake. Once combined, slowly pour this wet mixture into the bowl of dry ingredients, mixing gently until just combined to keep that fluffy texture intact.
Step 4: Incorporate Hot Water and Bake
Next, carefully stir in the hot water until the batter becomes smooth and easily pourable. This step is crucial for achieving a moist cake texture. Divide the batter evenly between the prepared cake pans and place them in the preheated oven. Bake for 30-35 minutes, or until a toothpick inserted in the center comes out clean. This is the moment when your kitchen will start to smell like chocolate heaven!
Step 5: Cool the Cakes
Once baked, remove the cake pans from the oven and let them cool for 10 minutes. Gently run a knife around the edges to loosen the cakes, then carefully invert them onto wire racks to cool completely for at least 2 hours. This cooling time is essential to ensure that your Tuxedo Cake layers are stable for the mousse assembly.
Step 6: Make the Chocolate Mousses
While the cakes cool, heat 1 cup of heavy cream in a saucepan over medium heat until it’s simmering. In a separate bowl, whisk together the egg yolks, sugar, and cornstarch until smooth. Gradually add the hot cream to the egg yolk mixture, whisking continuously to avoid curdling. Return it to the heat and cook until thickened, about 5 minutes. Divide the thickened mixture into two bowls, adding dark chocolate to one and white chocolate to the other, stirring until fully melted.
Step 7: Fold in Whipped Cream
In another bowl, whip the remaining heavy cream to soft peaks. Gently fold half of the whipped cream into the dark chocolate mixture and the other half into the white chocolate mixture. This step adds a light and airy consistency to each mousse, ensuring your Tuxedo Cake has those rich but fluffy layers that melt in your mouth.
Step 8: Assemble the Cake
Place one cooled cake layer on a serving plate. Spread the dark chocolate mousse evenly over the first layer, creating a luscious base. Carefully add the second cake layer on top, and then spread the white chocolate mousse over this layer. To let the flavors meld, refrigerate the cake for at least 2 hours, allowing the mousses to set beautifully.
Step 9: Prepare the Ganache
For the ganache, heat a cup of heavy cream until it’s steaming but not boiling. Pour it over the chopped milk chocolate in a bowl and let it sit for 5 minutes. Stir gently until the mixture is smooth and glossy, which is perfect for drizzling. Once the ganache is ready, remove the cake from the fridge and pour the ganache over the assembled Tuxedo Cake, letting it drip down the sides for that stunning effect.
Step 10: Final Chill and Serve
After covering the cake with ganache, return it to the refrigerator for an additional 30 minutes to allow the ganache to set. Once ready, slice through the layers with a warm knife for clean edges, revealing the beautiful mousse designs inside. Your Tuxedo Cake is now complete and ready to impress!
Tuxedo Cake: Endless Customization Ideas
Feel free to get creative with this Tuxedo Cake—there are so many delightful twists and turns you can add!
-
Gluten-Free: Use almond flour instead of all-purpose flour for a gluten-free version that doesn’t skimp on flavor. It’s a wonderful way to ensure everyone can join in on the celebration!
-
Dairy-Free: Switch out heavy cream for coconut cream and use dairy-free chocolate to make this cake accessible for dairy-sensitive friends. The coconut adds a subtle tropical note that pairs beautifully with chocolate.
-
Espresso Enhancement: Boost the flavor by increasing the espresso powder and incorporating coffee liqueur. This will deepen the chocolate’s intensity, creating a rich tasting experience!
-
Seasonal Berry Twist: Layer fresh raspberries or strawberries between the mousse layers for a delightful tartness. The berries not only enhance flavor but also add a pop of color to your presentation.
-
Lighter Version: Swap sour cream with Greek yogurt and reduce the sugar to make a lighter version of this indulgent treat without compromising on rich flavors. Your guests will love a guilt-free dessert!
-
Nutty Variation: Incorporate toasted hazelnuts into the ganache and sprinkle sliced almonds between the cake layers for a delightful crunch. This adds texture and a beautiful nutty aroma that complements the chocolate.
-
Serving Suggestions: Consider serving the Tuxedo Cake with a side of espresso or a glass of bubbly champagne for a sophisticated touch. For ultimate decadence, garnish the top with edible gold leaf to elevate both flavor and presentation.
For more dessert inspiration, why not check out the delightful Strawberry Crunch Cheesecake or try a slice of the Gingerbread Latte Cake—both are sure to charm your guests just like this Tuxedo Cake!
Make Ahead Options
These Tuxedo Cake components are perfect for meal prep, allowing you to savor more time with your guests on the big day! You can bake the cake layers up to 24 hours in advance; just let them cool completely, wrap them tightly in plastic wrap, and refrigerate. The mousse can also be prepared up to 3 days ahead; simply fold in the whipped cream, cover them tightly to prevent any skin formation, and refrigerate until you’re ready to assemble. When it’s time to serve, layer the cooled cakes with the mousses, pour the ganache over, and let it set in the fridge for a quick 30 minutes. This way, you’ll enjoy a beautiful, delicious dessert that’s just as delightful as if you had made it from scratch that same day!
What to Serve with Tuxedo Cake?
Imagine the sweet symphony of flavors as you indulge in Tuxedo Cake, complemented by perfect pairings that elevate the whole experience.
-
Fresh Berries:
Juicy strawberries or raspberries add a tart contrast that balances the rich mousse. -
Vanilla Ice Cream:
A scoop of creamy vanilla ice cream provides a delightful temperature contrast to the rich chocolate layers. -
Espresso or Coffee:
An invigorating cup of coffee enhances chocolate flavors and offers a warm, comforting vibe to your dessert. -
Whipped Cream:
A dollop of fresh whipped cream adds extra creaminess without overshadowing the cake’s luxurious texture. -
Chocolate-Covered Strawberries:
These decadent treats echo the cake’s theme while providing a fresh bite to balance its richness. -
Champagne:
The light bubbles of champagne cleanse the palate, making each bite of cake taste even more divine. -
Nutty Biscotti:
Crisp biscotti offers a crunchy texture that plays against the cake’s softness, adding contrast in both flavor and texture. -
Mint Tea:
A soothing cup of mint tea brightens the palate, making it a refreshing accompaniment after a rich dessert.
These pairings will enhance your Tuxedo Cake experience, leaving everyone at your table eagerly anticipating each mouthful!
How to Store and Freeze Tuxedo Cake
Fridge: Keep your Tuxedo Cake in an airtight container or cover it with plastic wrap to maintain freshness for up to 3-4 days. This helps preserve the delicious mousse layers.
Freezer: Individual slices of Tuxedo Cake can be frozen for up to three months. Wrap each slice tightly in plastic wrap or foil to prevent freezer burn.
Assembling Ahead: You can prepare the cake layers up to 2 days in advance and store them in the fridge, ensuring they’re well-wrapped to retain moisture and flavor.
Reheating: If you prefer your cake slightly warm, use the microwave for a few seconds; just be careful not to overheat and melt the mousse layers.
Expert Tips for Tuxedo Cake
-
Perfect Mousse Texture: Gently fold the whipped cream into the chocolate mixtures to maintain the lightness of the mousses. Avoid over-mixing, as it can deflate the airiness.
-
Smooth Ganache Finish: Allow the ganache mixture to cool for 5 minutes before pouring it over the cake. This creates a luscious, glossy finish without pooling everywhere.
-
Layer Stability: To keep your cake layers from sliding, ensure they are completely cool before assembling. Refrigerating the cake helps the layers set firmly.
-
Clean Cuts: For the best presentation, dip your knife in warm water before slicing the Tuxedo Cake. This will help create clean edges for a beautiful reveal.
-
Storage Savvy: To keep the Tuxedo Cake fresh, cover it with plastic wrap or store it in an airtight container in the refrigerator for up to 4 days.
Tuxedo Cake Recipe FAQs
What type of flour should I use for the Tuxedo Cake?
For the Tuxedo Cake, all-purpose flour provides the best structure; however, you can easily substitute it with almond flour for a gluten-free option. Just keep in mind that the texture may change slightly and could result in a denser cake.
How should I store the Tuxedo Cake after making it?
Store your Tuxedo Cake in an airtight container or tightly cover it with plastic wrap if you’re using a cake stand. It will stay fresh in the refrigerator for about 3-4 days. This helps to maintain the delicious moisture of the mousse layers, so every slice remains as luscious as the first!
Can I freeze the Tuxedo Cake?
Absolutely! You can freeze individual slices of Tuxedo Cake for up to three months. Just wrap each slice tightly in plastic wrap and then in foil to combat freezer burn. When you’re ready to enjoy a slice, let it thaw in the fridge overnight for the best texture.
What if my mousse layers don’t set properly?
If your mousse layers don’t set as expected, it might be due to not cooking the custard mixture long enough or not whisking the egg yolks properly with the sugar and cornstarch. If it seems too runny, you can gently reheat it on the stove, whisking constantly until it’s thickened. Alternatively, you can add a splash more of cornstarch mixed with water to the hot mixture, then cool it in the fridge before folding in your whipped cream.
Are there any dietary considerations for the Tuxedo Cake?
Yes! The Tuxedo Cake can easily cater to various dietary restrictions. For a gluten-free version, substitute the all-purpose flour with almond flour. To make it dairy-free, replace the heavy cream with coconut cream and choose dairy-free chocolate options. Always check for any allergies with guests as varied chocolate brands may contain different allergens.
Tuxedo Cake: Indulge in a Decadent Triple Chocolate Dream
Ingredients
Equipment
Method
- Preheat the oven to 350°F (175°C) and prepare two 9-inch round cake pans by greasing and lining them with parchment paper.
- In a large mixing bowl, whisk together the dry ingredients: flour, sugar, cocoa powder, baking powder, baking soda, and salt until well blended.
- In a separate bowl, combine the wet ingredients: milk, eggs, sour cream, vegetable oil, espresso powder, and vanilla extract, then mix them well.
- Gradually add the wet mixture to the dry ingredients and mix gently until just combined. Stir in the hot water until the batter is smooth.
- Divide the batter evenly between the prepared pans and bake for 30-35 minutes, or until a toothpick comes out clean.
- Let the cakes cool in the pans for 10 minutes, loosen the edges, and invert them onto wire racks to cool completely for at least 2 hours.
- For the mousses, heat 1 cup of heavy cream until simmering. Whisk egg yolks, sugar, and cornstarch in a bowl, and gradually add the hot cream, whisking continuously.
- Return the mixture to heat and cook until thickened, about 5 minutes. Divide and stir dark chocolate into one bowl and white chocolate into another.
- Whip the remaining heavy cream to soft peaks, then fold into the chocolate mixtures to create fluffy mousses.
- Assemble the cake by placing one layer on a serving plate. Spread dark chocolate mousse on top, add the second layer, and spread white chocolate mousse. Refrigerate for at least 2 hours.
- For the ganache, heat heavy cream until steaming, pour it over chopped milk chocolate, let it sit for 5 minutes, and stir until smooth.
- Pour the ganache over the cooled assembled cake and let it set in the refrigerator for 30 minutes before slicing.
Leave a Reply