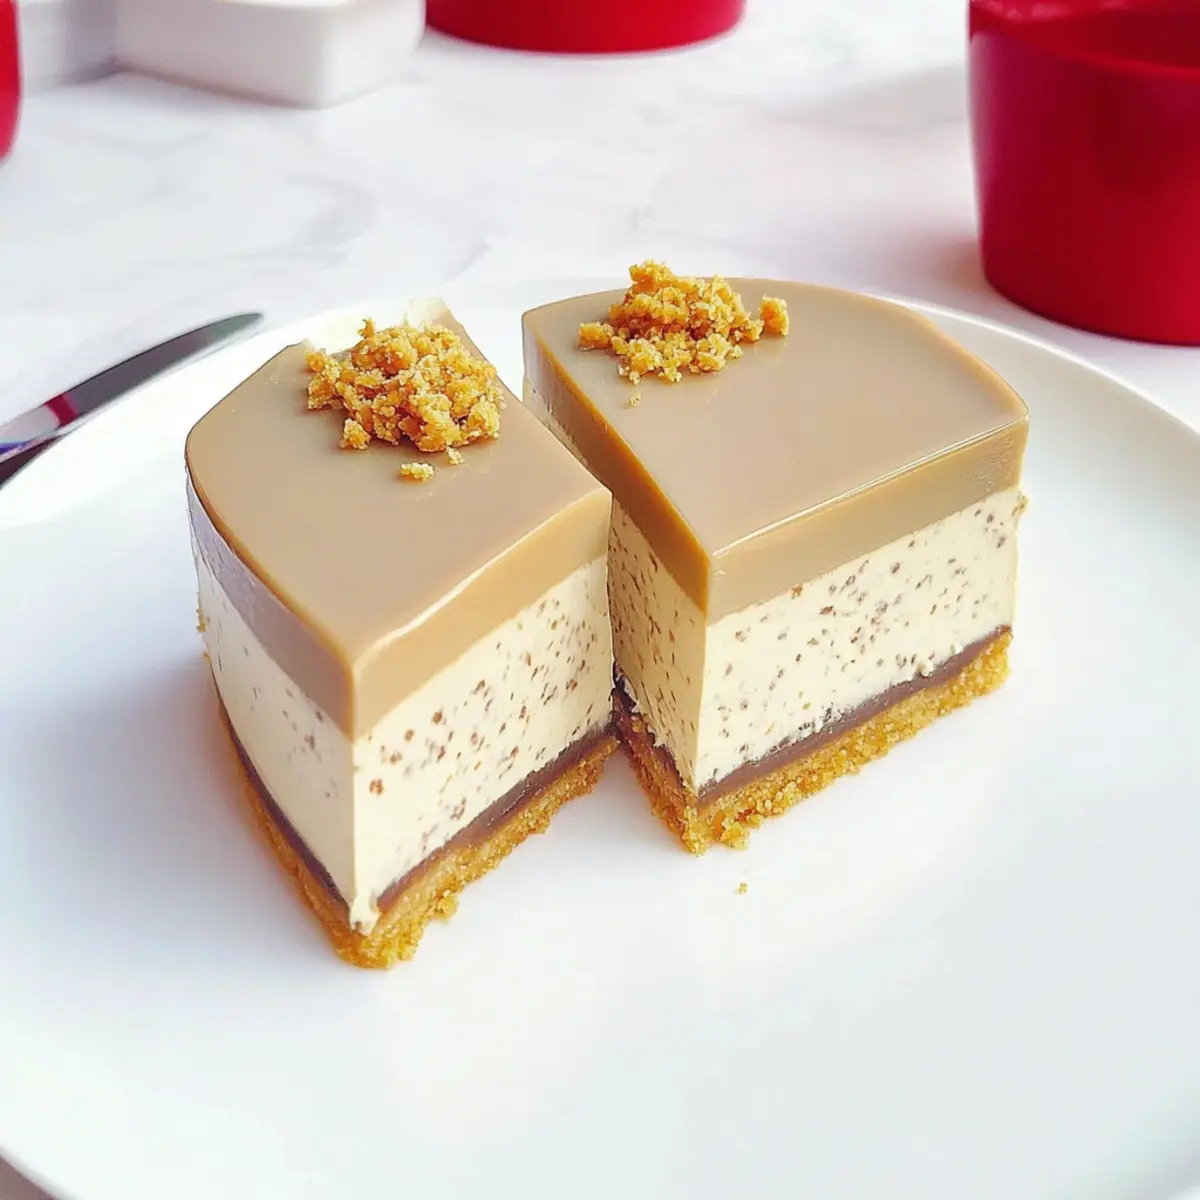
“Would you believe this stunning dessert comes together without ever turning on the oven?” The No-Bake Earl Grey Mousse Cheesecake is a game-changer for anyone craving an elegant yet simple sweet treat. With its creamy mousse infused with the fragrant notes of Earl Grey tea, this dessert captures the essence of indulgence without the fuss. Not only is it a delight to the taste buds, but it also boasts a gorgeous glossy finish that impresses at any gathering—from afternoon tea with friends to special celebrations. Plus, it’s a fantastic option for busy home-chefs seeking something exquisite without the time commitment. Ready to discover how to create this perfectly refreshing cheesecake at home? Let’s dive in!
Why is No-Bake Cheesecake a Game Changer?
Effortless Elegance: This Earl Grey Mousse Cheesecake embodies simple sophistication, making it perfect for any occasion without the need for baking.
Floral Infusion: The delicate notes of Earl Grey tea elevate this dessert, providing a unique flavor that sets it apart from typical cheesecakes.
Decadent Texture: Indulge in the luscious creaminess of the mousse, which melts in your mouth and leaves you wanting more with every bite.
Crowd-Pleasing Appeal: Whether for an afternoon tea or a special gathering, this dessert will impress your guests with its stunning presentation and delightful taste.
Time-Saving: Ready in a few hours with minimal prep, you can whip up this showstopper in no time, freeing your schedule for other festivities.
For more delicious cheesecake ideas, check out my recipes for Strawberry Crunch Cheesecake and Caramel Crunch Cheesecake Fruit Salad.
Earl Grey Mousse Cheesecake Ingredients
For the Crust
• Caramel Biscuits – These provide a delightful sweetness and a sturdy base; feel free to substitute with digestive biscuits if you prefer.
• Unsalted Butter – Binds the biscuit crumbs, adding a rich, buttery flavor to the crust.
For the Mousse
• Cream Cheese – This is the star of the cheesecake, offering smoothness; remember to soften it to ensure easy mixing.
• Caster Sugar – Sweetens the cheesecake and balances flavors; divide into two portions for the best result.
• Hot Milk – Helps dissolve gelatin and enhances the tea flavor; aim for around 40°C for optimal results.
• Gelatin Sheets – Provides essential structure for the mousse; powdered gelatin can be used as well (1 sheet = ~2g).
• Earl Grey Tea Powder – Infuses the mousse with its signature floral flavor; using tea from 2 bags works beautifully.
• Whipping Cream – Lightens the mousse, creating that airy texture; whip until you reach soft peaks.
For Decoration
• Crushed Caramel Biscuits – These add a lovely visual touch and extra texture for the final presentation.
Get ready to impress your loved ones with this Earl Grey Mousse Cheesecake, a treat that seamlessly blends elegance with simplicity!
Step‑by‑Step Instructions for No-Bake Earl Grey Mousse Cheesecake
Step 1: Biscuit Base
Begin by crushing the caramel biscuits into fine crumbs using a rolling pin or food processor. Combine the crumbs with melted butter until you achieve a sandy texture. Firmly press this mixture into a parchment-lined mold to create an even base. Chill in the refrigerator for 10 minutes, allowing it to set while you prepare the mousse layer.
Step 2: Cheese Mousse Layer
In a mixing bowl, blend the softened cream cheese with 10g of caster sugar until the mixture is completely smooth and creamy. Meanwhile, soak the gelatin sheets in cold water. Heat 80ml of hot milk (around 40°C), then incorporate the softened gelatin, stirring until dissolved before adding the Earl Grey tea powder. Combine this tea mixture into the cream cheese mixture until well-blended and smooth.
Step 3: Whip and Fold the Cream
In a separate bowl, whip the cream until soft peaks form, creating a light and airy texture. Gently fold the whipped cream into the cheese-tea mixture, being careful not to deflate the mixture. This step is crucial for achieving the light mousse texture of your Earl Grey Mousse Cheesecake. Once incorporated, pour the mousse over the firm biscuit base in the mold.
Step 4: Refrigerate to Set
Cover the mold with plastic wrap and place it in the refrigerator. Allow the cheesecake to set for at least 4 hours, or overnight if you have the time. The mousse will become firm and stable, making it easy to slice when ready to serve. Enjoy the anticipation of tasting this exquisite dessert!
Step 5: Earl Grey Mirror Glaze (Optional)
If you’d like to elevate your cheesecake further, prepare an optional mirror glaze. Steep 1 Earl Grey tea bag in 100ml of hot milk for 5 minutes. In this mixture, dissolve additional sugar and the squeezed gelatin, stirring until completely incorporated. Allow this glaze to cool slightly before carefully pouring it over the set mousse for an elegant finish.
Step 6: Final Steps and Serving
When you’re ready to serve the No-Bake Earl Grey Mousse Cheesecake, gently warm the edges of the mold using a hairdryer to ensure easy release. Carefully remove the cheesecake from the mold and place it on a serving plate. Decorate the top with crushed caramel biscuits for added texture and visual appeal, then slice and serve to your delighted guests.
What to Serve with No-Bake Earl Grey Mousse Cheesecake
Looking to elevate your dessert experience? Pair this creamy, floral cheesecake with delightful sides for a well-rounded meal.
- Fresh Berries: The tartness of berries complements the sweet, creamy cheesecake, adding a bright and vibrant touch to each bite.
- Lavender Earl Grey Tea: Enhance the flavor profile with a warm cup of lavender-infused Earl Grey tea, echoing the cheesecake’s delicate notes.
- Shortbread Cookies: These buttery delights provide a nice crunch contrast, making each bite a pleasurable play of textures.
- Citrus Salad: A refreshing citrus salad with a hint of mint will cleanse the palate between bites, enhancing the floral flavors of the cheesecake.
Serve it as a side to refresh your taste buds, making the dessert even more delightful. - Caramel Sauce: Drizzle some silky caramel on the cheesecake for added sweetness and an indulgent touch that elevates the dessert.
- Chocolate Ganache: Pair with a small side of rich chocolate ganache for those with a sweet tooth, creating a decadent duo that’s hard to resist.
- Sparkling Wine: Celebrate with a glass of bubbly! Sparkling wine adds a festive element, perfectly balancing the richness of the cheesecake.
- Ice Cream: A scoop of vanilla or lavender ice cream beside the cheesecake provides a creamy, cold contrast, enhancing the overall dessert experience.
- Fruit Tart: A light fruit tart adds a lovely visual and textural balance, introducing an array of fresh flavors to your dessert table.
Expert Tips for No-Bake Earl Grey Mousse Cheesecake
- Softened Cheese: Ensure your cream cheese is fully softened before mixing to avoid any lumps and achieve a silky smooth mousse.
- Perfectly Whipped Cream: Whip the cream until soft peaks form; this lightness is essential for that dreamy mousse texture. Don’t over-whip, as it can become grainy.
- Avoid Bubbles: After pouring the mousse into the mold, tap it gently on the counter. This helps release any trapped air bubbles for a smoother finish.
- Mirror Glaze Magic: While optional, a mirror glaze creates an elegant aesthetic. If you choose to skip it, don’t worry, the flavor of the Earl Grey Mousse Cheesecake remains delightful!
- Chill Time: Plan ahead and refrigerate the cheesecake for at least 4 hours or overnight. This ensures a perfectly set mousse for easy slicing.
Earl Grey Mousse Cheesecake Variations
Feel free to get creative and make this delightful cheesecake your own with these exciting twists!
- Dairy-Free: Substitute cream cheese with vegan cream cheese and use almond milk for a luscious non-dairy version.
- Fruit-Infused: Add a layer of fresh berries like raspberries or blueberries between the biscuit base and mousse for a burst of fruity flavor.
- Citrus Zest: Incorporate lemon or orange zest into the mousse for a refreshing citrus kick that complements the tea beautifully.
- Matcha Magic: Swap Earl Grey tea powder with matcha for a vibrant green cheesecake that adds a unique flavor profile and stunning color.
- Chocolate Drizzle: Drizzle melted dark chocolate over the top before serving for a decadent touch that pairs wonderfully with the mousse.
- Nutty Crunch: Fold in finely chopped nuts, such as pistachios or almonds, for added texture and a nutty flavor to your cheesecake.
- Chai Twist: Experiment by using chai tea instead of Earl Grey to create a warm, spiced version of this cheesecake that’s equally indulgent.
- Lemon Mirror Glaze: Replace the Earl Grey in the mirror glaze with lemon juice to add a zesty finish that brightens the overall flavor.
Each variation brings something special to your Earl Grey Mousse Cheesecake, just like the incredible recipes for Cheesecake Pumpkin Swirl or Caramel Crunch Cheesecake Fruit Salad. So, don’t be shy—let your taste buds guide you!
How to Store and Freeze Earl Grey Mousse Cheesecake
Fridge: Keep your Earl Grey Mousse Cheesecake stored covered in the refrigerator for up to 3 days to enjoy its fresh flavor and creamy texture.
Freezer: Avoid freezing as the mousse’s delicate texture may become grainy once thawed, compromising its delightful melt-in-your-mouth quality.
Reheating: No reheating is necessary as this is a no-bake cheesecake, simply slice and serve chilled for the best experience.
Wrap Properly: If you’re storing leftovers, ensure the cheesecake is tightly wrapped or in an airtight container to prevent it from absorbing other flavors in your fridge.
Make Ahead Options
These No-Bake Earl Grey Mousse Cheesecakes are perfect for meal prep enthusiasts! You can prepare the biscuit base and cheese mousse layer up to 24 hours in advance. Simply crush the caramel biscuits, mix with melted butter, and press into the mold; chill for 10 minutes before adding the cheese mousse. Cover the mold tightly and refrigerate it. To maintain quality, ensure the mousse is well-sealed to prevent any absorption of odors. When ready to serve, you can quickly whip up the optional mirror glaze if desired, or simply remove the cheesecake from the mold and decorate it before slicing. This way, you’ll have an elegant dessert ready to impress with minimal last-minute effort!
Earl Grey Mousse Cheesecake Recipe FAQs
How do I select the best Earl Grey tea for this cheesecake?
Choosing a high-quality Earl Grey tea can make a noticeable difference in flavor. Look for loose-leaf varieties or premium tea bags that contain real bergamot oil for the best aromatic infusion. If the tea looks bright and fragrant, you’re on the right track!
Can I replace cream cheese with a dairy-free option?
Absolutely! If you’re opting for a vegan version of the Earl Grey Mousse Cheesecake, look for plant-based cream cheese alternatives. Coconut cream or cashew cream can also work beautifully, providing a creamy texture while still allowing the Earl Grey flavor to shine through.
What’s the best way to store leftovers?
To savor your cheesecake for up to 3 days, tightly cover it or place it in an airtight container in the refrigerator. This prevents it from absorbing any unwanted odors or flavors. Just remember: it’s best to enjoy it fresh for that creamy perfection!
Can I freeze Earl Grey Mousse Cheesecake?
I don’t recommend freezing this cheesecake, as the delicate mousse texture may turn grainy once thawed, losing its luxurious mouthfeel. If you must freeze it, wrap it well with plastic wrap and store in an airtight container for up to a month, then enjoy it chilled straight from the fridge rather than letting it sit out.
What do I do if my mousse didn’t set properly?
If you find that your mousse hasn’t set, it may be due to not enough gelatin or insufficient chilling time. Make sure to follow the soaking and dissolving steps correctly. If needed, you can reheat the mousse slightly and add more dissolved gelatin, then pour it back into the mold and chill again. Remember, patience is key; allow it to rest overnight for the best results!
Is this recipe safe for pets or anyone with allergies?
Given that this cheesecake contains dairy, it’s not suitable for pets, particularly cats and dogs, who cannot digest lactose easily. Additionally, if you’re making this for someone with allergies, be cautious of the cream cheese and whipping cream, as both may cause reactions in individuals with dairy allergies. Always check ingredient labels if you’re using substitutes!
Earl Grey Mousse Cheesecake That Melts in Your Mouth
Ingredients
Equipment
Method
- Crush the caramel biscuits into fine crumbs using a rolling pin or food processor. Combine the crumbs with melted butter until sandy. Press this mixture into a parchment-lined mold and chill in the refrigerator for 10 minutes.
- Blend the softened cream cheese with 10g of caster sugar until smooth. Soak gelatin sheets in cold water. Heat 80ml of hot milk, dissolve gelatin, then add Earl Grey tea powder. Combine with cream cheese mixture until smooth.
- Whip the cream until soft peaks form. Gently fold the whipped cream into the cheese-tea mixture, being careful not to deflate it. Pour the mousse over the biscuit base.
- Cover the mold with plastic wrap and refrigerate for at least 4 hours, or overnight, until the mousse is firm and stable.
- For glaze, steep 1 Earl Grey tea bag in 100ml of hot milk for 5 minutes. Dissolve additional sugar and squeezed gelatin into the mixture, then pour over set mousse.
- Warm the edges of the mold with a hairdryer for easy release. Remove cheesecake from mold, decorate with crushed caramel biscuits, then slice and serve.
Leave a Reply