As I stood in the kitchen, the scent of toasting rice filled the air, reminding me of cozy evenings spent in Japan. Today, I’m excited to share my take on Crispy Rice Bombs, a quick and easy snack that combines satisfying crunch with delightful flavors. In just under 15 minutes and with fewer than 10 ingredients, you can whip these up for a picnic or a casual gathering, delighting your friends and family with a taste of something special. Plus, they’re not just delicious but also adaptable: feel free to make them vegan or gluten-free to suit any dietary needs. Ready to take your snacking to the next level? Let’s dive into this fun and tasty recipe!

Why are Crispy Rice Bombs a must-try?
Quick and Easy: These Crispy Rice Bombs come together in just 15 minutes, perfect for busy weeknights or impromptu gatherings.
Flavor Explosion: Each bite delivers a delightful crunch and savory sweetness, thanks to the mix of teriyaki sauce and fresh ingredients.
Versatile Options: Customize your bombs with various fillings like hummus or chickpea salad to suit your taste.
Diet-Friendly: Adaptable for both vegan and gluten-free diets, these rice bombs cater to a range of dietary preferences.
Crowd-Pleaser: They make an excellent snack for parties or picnics, pairing perfectly with a side of dipping sauce for even more flavor! Check out my Pumpkin Wild Rice for another flavorful option.
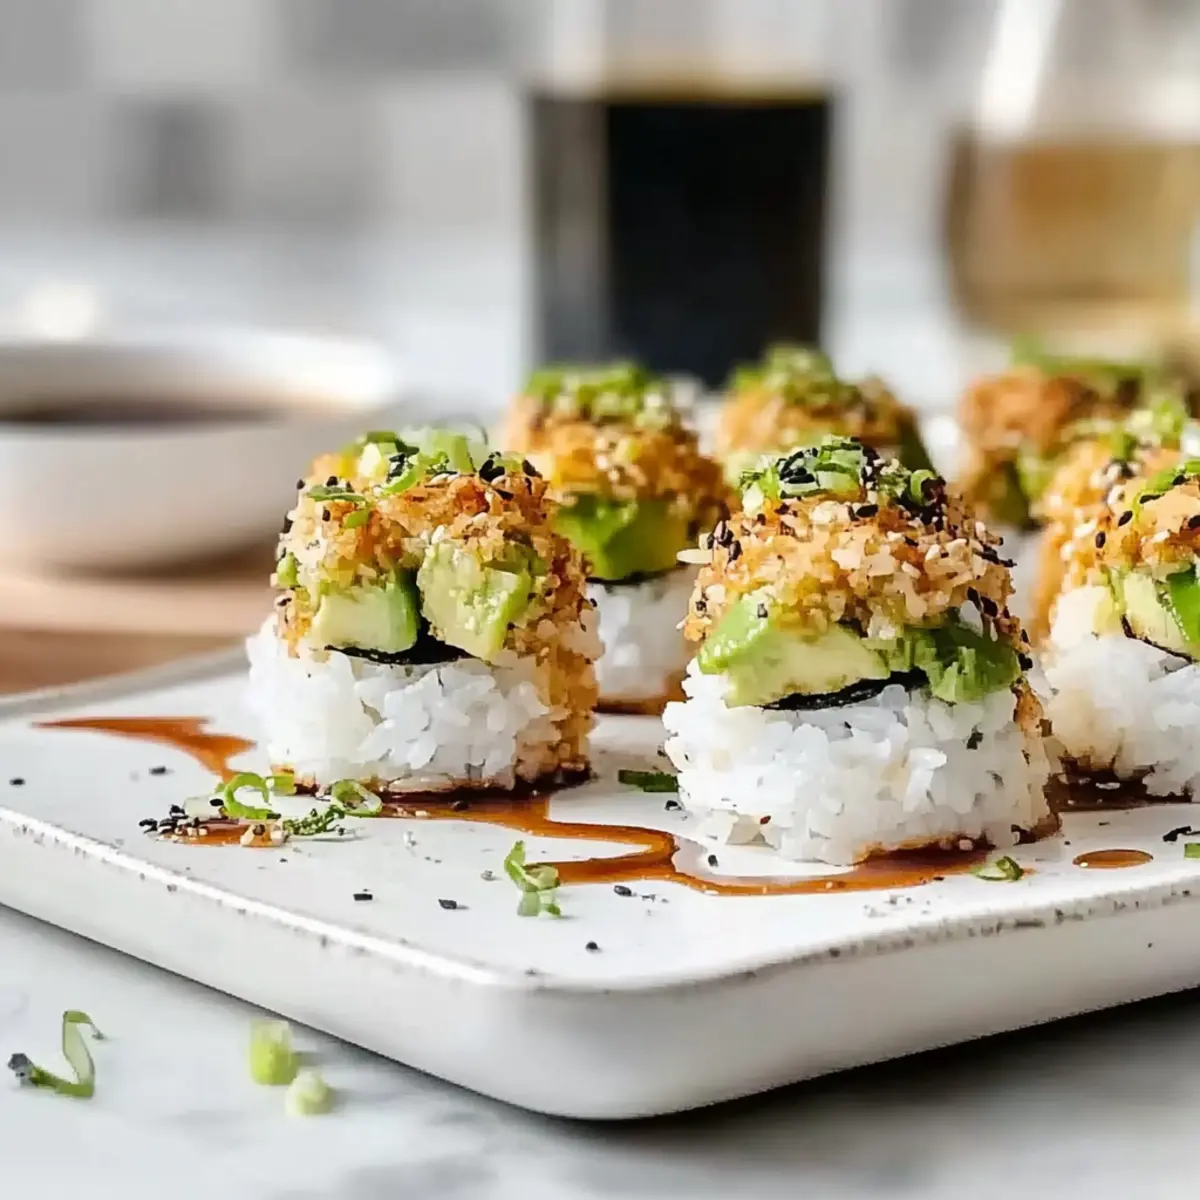
Crispy Rice Bombs Ingredients
• Prepare to be amazed by the variety of flavors in these Crispy Rice Bombs!
For the Rice Bombs
- Short-grain Japanese rice – provides the perfect sticky base for the bombs.
- Avocado – adds creaminess, but you can swap with hummus for a different taste.
- Cucumber – offers a refreshing crunch; diced bell peppers make a great alternative.
For Flavoring
- Teriyaki sauce – imparts savory umami flavor; ensure you use a gluten-free version if necessary.
- Tempura scraps – give an extraordinary crunch; crispy seaweed works as a delightful substitute.
- Furikake – this flavor-enhancer is essential; just make sure it’s vegan!
- Vegan mayo – enhances creaminess and umami; any plant-based mayo will do perfectly.
With just these ingredients, you’re on your way to creating an irresistible treat that’s both quick and satisfying. Get ready to impress your family and friends!
Step‑by‑Step Instructions for Crispy Rice Bombs
Step 1: Cook the Rice
Begin by rinsing 1 cup of short-grain Japanese rice under cold water until the water runs clear. Cook the rice according to the package instructions, typically in 1.5 cups of water for about 15 minutes on medium heat. Once cooked, remove it from heat and let it cool slightly, allowing it to become sticky and manageable for forming the rice bombs.
Step 2: Prepare the Filling
While the rice is cooling, chop 1 ripe avocado and ½ a cucumber into small pieces. In a mixing bowl, combine these with 2 tablespoons of teriyaki sauce, stirring well to create a creamy and flavorful filling. The mixture should be vibrant and well-combined to ensure each crispy rice bomb is bursting with flavor.
Step 3: Shape the Rice Bombs
Once the rice has cooled to a manageable temperature, take a handful and mold it into a small ball, about the size of a golf ball. Make a small indentation in the center of each rice ball using your thumb, ensuring there’s enough space to hold the filling without breaking the rice exterior. This is the key step in forming your Crispy Rice Bombs.
Step 4: Fill the Rice Bombs
Spoon a generous amount of the avocado and cucumber filling into the indentation of each rice ball. Carefully mold the rice around the filling, sealing it completely so that none of the mixture spills out. Make sure the bombs are compact and well-formed, as this will help them keep their shape during cooking.
Step 5: Brush with Teriyaki Sauce
Prepare to add flavor to the outside by brushing each rice bomb lightly with teriyaki sauce. This step not only adds extra flavor but also enhances the marbling when they are cooked. After brushing, sprinkle the outside with tempura scraps (or your chosen topping) to create an irresistible crunch on each bomb.
Step 6: Sear the Rice Bombs
Heat a non-stick pan over medium heat and add the rice bombs carefully. Sear each side for about 3-5 minutes, until they turn golden brown and crispy. Turn them gently to avoid breaking them apart. As they cook, you’ll hear a satisfying sizzle, indicating that they are forming that deliciously crispy exterior.
Step 7: Serve and Enjoy
Once golden and crispy on all sides, remove the rice bombs from the pan and serve warm. Pair them with a side of dipping sauce, such as soy sauce or extra teriyaki, for an added kick. These Crispy Rice Bombs are best enjoyed fresh but can be stored in an airtight container for a day or two if you have leftovers.
What to Serve with Crispy Rice Bombs
These crispy, savory bites are perfect for building a delightful meal that tantalizes all the senses.
-
Soy Sauce: A classic dipping sauce that adds a dash of saltiness to enhance the flavors of your rice bombs.
-
Fresh Salad: A crisp side salad with mixed greens and a light vinaigrette brings a refreshing contrast to the crunchiness.
-
Miso Soup: This warming, umami-rich soup complements the bombs beautifully, providing a comforting and hearty addition to the meal.
-
Pickled Vegetables: Add some zing with a side of tangy pickled veggies, which can balance the richness of the rice bombs perfectly.
-
Avocado Toast: For an indulgent pairing, consider serving alongside creamy avocado toast topped with chili flakes for a spiced kick.
-
Sesame Noodles: Serve with cold sesame noodles to introduce a delightful chill and an added layer of flavor to your snack time.
Explore the possibilities and create a meal that combinations not only elevate your Crispy Rice Bombs but also create memorable moments around the table.
Crispy Rice Bombs: Customize Your Treats
Feel free to make these Crispy Rice Bombs uniquely yours by exploring different flavor profiles and dietary options!
- Dairy-Free: Use avocado instead of mayo for creaminess without dairy.
- Gluten-Free: Swap teriyaki sauce for a gluten-free variety and enjoy without worry.
- Spicy Twist: Add sriracha to the filling for an extra kick; it’s a delightful surprise!
- Protein Boost: Mix in chopped tofu or edamame for additional nutrients and texture. Each bite becomes more satisfying and hearty.
- Vegetarian Flavor: Substitute avocado with a zesty chickpea salad for a delightful alternative filling. This brings a whole new taste adventure!
- Crunchy Variation: Replace tempura scraps with crispy seaweed for a savory, ocean-like crunch that brings depth to each bite.
- Herb Garden: Toss in fresh herbs like cilantro or basil into the filling for a burst of freshness; it’s aromatic and vibrant.
These variations can cater to nearly every taste, and for a vegetarian option, don’t miss my Parmesan Artichoke Hearts to serve alongside!
Expert Tips for Crispy Rice Bombs
-
Freshly Cooked Rice: Use hot, freshly cooked rice for best results; cold or leftover rice may not hold its shape well during cooking.
-
Don’t Rush Searing: Take your time searing each side until golden brown; rushing can lead to burnt or unevenly cooked rice bombs.
-
Filling Variations: Feel free to experiment with fillings like edamame or shiitake mushrooms, but ensure the fillings are not too wet to avoid sogginess in the crispy rice bombs.
-
Check Labels: Always verify that store-bought teriyaki sauce and furikake are gluten-free and vegan to maintain dietary preferences.
-
Serve Immediately: Enjoy the rice bombs right after cooking for maximum crispiness; they’re best eaten fresh!
Make Ahead Options
These Crispy Rice Bombs are a fantastic option for meal prep, making your busy weeknights a breeze! You can prepare the rice and fill it with the avocado mixture up to 24 hours in advance. Simply cook the rice, let it cool, then shape it and create an indentation for the filling. Store the formed rice balls and filling in airtight containers in the fridge, which keeps them fresh. When you’re ready to enjoy, just brush the bombs with teriyaki sauce, coat with tempura scraps, and sear them in a pan for 3-5 minutes per side until crispy. This way, you’ll have a delicious, satisfying snack right at your fingertips, just as delightful as when freshly made!
Storage Tips for Crispy Rice Bombs
Fridge: Store leftover Crispy Rice Bombs in an airtight container in the fridge for up to 2 days. This will help maintain their flavor and texture.
Reheating: To reheat, heat a non-stick pan over medium heat and place the rice bombs in for about 2-3 minutes on each side until heated through and crispy.
Freezer: If you want to freeze, wrap each rice bomb tightly in plastic wrap, then place them in a freezer-safe bag. They can be stored for up to 1 month.
Thawing: When ready to enjoy, thaw in the refrigerator overnight and then reheat as noted above for the best results.

Crispy Rice Bombs Recipe FAQs
How do I select the right rice for Crispy Rice Bombs?
Absolutely! For the best texture in your Crispy Rice Bombs, use short-grain Japanese rice. This variety is stickier than others, which helps the rice balls hold their shape. Avoid long-grain rice, as it won’t provide the same delightful sticky texture needed for these treats.
What’s the best way to store leftover Crispy Rice Bombs?
After enjoying your delicious rice bombs, store any leftovers in an airtight container in the fridge for up to 2 days. This helps maintain their flavor and texture. For optimal taste, reheat them in a non-stick pan over medium heat for about 2-3 minutes per side until they become warm and regain some crispiness.
Can Crispy Rice Bombs be frozen?
Yes, they can! To freeze, wrap each rice bomb individually in plastic wrap and then place them in a freezer-safe bag. They will keep well for up to 1 month. When ready to enjoy, simply thaw in the refrigerator overnight and reheat in a pan until warmed through and crispy for that wonderful texture.
What if my rice bombs fall apart while shaping?
No worries! If you find your rice bombs are falling apart, it’s likely due to using cold or leftover rice. You want your rice to be warm and freshly cooked for the best adhesion. When forming the balls, ensure they are tightly packed, and make sure to seal the filling well. A little extra pressure can work wonders in keeping everything together!
Are there any dietary considerations for Crispy Rice Bombs?
Very much! These tasty treats can easily be adapted to meet various dietary needs. Ensure you use gluten-free teriyaki sauce and verify that the furikake seasoning is vegan if required. Plus, feel free to swap the avocado for a suitable alternative like hummus for those with specific allergies or preferences. Always check the labels of your ingredients to ensure they fit your dietary requirements!
How can I make these Crispy Rice Bombs spicier?
The more the merrier! If you prefer a bit of heat, consider mixing in sriracha into your avocado filling or serving the rice bombs with a spicy dipping sauce. Adding chopped jalapeños or even a sprinkle of red pepper flakes into the rice mixture can also elevate the level of flavor and heat to suit your preferences. Enjoy customizing!

Crispy Rice Bombs: Delicious Vegan Snack in 15 Minutes
Ingredients
Equipment
Method
- Rinse 1 cup of short-grain Japanese rice under cold water until clear, then cook with 1.5 cups of water for about 15 minutes.
- Chop 1 ripe avocado and ½ cucumber, then mix with 2 tablespoons of teriyaki sauce in a bowl.
- Once cooled, mold rice into small balls, about the size of a golf ball, with a thumb indentation for filling.
- Spoon the avocado and cucumber mixture into the indentation and mold the rice around it, ensuring it's sealed.
- Brush each rice bomb with teriyaki sauce and sprinkle with tempura scraps.
- Heat a non-stick pan over medium heat and sear each side of the rice bombs for about 3-5 minutes until golden brown.
- Serve warm with a side of dipping sauce, such as soy sauce or teriyaki.
Leave a Reply