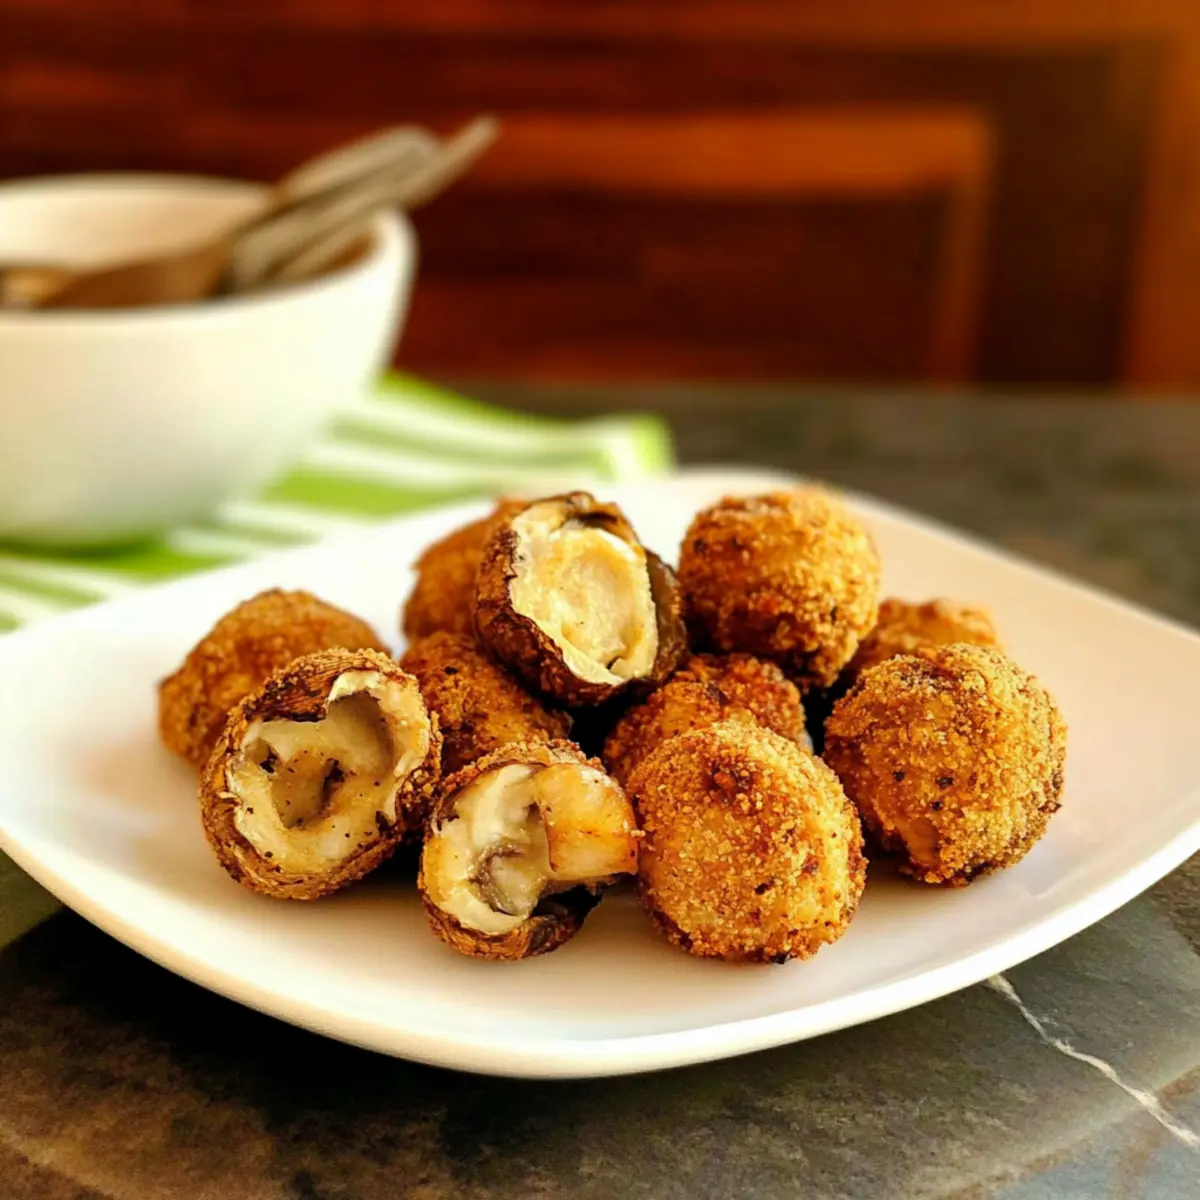
As I was getting ready for a cozy night in, I couldn’t shake the idea of satisfying my cravings with something crispy and full of flavor. Enter my Crispy Oven-Fried Garlic Mushrooms—a delightful twist on a classic favorite. These irresistible morsels are not only gluten-free and low-carb but also keto-friendly, making them an excellent choice for anyone seeking a healthier snack or appetizer. With a simple mix of ingredients and minimal prep time, you can whip up a batch that’s perfect for sharing or enjoying solo. Imagine the satisfying crunch that greets you as you take that first bite, paired with the savory taste of garlic dancing on your palate. Are you ready to dive into this guilt-free gourmet experience? Let’s cook!
Why Are These Mushrooms So Irresistible?
Crunchy Coating: The crispy texture is achieved by perfectly baking these mushrooms, keeping them light yet satisfying.
Flavor Explosion: With a savory garlic taste, each bite is bursting with flavor, making them a perfect crowd-pleaser!
Quick & Easy: In just 15 minutes, you can have a delicious snack or appetizer that rivals anything from a restaurant.
Versatile Dish: Serve them as appetizers, snacks, or even alongside grilled meats. They fit perfectly into any meal!
Guilt-Free Indulgence: They’re gluten-free, low-carb, and keto-friendly, so you can enjoy munching without the extra calories. Pair them with a dip like our Herby Barley Mushrooms for an added layer of flavor!
Crispy Garlic Mushrooms Ingredients
• Discover the tasty must-haves for these keto fried mushrooms!
For the Coating
- Mushrooms – Small to medium-sized; choose fresh mushrooms for the best flavor absorption.
- Almond Flour – A grain-free option for a crunchy breading; substitute with coconut flour if desired.
- Raw Sunflower Seeds (ground) – Adds a delightful crunch and enriched flavor; use ground pork rinds for a nut-free alternative.
- Garlic Powder – Provides that essential garlicky kick; feel free to swap in fresh garlic for a bolder taste.
- Sea Salt – Elevates all the flavors; adjust to your taste preferences or dietary needs.
- Paprika – Imparts a lovely smokiness; mix in other spices if you want a flavor twist!
- Dried Parsley – Adds a hint of color and freshness; oregano or thyme can also work wonderfully.
- Parmesan Cheese (optional) – Introduces richness and depth; skip for a dairy-free option.
For Binding
- Egg (beaten) – Works as a binder; flaxseed meal combined with water serves as a vegan substitute.
- Butter (melted, optional) – Enhances crispiness; you can replace it with olive oil for a dairy-free alternative.
For Baking
- Avocado Oil or Olive Oil – Needed for greasing the baking sheet; coconut oil is a great substitute too.
These crispy garlic mushrooms are sure to impress friends and family with their delightful crunch and mouthwatering flavor!
Step‑by‑Step Instructions for Crispy Oven-Fried Garlic Mushrooms
Step 1: Preheat and Prepare
Begin by preheating your oven to 400°F (200°C) while you prepare your baking sheet. Grease a baking sheet generously with avocado oil or olive oil to ensure those crispy garlic mushrooms won’t stick, leading to perfectly baked bites. Place it aside so it’s ready for the mushrooms once they’re coated.
Step 2: Clean the Mushrooms
Rinse your small to medium-sized mushrooms under cold water to remove any dirt, then pat them dry thoroughly with paper towels. This step is crucial for achieving the desired crispiness of your fried garlic mushrooms; excess moisture will make them soggy instead of crunchy. Set the cleaned mushrooms aside for the next step.
Step 3: Grind the Sunflower Seeds
In a blender or food processor, grind raw sunflower seeds into a fine powder. This will create a delicious, grain-free coating for your mushrooms. Once ground, transfer the sunflower seed flour to a large zippered bag; this will help with coating the mushrooms evenly in the next step.
Step 4: Mix the Breading
In the zippered bag with crushed sunflower seeds, add almond flour, garlic powder, sea salt, paprika, dried parsley, and optional parmesan cheese. Seal the bag and shake it vigorously to thoroughly combine all the ingredients, ensuring that each element is evenly mixed for the perfect flavor and crunch in your crispy oven-fried garlic mushrooms.
Step 5: Prepare the Egg Mixture
In a mixing bowl, beat an egg until smooth, optionally adding melted butter to enrich the flavor and improve the crispy texture. This mixture will serve as the binding agent for coating your mushrooms. Stir until well combined, then be ready to dip those lovely mushrooms for a flavorful outer layer!
Step 6: Coat the Mushrooms
Taking each mushroom, dip it first into the egg mixture, allowing any excess to drip off, then place it in the zippered bag with the breading mix. Seal the bag and shake gently until each mushroom is well-coated with the crunchy mixture. This will ensure that every bite of your fried garlic mushrooms is bursting with flavor.
Step 7: Arrange on Baking Sheet
Carefully take the coated mushrooms out of the zippered bag and arrange them in a single layer on the greased baking sheet. Make sure they are spaced apart to ensure even cooking and maximum crispiness. This layout is key for getting that mouthwatering crunch that makes your crispy oven-fried garlic mushrooms so irresistible.
Step 8: Bake to Perfection
Place the baking sheet in the preheated oven and bake for 12-14 minutes, flipping the mushrooms halfway through to ensure they cook evenly. You’ll know they’re done when they turn a beautiful golden brown and are crispy on all sides. If you desire even greater crispiness, switch on the broiler for 1-2 minutes at the end, watching closely to prevent burning.
Step 9: Cool and Serve
Once baked to perfection, remove the crispy garlic mushrooms from the oven and allow them to cool slightly on the baking sheet. This step helps set the crunch before serving. Enjoy them warm as a delightful appetizer or snack, and we recommend pairing them with a dipping sauce for extra flavor!
Storage Tips for Crispy Oven-Fried Garlic Mushrooms
Fridge: Store leftover crispy garlic mushrooms in an airtight container; they’ll remain fresh for up to 3 days. This helps maintain their flavor while keeping them safe to eat.
Freezer: For longer storage, place the cooled mushrooms in a single layer on a baking sheet to freeze. Once frozen, transfer them to a freezer-safe bag for up to 2 months.
Reheating: To regain that delightful crunch, reheat the mushrooms in an oven set to 375°F (190°C) for about 10 minutes. Avoid the microwave as it may make them soggy.
Airtight Guidance: Always seal your storage containers well. This prevents air exposure, which can compromise the texture and flavor of your keto fried mushrooms.
Variations & Substitutions for Fried Garlic Mushrooms
Feel free to unleash your creativity and customize these crispy garlic mushrooms to suit your taste buds!
- Gluten-Free: Use certified gluten-free breadcrumbs instead of almond flour for added crunch.
- Nut-Free: Substitute almond flour with ground oats or pumpkin seeds for a great nut-free option.
- Extra Flavor: Toss in fresh herbs like thyme or rosemary to the breading mix for a delightful aromatic kick. Adding herbs can transform the flavor profile completely!
- Cheesy Delight: You can sprinkle nutritional yeast over the breading for a dairy-free cheesy flavor that complements the mushrooms perfectly.
- Spicy Kick: Add a pinch of cayenne pepper or chili flakes to the breading to give these mushrooms a zesty heat that elevates the dish.
- Wild Mushroom Medley: Mix different mushroom varieties like shiitake or oyster mushrooms for a unique texture and taste.
- Air Fryer Version: Prepare the mushrooms using an air fryer for a quicker cooking method that still achieves that crispy finish.
- Savory Dipping Sauce: Pair these crispy delights with a tangy garlic aioli or a zesty marinara dip for an added flavor experience. You could even serve them alongside our Roasted Mushrooms Savory for a delightful contrast in textures!
What to Serve with Crispy Oven-Fried Garlic Mushrooms
These delightful bites are perfect for elevating your meal, whether you’re hosting a cozy gathering or indulging in a special treat at home.
-
Garlic Aioli: A creamy dip that complements the garlic flavor of the mushrooms, enhancing each crunchy bite.
-
Marinara Sauce: This classic pairing brings a tangy contrast, making every mouthful a delicious adventure in flavor.
-
Zesty Salad: A fresh, mixed greens salad tossed with a citrus vinaigrette adds a refreshing zing, balancing the richness of the mushrooms. It’s a vibrant, colorful addition that lifts the whole meal.
-
Grilled Chicken: Juicy grilled chicken offers a hearty protein that works beautifully with the crunchy texture of the mushrooms, creating a satisfying combination.
-
Roasted Vegetables: Roasted seasonal vegetables add earthy flavors and a lovely texture that pairs nicely with the crispy mushrooms for a wholesome side dish.
-
Wine Spritzer: A light, refreshing wine spritzer can cleanse the palate between bites, enhancing the overall dining experience while keeping it light and enjoyable.
-
Cheesy Cauliflower Mash: Creamy, cheesy cauliflower mash serves as a comforting base alongside the mushrooms, bringing a rich and keto-friendly side to the table.
Elevate your serving experience by mixing and matching these delicious options with your crispy garlic mushrooms!
Make Ahead Options
These Crispy Oven-Fried Garlic Mushrooms are perfect for meal prep enthusiasts! You can clean and coat the mushrooms up to 24 hours in advance, ensuring they are flavorful and ready to bake when needed. Simply follow through to the coating stage, then place the coated mushrooms in an airtight container in the refrigerator. This way, the coating remains delicious and won’t become soggy. When it’s time to enjoy, just preheat your oven and bake for 12-14 minutes, flipping halfway through, to regain that irresistible crunch. With this make-ahead option, you’ll have a delightful, hassle-free snack ready in no time!
Tips for the Best Crispy Oven-Fried Garlic Mushrooms
-
Pat Dry First: Ensure mushrooms are thoroughly dried after rinsing to prevent excess moisture, which could lead to sogginess in your crispy garlic mushrooms.
-
Use Fresh Ingredients: For the best flavor, opt for fresh garlic and high-quality seasonings; they greatly enhance the taste profile of your mushrooms.
-
Even Coating: Make sure to shake the mushrooms in the bag gently but thoroughly to achieve a uniform coating, ensuring every piece gets that delightful crunch.
-
Monitor Baking Time: Keep an eye on the mushrooms as they bake; everyone’s oven is different, and you want to avoid burning while achieving golden perfection.
-
Experiment with Spices: Don’t hesitate to mix in your favorite herbs and spices to the breading; a little variety can elevate the flavor of your keto fried mushrooms even further.
Crispy Oven-Fried Garlic Mushrooms Recipe FAQs
What type of mushrooms should I use for this recipe?
For the best results, opt for small to medium-sized mushrooms like cremini or button mushrooms. They’ll absorb the flavors beautifully and provide that satisfying bite. Always select fresh ones, avoiding any that have dark spots or appear slimy for a great crispiness.
How do I store leftover crispy garlic mushrooms?
Store your leftover crispy garlic mushrooms in an airtight container in the fridge. They’ll keep fresh for up to 3 days. To maintain their crunchiness, reheat them in the oven at 375°F (190°C) for around 10 minutes. This method helps to restore their delightful texture!
Can I freeze crispy oven-fried garlic mushrooms?
Absolutely! To freeze them, place the cooled mushrooms in a single layer on a baking sheet. Freeze until solid, then transfer them to a freezer-safe bag, ensuring they’re sealed tight. They can be kept in the freezer for up to 2 months. When you’re ready to enjoy, reheat them in the oven to restore their crunch.
What should I do if the mushrooms turn out soggy?
If you find your mushrooms are soggy, don’t worry! Next time, make sure to pat them dry thoroughly after rinsing to remove excess moisture. Also, avoid overcrowding on the baking sheet, which can trap steam. If baking made them soggy, giving them a quick reheating in the oven can refresh their texture.
Are these crispy garlic mushrooms safe for people with allergies?
This recipe is gluten-free and can be modified for nut allergies by substituting ground sunflower seeds with additional almond flour or ground pork rinds. If avoiding dairy, simply omit the optional parmesan cheese or use nutritional yeast for added flavor. Always check all ingredient labels to ensure they meet your dietary needs.
Can I use fresh garlic instead of garlic powder?
Yes, you can certainly use fresh garlic instead of garlic powder for a bolder flavor. Use about 2-3 cloves of minced fresh garlic to replace the teaspoon of garlic powder. Just be aware that fresh garlic might alter the texture slightly and requires thorough incorporation into the egg mixture.
Crispy Fried Garlic Mushrooms That Steal the Show
Ingredients
Equipment
Method
- Preheat your oven to 400°F (200°C) and grease a baking sheet with avocado oil or olive oil.
- Rinse mushrooms under cold water, pat dry thoroughly with paper towels.
- In a blender, grind raw sunflower seeds into a fine powder, then transfer to a zippered bag.
- In the zippered bag, add almond flour, garlic powder, sea salt, paprika, dried parsley, and optional parmesan cheese. Seal and shake to combine.
- In a mixing bowl, beat an egg until smooth, optionally adding melted butter.
- Dip each mushroom into the egg mixture, allow excess to drip, then place in the bag with the breading mix. Seal and shake to coat.
- Arrange the coated mushrooms in a single layer on the greased baking sheet, ensuring they are spaced apart.
- Bake for 12-14 minutes, flipping halfway through, until golden brown and crispy.
- Allow mushrooms to cool slightly on the baking sheet before serving.
Leave a Reply